Documentation
Welcome to the Nebula Commander documentation.
This section contains guides for installing, configuring, and using Nebula Commander:
- Getting started – What Nebula Commander is, features, and prerequisites
- Nebula Commander Cloud – The hosted version: sign up and manage your membership, no server needed
- Server Installation – Docker (recommended), NixOS
- Server Configuration – Environment variables, OIDC, and how to configure everything
- Web UI – Networks, Groups, Nodes, Client Download, Invitations
- Client Usage – ncclient (experimental), nebula (preferred)
- Development – Setup, GitHub Actions, manual builds, API
When the backend is running, interactive API docs are available at /api/docs.
1 - Getting Started
Nebula Commander is a self-hosted control plane for Nebula overlay networks. You run the server yourself and manage networks, nodes, certificates, and access from a web UI and optional device client.
Features
- Networks and nodes – Create networks, manage nodes, IP allocation, and certificates
- Web UI – React dashboard with OIDC (for example, Keycloak) or a dev token for local development
- Device client (ncclient) – Enroll devices with a one-time code, then run as a daemon to pull config and certificates and optionally run or restart Nebula when config changes. Install with
pip install nebula-commander; see ncclient for details.
Status
v0.6.1. The core control plane (networks, nodes, certificates, firewall groups, Magic
DNS, audit logging, invitations, user management) and the web UI are mature and in
production use. The device client (ncclient) ships as a CLI, native desktop apps
for Windows and Linux, a Docker image, and a NixOS module, with mobile support
(iOS/Android via the official Mobile Nebula app). See About: Status for the full picture,
including what’s still planned.
Prerequisites
- Nebula – You need Nebula installed on devices that will join your networks. Nebula Commander issues certificates and config; the Nebula binary runs on each node.
- Server – A machine or container to run the backend (and optionally the frontend). Python 3.10+ for development; Docker or NixOS for deployment.
Next steps
- Choose an installation method (Docker or NixOS), or development setup for local hacking.
- Configure the backend (database, JWT, and optionally OIDC and SMTP).
- Use the Web UI and ncclient as needed.
License
Backend and frontend: MIT. Client (ncclient): GPLv3 or later. See the repository for details.
2 - Nebula Commander Cloud
Hosted Nebula Commander: your own private instance, without running a server.
Nebula Commander Cloud is Nebula Commander hosted for you. You
get a private instance at your-name.nebulacdr.net with its own database, certificate
authority and sign-in. Backups, HTTPS and updates are handled for you.
It’s the same open-source Nebula Commander described in the rest of these docs. Everything under
Web UI and Client Usage applies unchanged.
Hosted or self-hosted?
| Nebula Commander Cloud | Self-hosted |
|---|
| Price | Monthly subscription (pricing) | Free (MIT licensed) |
| Server, HTTPS, sign-in service | Run for you | You run them (installation) |
| Backups and updates | Nightly encrypted backups, tested updates | Up to you |
| Your devices and lighthouses | On your machines | On your machines |
| Your data | Export any time from Backup & export | On your server |
Either way, only the control plane is hosted. Your devices, lighthouses and relays run on
your own machines, and Nebula traffic goes directly between your devices. It never passes
through Nebula Commander Cloud.
You can move between the two at any time with an encrypted
export and import.
Plans
- Hosted: the standard monthly price.
- Name your own price: the same instance and service. You choose the monthly amount, from the
minimum shown on the pricing page, with no maximum.
Paying more helps fund Nebula Commander’s development. You can change the amount at any time.
Both plans include unlimited networks, nodes and users.
In this section
Getting help
2.1 - Signing up
Create your Nebula Commander Cloud instance and sign in for the first time.
Setting up takes a few minutes. Your instance is created automatically as soon as payment goes
through.
1. Choose a name and plan
Go to cloud.nebulacdr.net/signup and fill in:
- Email: this account becomes the administrator of your instance.
- Organization or project name.
- Subdomain: your instance’s address, for example
acme for acme.nebulacdr.net. Use 3–32
lowercase letters, digits and hyphens. The form tells you straight away if a name is taken or
reserved. - Plan: Hosted at the standard price, or Name your own price. For the second, enter your
monthly amount (at least the minimum shown) or pick one of the suggested amounts.
Accept the Terms of Service, then click Continue to payment. Your subdomain is held for you
while you complete checkout.
2. Pay
You’re taken to Stripe Checkout to enter your card. Nebula Commander Cloud never sees or stores
your card details. If you cancel checkout, you can come back and try again; your subdomain stays
held for a little while.
3. Wait a minute or two
After payment you land on a page that updates on its own while your instance is created: its
containers, database, certificate authority, sign-in service and HTTPS certificate. It usually
takes a minute or two. You can close the page; you’ll get an email when it’s ready.
4. Set your password
You’ll receive two emails:
- “Update your account”, from the sign-in service. Its link lets you set your password and
confirm your email address. It’s valid for 3 days.
- “Your Nebula Commander instance is ready”, with your instance’s address.
Use the first email, then sign in at https://your-name.nebulacdr.net. The first time, you’re
asked for your first and last name. Your account is the instance administrator.
5. Next steps
- Create a network and add a lighthouse: any machine you control with
a public IP address and UDP port 4242 open.
- Install the ncclient on your devices and enroll them with codes from
the Nodes page.
- Invite your team. They create their own sign-in on your
instance’s login page.
“We’re not taking new sign-ups right now”
We only accept new instances when the server has room for them. If the sign-up page says it’s
full, email support@nebulacdr.net and we’ll let
you know when a spot opens. In the meantime you can
self-host Nebula Commander for free, and later
import that instance into Nebula Commander Cloud.
2.2 - Managing your membership
Billing, changing your price, payment problems, cancelling, and keeping your data.
Signing in to your account
Your account at cloud.nebulacdr.net is where you manage billing.
It’s separate from your instance, which you use at your-name.nebulacdr.net.
- Go to cloud.nebulacdr.net/login and enter the email you
signed up with.
- Open the sign-in link we email you. It expires after 15 minutes.
The account page lists your instances with their status and current price.
Updating your card and downloading invoices
On the account page, click Manage billing. This opens Stripe’s secure billing page, where you
can:
- update your payment method,
- see and download invoices,
- cancel your subscription.
Changing your price
Any active instance can use Name your own price. On the account page, enter a new monthly
amount under Name your own price and click Update.
- The amount must be at least the minimum shown. There’s no maximum.
- The change applies from your next invoice. There’s no extra charge or credit for the
current month.
- Paying more doesn’t change the service. It helps fund Nebula Commander’s development.
If a payment fails
- Stripe retries the payment automatically over the following days, and we email you.
- To fix it, update your card under Manage billing.
- If payment still hasn’t gone through after the retries, the instance is suspended. Its
address shows a “suspended” page and your devices can’t fetch new config, but your data is
kept.
- As soon as the payment succeeds, the instance starts again by itself.
Cancelling
Cancel from Manage billing.
- Until the end of the period you’ve paid for, your instance keeps working as normal.
- Then it’s suspended. Its data is kept for 30 days.
- Within those 30 days you can click Resubscribe on the account page to get it back
exactly as it was.
- After 30 days the instance and its data are permanently deleted. Remaining encrypted
backups expire as described in the privacy policy.
Keeping your data
Your data is yours, and you can take it with you at any time:
- An instance administrator can download an encrypted export of everything from
Backup & export in the instance. The export is encrypted with a
passphrase only you know, so we can’t read it.
- Export before you cancel. A suspended instance isn’t running, so Backup & export isn’t
available then. If your instance is already suspended, email
support@nebulacdr.net from your account’s address.
- To move to your own server, install Nebula Commander and
import the export. With the default
export options, enrolled devices keep working once you point them at the new server.
Help
Ask in the
Nebula Commander Cloud support room on Matrix
or email support@nebulacdr.net.
3 - Server Installation
Prefer not to run a server? Nebula Commander Cloud hosts it for you.
You can run Nebula Commander in several ways:
| Method | Best for |
|---|
| Docker (recommended) | Quick start and production: pre-built images, docker compose |
| NixOS | NixOS hosts: services.nebula-commander (server) and services.ncclient (device client) modules |
| Reverse Proxy | Nginx, Traefik, or Caddy in front with TLS and HSTS |
Choose one and follow the linked page. For local development (venv, uvicorn, frontend dev server), see Development: Setup. After installation, see Server Configuration to set the database, JWT, and optional OIDC.
3.1 - Docker
Run Nebula Commander with Docker using pre-built images or a local build. You can download all required files without cloning the repository. For HTTPS and HSTS at the edge (Nginx, Traefik, or Caddy in front of the frontend container), see Reverse Proxy.
Downloading files
You need: docker-compose.yml, docker-compose-keycloak.yml, .env.example, and the env.d.example/ directory (backend and Keycloak config). Either use the commands below or the provided script.
Using curl
Run these in an empty directory (or where you want the Docker setup):
BASE_URL="https://raw.githubusercontent.com/NixRTR/nebula-commander/main/docker"

curl -sSL -o docker-compose.yml "${BASE_URL}/docker-compose.yml"
curl -sSL -o docker-compose-keycloak.yml "${BASE_URL}/docker-compose-keycloak.yml"
curl -sSL -o .env.example "${BASE_URL}/.env.example"

mkdir -p env.d.example/keycloak
curl -sSL -o env.d.example/backend "${BASE_URL}/env.d.example/backend"
curl -sSL -o env.d.example/keycloak/keycloak "${BASE_URL}/env.d.example/keycloak/keycloak"
curl -sSL -o env.d.example/keycloak/postgresql "${BASE_URL}/env.d.example/keycloak/postgresql"
Then create the Docker network (required by the compose files):
docker network create nebula-commander
Copy the example env into place and edit as needed:
cp .env.example .env
cp -r env.d.example env.d
# Edit env.d/backend (JWT secret, OIDC, etc.)
Using the download script
The repository provides a script that downloads the same files and checks for prerequisites. It does not install anything; if Docker or Docker Compose is missing, it prints what you need and exits.
curl -sSL https://raw.githubusercontent.com/NixRTR/nebula-commander/main/docker/download.sh | bash
Then run the steps the script prints: copy .env.example to .env, copy env.d.example to env.d, edit env.d/backend, create the network, and start with docker compose up -d.
Example file contents
Below are the default file contents for reference. After downloading, copy to .env and env.d/ and customize.
docker-compose.yml
name: nebulacdr

include:
  - path: ./docker-compose-keycloak.yml

services:

  backend:
    build:
      context: ..
      dockerfile: docker/backend/Dockerfile
    image: ghcr.io/nixrtr/nebula-commander-backend:latest
    container_name: nebula-commander-backend
    restart: unless-stopped
    ports:
      - "${BACKEND_PORT:-8081}:8081"
    volumes:
      # Persistent data storage
      - nebula-commander-data:/var/lib/nebula-commander
      # Optional: mount JWT secret file
      - ${JWT_SECRET_FILE:-/dev/null}:/run/secrets/jwt-secret:ro
    env_file:
      # Backend configuration (database, JWT, OIDC, CORS, debug)
      - env.d/backend
    environment:
      - NEBULA_COMMANDER_SERVER_HOST=0.0.0.0
      - NEBULA_COMMANDER_SERVER_PORT=8081
    healthcheck:
      test: ["CMD", "python3", "-c", "import urllib.request; urllib.request.urlopen('http://localhost:8081/api/health')"]
      interval: 30s
      timeout: 10s
      retries: 3
      start_period: 10s
    networks:
      - nebula-commander

  frontend:
    build:
      context: ..
      dockerfile: docker/frontend/Dockerfile
    image: ghcr.io/nixrtr/nebula-commander-frontend:latest
    container_name: nebula-commander-frontend
    restart: unless-stopped
    ports:
      - "${FRONTEND_PORT:-80}:80"
    depends_on:
      backend:
        condition: service_healthy
    healthcheck:
      test: ["CMD", "curl", "-f", "http://localhost/health"]
      interval: 30s
      timeout: 10s
      retries: 3
      start_period: 5s
    networks:
      - nebula-commander

networks:
  nebula-commander:
    external: true

volumes:
  nebula-commander-data:
    driver: local
docker-compose-keycloak.yml
# Keycloak OIDC Authentication Stack
# To use: docker compose -f docker-compose.yml -f docker-compose-keycloak.yml up -d

services:
  keycloak_db:
    image: postgres:16-alpine
    container_name: keycloak-db
    restart: unless-stopped
    env_file:
      - env.d/keycloak/postgresql
    volumes:
      - keycloak-db-data:/var/lib/postgresql/data
    networks:
      - nebula-commander
    healthcheck:
      test: ["CMD-SHELL", "pg_isready -U ${POSTGRES_USER:-keycloak}"]
      interval: 10s
      timeout: 5s
      retries: 5
      start_period: 10s

  keycloak:
    build:
      context: ..
      dockerfile: docker/keycloak/Dockerfile
    image: ghcr.io/nixrtr/nebula-commander-keycloak:latest
    container_name: keycloak
    restart: unless-stopped
    env_file:
      - env.d/keycloak/keycloak
      - env.d/backend
    ports:
      - "${KEYCLOAK_PORT:-8080}:8080"
      - "${KEYCLOAK_ADMIN_PORT:-9000}:9000"
    depends_on:
      keycloak_db:
        condition: service_healthy
    networks:
      - nebula-commander
    healthcheck:
      test: ["CMD-SHELL", "exec 3<>/dev/tcp/127.0.0.1/8080 && echo -e 'GET /health/ready HTTP/1.1\\r\\nhost: 127.0.0.1\\r\\nConnection: close\\r\\n\\r\\n' >&3 && cat <&3 | grep -q '200 OK'"]
      interval: 30s
      timeout: 10s
      retries: 5
      start_period: 60s

volumes:
  keycloak-db-data:
    driver: local

networks:
  nebula-commander:
    external: true
.env.example
# Nebula Commander Docker Infrastructure Configuration
# Copy to .env and customize. Backend settings go in env.d/backend.

# Port for the frontend (Nginx)
FRONTEND_PORT=80

# Port for the backend (FastAPI)
# BACKEND_PORT=8081

# Port for Keycloak (when using docker-compose-keycloak.yml)
# KEYCLOAK_PORT=8080

# Path to JWT secret file on host (optional)
# JWT_SECRET_FILE=/path/to/jwt-secret.txt
env.d.example/backend
Full example. See Configuration: Environment for all options.
# =============================================================================
# Nebula Commander Backend Configuration
# =============================================================================
# This file contains all backend-specific settings including database, JWT,
# OIDC, CORS, and debug mode. All variables use the NEBULA_COMMANDER_ prefix.

# =============================================================================
# Database Configuration
# =============================================================================

# SQLite database URL: use four slashes for absolute path (so DB is at /var/lib/..., not CWD/var/lib/...)
NEBULA_COMMANDER_DATABASE_URL=sqlite+aiosqlite:////var/lib/nebula-commander/db.sqlite

# Certificate storage path (inside container)
NEBULA_COMMANDER_CERT_STORE_PATH=/var/lib/nebula-commander/certs

# =============================================================================
# JWT Authentication
# =============================================================================

# JWT secret key for signing tokens
# WARNING: Generate a secure random key for production! Use: openssl rand -base64 32
# DO NOT use this example value in production!
NEBULA_COMMANDER_JWT_SECRET_KEY=CHANGE_ME_GENERATE_RANDOM_32_CHARS_MIN

# Alternative: Use a secret file (more secure)
# NEBULA_COMMANDER_JWT_SECRET_FILE=/run/secrets/jwt-secret

# JWT algorithm (HS256, HS384, HS512)
NEBULA_COMMANDER_JWT_ALGORITHM=HS256

# JWT token expiration in minutes (1440 = 24 hours)
NEBULA_COMMANDER_JWT_EXPIRATION_MINUTES=1440

# =============================================================================
# Encryption at rest (required)
# =============================================================================
# Fernet key for encrypting sensitive DB columns and cert store files.
# Generate: python -c "from cryptography.fernet import Fernet; print(Fernet.generate_key().decode())"
# Required at startup - the backend refuses to boot without one.
NEBULA_COMMANDER_ENCRYPTION_KEY=your-fernet-key-here

# Alternative: key from file
# NEBULA_COMMANDER_ENCRYPTION_KEY_FILE=/run/secrets/encryption-key

# =============================================================================
# Public URL (required for OIDC and redirects)
# =============================================================================
# Base URL where users reach the app (browser). All auth redirects and callbacks
# use this. Supports FQDN or host:port. Backend and frontend may be on different hosts.
# Examples: https://nebula.example.com  |  http://192.168.1.1:9091
# If set, OIDC redirect URI is derived as PUBLIC_URL + /api/auth/callback.
NEBULA_COMMANDER_PUBLIC_URL=https://nebula.example.com

# =============================================================================
# Standalone Admin Bootstrap (only relevant if you skip OIDC entirely)
# =============================================================================
# When no OIDC provider is configured below, /api/auth/dev-token is disabled by
# default. If you're running standalone with no IdP and need the UI to be able
# to self-issue an initial admin session, opt in explicitly here.
# WARNING: This grants unauthenticated system-admin access to anyone who can
# reach the backend. Only enable for a genuinely no-IdP deployment.
# NEBULA_COMMANDER_STANDALONE_ADMIN_BOOTSTRAP=true

# =============================================================================
# OIDC Configuration (Optional)
# =============================================================================
# Uncomment and configure to use OIDC authentication with Keycloak or other providers.
# All user-facing auth (login redirect, callback, logout) goes through the public URL above.

# OIDC Issuer URL (internal - backend→Keycloak, same Docker network only)
# Use CONTAINER port (8080). If Keycloak host port is 8082, still use 8080 here.
NEBULA_COMMANDER_OIDC_ISSUER_URL=http://keycloak:8080/realms/nebula-commander

# OIDC Public Issuer URL (external - for browser: logout, discovery)
# Keycloak as seen by the user's browser: FQDN or host:port.
# Examples: https://auth.example.com/realms/nebula-commander  |  http://host:8082/realms/nebula-commander
NEBULA_COMMANDER_OIDC_PUBLIC_ISSUER_URL=https://auth.example.com/realms/nebula-commander

# OIDC Client ID (configured in Keycloak)
NEBULA_COMMANDER_OIDC_CLIENT_ID=nebula-commander

# OIDC Client Secret (from Keycloak client credentials)
# WARNING: Replace with your actual Keycloak client secret! Do not use this placeholder.
NEBULA_COMMANDER_OIDC_CLIENT_SECRET=YOUR_KEYCLOAK_CLIENT_SECRET_HERE

# Alternative: Use a secret file (more secure)
# NEBULA_COMMANDER_OIDC_CLIENT_SECRET_FILE=/run/secrets/oidc-secret

# Redirect URI: derived from NEBULA_COMMANDER_PUBLIC_URL when unset (PUBLIC_URL + /api/auth/callback).
# Override only if you need a different callback URL.
# NEBULA_COMMANDER_OIDC_REDIRECT_URI=

# OIDC Scopes (space-separated)
NEBULA_COMMANDER_OIDC_SCOPES=openid profile email

# =============================================================================
# CORS Configuration
# =============================================================================

# Allowed CORS origins (comma-separated). Include your public app URL (FQDN or host:port).
# SECURITY WARNING: Using '*' with credentials is insecure!
NEBULA_COMMANDER_CORS_ORIGINS=https://nebula.example.com

# =============================================================================
# Session Security
# =============================================================================

# Set session cookie to HTTPS-only (recommended for production)
NEBULA_COMMANDER_SESSION_HTTPS_ONLY=false

# =============================================================================
# Redirect Security
# =============================================================================

# Allowed hosts for OAuth/OIDC redirects (comma-separated)
# When empty and NEBULA_COMMANDER_PUBLIC_URL is set, derived from PUBLIC_URL (recommended).
NEBULA_COMMANDER_ALLOWED_REDIRECT_HOSTS=

# =============================================================================
# Email / SMTP Configuration (Optional)
# =============================================================================

NEBULA_COMMANDER_SMTP_ENABLED=false
NEBULA_COMMANDER_SMTP_HOST=smtp.gmail.com
NEBULA_COMMANDER_SMTP_PORT=587
NEBULA_COMMANDER_SMTP_USE_TLS=true
# For Gmail, use an App Password, not your regular password.
NEBULA_COMMANDER_SMTP_USERNAME=your-email@gmail.com
NEBULA_COMMANDER_SMTP_PASSWORD=your-app-password
# Alternative: NEBULA_COMMANDER_SMTP_PASSWORD_FILE=/run/secrets/smtp-password
NEBULA_COMMANDER_SMTP_FROM_EMAIL=noreply@example.com
NEBULA_COMMANDER_SMTP_FROM_NAME=Nebula Commander

# =============================================================================
# Analytics (Optional)
# =============================================================================
# When set, the frontend fetches /api/public-config and injects the corresponding
# scripts into the page. No auth required; config is public.

# NEBULA_COMMANDER_PLAUSIBLE_DOMAIN=example.com
# NEBULA_COMMANDER_PLAUSIBLE_SCRIPT_SRC=https://plausible.example.com/js/script.file-downloads.hash.outbound-links.js
# NEBULA_COMMANDER_GA_MEASUREMENT_ID=
# NEBULA_COMMANDER_ANALYTICS_CUSTOM_SCRIPTS=[{"src":"https://example.com/script.js","defer":true}]

# =============================================================================
# Debug Mode
# =============================================================================

# Enable debug mode (enables /dev-token endpoint). Never enable in production!
NEBULA_COMMANDER_DEBUG=false
env.d.example/keycloak/keycloak
# Keycloak Configuration
KC_DB=postgres
KC_DB_URL_HOST=keycloak_db
KC_DB_URL_PORT=5432
KC_DB_URL_DATABASE=keycloak
KC_DB_USERNAME=keycloak
KC_DB_PASSWORD=keycloak_db_password

KC_BOOTSTRAP_ADMIN_USERNAME=admin
KC_BOOTSTRAP_ADMIN_PASSWORD=admin

KC_HOSTNAME=localhost
KC_HOSTNAME_STRICT=false
KC_HTTP_ENABLED=true
KC_HEALTH_ENABLED=true
KC_METRICS_ENABLED=true
KC_LOG_LEVEL=info
env.d.example/keycloak/postgresql
# PostgreSQL Configuration for Keycloak
POSTGRES_DB=keycloak
POSTGRES_USER=keycloak
POSTGRES_PASSWORD=keycloak_db_password
Quick start (pre-built images)
After you have the files and env.d/backend configured:
docker network create nebula-commander   # if not already created
docker compose pull
docker compose up -d
docker compose logs -f
The application is available at http://localhost (or the port set in .env).
Building locally
If you prefer to build images instead of pulling:
docker compose build
docker compose up -d
See Development: Manual builds for build-args and multi-arch builds.
Images
| Image | Registry | Base | Port | Platforms |
|---|
| Backend | ghcr.io/nixrtr/nebula-commander-backend:latest | Python 3.13-slim | 8081 | linux/amd64, linux/arm64 |
| Frontend | ghcr.io/nixrtr/nebula-commander-frontend:latest | nginx:alpine | 80 | linux/amd64, linux/arm64 |
| Keycloak | ghcr.io/nixrtr/nebula-commander-keycloak:latest | Keycloak | 8080 | linux/amd64, linux/arm64 |
Architecture
- Frontend (Nginx) – Serves the React SPA and proxies
/api/* to the backend. Port 80. - Backend (FastAPI) – REST API, certificate management, SQLite. Port 8081.
- Persistent volume – SQLite database and Nebula certificates under
/var/lib/nebula-commander.
Frontend (Nginx) :80 --> Backend (FastAPI) :8081 --> Volume (db + certs)
Configuration
Use two places:
- Infrastructure –
.env: ports, optional JWT secret file path. - Backend –
env.d/backend: all NEBULA_COMMANDER_* variables (database, JWT, OIDC, CORS, SMTP, debug).
See Configuration for full option lists.
With Keycloak (OIDC)
The default docker-compose.yml includes the Keycloak stack via include: path: ./docker-compose-keycloak.yml, so a single command starts backend, frontend, and Keycloak:
Configure OIDC in env.d/backend and optionally use the zero-touch Keycloak setup. Details: Configuration: OIDC.
Without Keycloak
Comment out (or delete) the include: block at the top of docker-compose.yml:
# include:
#   - path: ./docker-compose-keycloak.yml
Then docker compose up -d starts only the backend and frontend. With no OIDC
provider configured, the backend exposes /api/auth/dev-token (suitable for
development only). To use a different OIDC provider instead of Keycloak, see
Configuration: OIDC § External OIDC provider.
3.2 - NixOS
Run Nebula Commander as a NixOS service by adding the module and enabling the service. You can add the module from a local path (clone) or, when available, from a flake.
Adding the module (path-based, no flake)
Use this when you have the nebula-commander repository on disk (for example under /etc/nixos or a path you manage).
1. Get the repository
Clone or copy the nebula-commander repo so that the path contains both nix/ and backend/:
git clone https://github.com/NixRTR/nebula-commander.git /etc/nixos/nebula-commander
# Or use a path of your choice; the module expects ../backend relative to nix/module.nix
2. Import the module in your NixOS configuration
In configuration.nix (or a NixOS module you include), add the import and enable the service:
{
  imports = [
    /etc/nixos/nebula-commander/nix/module.nix
  ];

  services.nebula-commander.enable = true;
}
If you use a different path, use that path in imports, for example ./nebula-commander/nix/module.nix if the repo is in the same directory as your configuration.nix.
3. Optional: set options
Override any of the options (see the table below). The default package builds the backend from the same repo: it copies backend/ from the path relative to nix/module.nix (../backend), so your clone must have that layout.
services.nebula-commander = {
  enable = true;
  backendPort = 8081;
  databasePath = "/var/lib/nebula-commander/db.sqlite";
  certStorePath = "/var/lib/nebula-commander/certs";
  jwtSecretFile = null;   # or e.g. /run/secrets/nebula-commander-jwt
  encryptionKeyFile = null;   # or e.g. /run/secrets/nebula-commander-encryption-key
  debug = false;

  # Production/OIDC options (all optional):
  publicUrl = "https://nebula.example.com";
  corsOrigins = "https://nebula.example.com";
  sessionHttpsOnly = true;
  oidc = {
    issuerUrl = "https://keycloak.example.com/realms/nebula-commander";
    clientId = "nebula-commander";
    clientSecretFile = "/run/secrets/nebula-commander-oidc-secret";
  };
};
Then rebuild: nixos-rebuild switch (or your usual method).
Adding via a flake
The nebula-commander repository’s flake.nix exposes nixosModules.default for the server (this page) plus packages.default/backend/frontend. It also exposes nixosModules.client and packages.ncclient for the device client — see ncclient Installation: NixOS if you also want to run the client declaratively, on this host or another.
In your system flake (e.g. flake.nix in /etc/nixos or your config directory):
{
  inputs = {
    nixpkgs.url = "github:NixOS/nixpkgs/nixos-25.11";
    nebula-commander.url = "github:NixRTR/nebula-commander";
  };

  outputs = { self, nixpkgs, nebula-commander, ... }: {
    nixosConfigurations.yourHost = nixpkgs.lib.nixosSystem {
      system = "x86_64-linux";   # or "aarch64-linux" for ARM, etc.
      modules = [
        ./configuration.nix
        nebula-commander.nixosModules.default
      ];
    };
  };
}
If the repository does not yet have a flake.nix at the ref you’re pinning, use the path-based import above instead.
2. Enable the service and optional package
In your configuration.nix (or in the flake’s module list):
services.nebula-commander.enable = true;
# If the flake provides a package, point the service at it:
# services.nebula-commander.package = nebula-commander.packages.${pkgs.system}.default;
Then rebuild: nixos-rebuild switch --flake .#yourHost (or your usual flake command).
Server options
All options live under services.nebula-commander:
| Option | Type | Default | Description |
|---|
enable | bool | — | Enable the Nebula Commander service |
package | package | backend source from repo | Nebula Commander package (backend source). With path-based import, built from ../backend relative to the module file. |
port | port | 8080 | Port for the HTTP API when using nginx |
backendPort | port | 8081 | Port for the FastAPI backend (internal) |
databasePath | string | /var/lib/nebula-commander/db.sqlite | SQLite database file path |
certStorePath | string | /var/lib/nebula-commander/certs | Directory for CA and host certificates |
jwtSecretFile | null or path | null | Path to JWT secret file (e.g. managed by sops-nix). If null, a oneshot service generates /var/lib/nebula-commander/jwt-secret on first boot. |
encryptionKeyFile | null or path | null | Path to the Fernet encryption-at-rest key (e.g. managed by sops-nix). If null, a oneshot service generates /var/lib/nebula-commander/encryption-key on first boot. |
debug | bool | false | Enable debug mode |
publicUrl | null or string | null | Public URL of this instance (e.g. https://nebula.example.com). Derives the OIDC redirect URI and is used for redirect validation. |
standaloneAdminBootstrap | bool | false | Allow the unauthenticated dev-token admin bootstrap endpoint when no OIDC provider is configured. Must be explicitly opted into. |
corsOrigins | string | "*" | CORS origins: "*" or a comma-separated list. |
sessionHttpsOnly | bool | false | Set to true in production when served over HTTPS. |
allowedRedirectHosts | string | "" | Comma-separated allowed hosts for OAuth/OIDC redirects. Empty derives from oidc.redirectUri/publicUrl. |
oidc.issuerUrl | null or string | null | OIDC issuer URL (e.g. a Keycloak realm URL). Leave null to use dev-token auth instead. |
oidc.publicIssuerUrl | null or string | null | Public-facing OIDC issuer URL for browser redirects (logout, etc.), if different from issuerUrl. |
oidc.clientId | null or string | null | OIDC client ID. |
oidc.clientSecretFile | null or path | null | Path to a file containing the OIDC client secret (e.g. managed by sops-nix). |
oidc.redirectUri | null or string | null | OIDC redirect URI. If unset and publicUrl is set, derived as publicUrl + /api/auth/callback. |
oidc.scopes | string | "openid profile email" | OIDC scopes to request. |
The module creates a nebula-commander system user and group, tmpfiles for data directories, and oneshot services that generate the JWT secret and encryption key when their *File options are left null. The main service runs uvicorn with the backend and passes all of the above through as NEBULA_COMMANDER_* environment variables.
For settings not yet exposed as NixOS options, extend the service environment in your config; the backend reads any NEBULA_COMMANDER_* variable from the environment — see Environment variables for the full list.
Looking to run the device client (ncclient) declaratively on NixOS instead of (or alongside) this server? See ncclient Installation: NixOS.
3.3 - Reverse Proxy
Nebula Commander is typically run behind a reverse proxy such as Nginx, Traefik, or Caddy.
The frontend and backend containers listen on plain HTTP inside Docker; your reverse proxy:
- Terminates TLS on port 443 with a certificate
- Proxies requests to the frontend container (and through it to the backend)
- Adds security headers like
Strict-Transport-Security (HSTS)
This page shows recommended HSTS settings and example reverse proxy configurations.
HSTS and HTTPS
For best security, configure HTTPS and HSTS on your reverse proxy, not inside the containers.
That lets you choose the right TLS policy for your environment (LAN-only, VPN-only, or Internet-facing).
Recommended baseline HSTS header:
Strict-Transport-Security: max-age=31536000
For public Internet deployments on a DNS-backed domain, you can include subdomains:
Strict-Transport-Security: max-age=31536000; includeSubDomains
Avoid preload and avoid HSTS on bare IPs or non-public hostnames:
- HSTS preload lists require a public, DNS-backed domain
- HSTS on an IP or "internal-only" hostname can cause problems if it is repurposed later
The examples below assume you already have TLS certificates (for example from Let’s Encrypt)
and that the Nebula Commander frontend container is reachable as frontend:80 on a Docker network.
Nginx example
Minimal Nginx configuration to put nebula.example.com behind HTTPS with HSTS:
server {
    listen 443 ssl http2;
    server_name nebula.example.com;

    ssl_certificate     /path/to/fullchain.pem;
    ssl_certificate_key /path/to/privkey.pem;

    # HSTS: adjust policy for your environment
    add_header Strict-Transport-Security "max-age=31536000" always;

    location / {
        proxy_pass http://frontend:80;
        proxy_set_header Host $host;
        proxy_set_header X-Real-IP $remote_addr;
        proxy_set_header X-Forwarded-For $proxy_add_x_forwarded_for;
        proxy_set_header X-Forwarded-Proto $scheme;
    }
}
Change:
nebula.example.com to your actual hostname- Certificate paths to where your certs are stored
frontend:80 if you renamed the frontend service or are not using Docker networking
Traefik (file or dynamic configuration)
Traefik can apply HSTS via a headers middleware and route HTTPS traffic to the frontend service.
Example dynamic configuration (YAML) using the websecure entrypoint:
http:
  middlewares:
    hsts-headers:
      headers:
        stsSeconds: 31536000
        stsIncludeSubdomains: true

  routers:
    nebula:
      rule: "Host(`nebula.example.com`)"
      entryPoints: ["websecure"]
      service: nebula-frontend
      middlewares:
        - hsts-headers
      tls:
        certResolver: letsencrypt

  services:
    nebula-frontend:
      loadBalancer:
        servers:
          - url: "http://frontend:80"
Adapt:
nebula.example.com to your hostnamewebsecure and letsencrypt to your Traefik entrypoint and certresolver namesfrontend:80 to match your frontend container name and port
Traefik with Docker labels
If you use the Nebula Commander Docker compose stack and Traefik’s Docker provider,
you can attach labels directly to the frontend service. Example:
  frontend:
    image: ghcr.io/nixrtr/nebula-commander-frontend:latest
    container_name: nebula-commander-frontend
    restart: unless-stopped
    networks:
      - nebula-commander
      - traefik
    labels:
      - "traefik.enable=true"

      # Router: HTTPS entrypoint and host rule
      - "traefik.http.routers.nebula.rule=Host(`nebula.example.com`)"
      - "traefik.http.routers.nebula.entrypoints=websecure"
      - "traefik.http.routers.nebula.tls.certresolver=letsencrypt"

      # Service: forward to container port 80
      - "traefik.http.services.nebula-frontend.loadbalancer.server.port=80"

      # HSTS middleware
      - "traefik.http.middlewares.nebula-hsts.headers.stsSeconds=31536000"
      - "traefik.http.middlewares.nebula-hsts.headers.stsIncludeSubdomains=true"

      # Attach middleware to router
      - "traefik.http.routers.nebula.middlewares=nebula-hsts"
You must also ensure Traefik is on the same Docker network as the frontend service
(for example a shared traefik network).
Rename router (nebula), service (nebula-frontend), middleware (nebula-hsts),
entrypoint (websecure), and certresolver (letsencrypt) to fit your existing Traefik setup.
Caddy example
Caddy can automatically obtain certificates and proxy to the frontend container:
nebula.example.com {
    reverse_proxy frontend:80

    header {
        Strict-Transport-Security "max-age=31536000"
    }
}
Change nebula.example.com and frontend:80 as needed. Caddy will handle TLS certificates
for you when properly configured with DNS and ports 80/443 exposed.
4 - Server Configuration
Nebula Commander is configured with environment variables. All backend settings use the prefix NEBULA_COMMANDER_. You can configure everything from the docs below.
- Environment variables – Full list: database, JWT, OIDC, CORS, session, SMTP, debug. Use this to configure the backend completely.
- OIDC – Log in with Keycloak or another OIDC provider: issuer URLs (internal vs public), client id/secret, redirect URI, and zero-touch vs manual setup.
Two-tier layout (Docker)
When using Docker:
- Infrastructure –
docker/.env: ports (e.g. frontend, backend, Keycloak), optional JWT_SECRET_FILE path. - Backend –
docker/env.d/backend: every NEBULA_COMMANDER_* variable. Copy from env.d.example/backend and edit.
See Installation: Docker for the copy steps.
NixOS
services.nebula-commander exposes most of these settings as first-class options, including OIDC, publicUrl, corsOrigins, and sessionHttpsOnly — see Installation: NixOS for the full option table. Anything not yet exposed as an option can still be set by extending the service environment directly with the matching NEBULA_COMMANDER_* variable. A separate services.ncclient module is also available for running the device client declaratively.
4.1 - Environment Variables
All backend settings use the NEBULA_COMMANDER_ prefix. Set them in the environment or in a file (e.g. docker/env.d/backend). Optional values can be omitted; defaults apply.
Application
| Variable | Description | Default |
|---|
NEBULA_COMMANDER_DEBUG | Enable debug mode (enables dev-token endpoint; do not use in production) | false |
NEBULA_COMMANDER_UPDATE_CHECK_ENABLED | Check GitHub for a newer release, shown as a notification in the About screen. Set to false to disable all outbound calls to github.com (air-gapped/privacy-conscious deployments). | true |
Database
| Variable | Description | Default |
|---|
NEBULA_COMMANDER_DATABASE_URL | Database URL (SQLite: use four slashes for absolute path, e.g. sqlite+aiosqlite:////var/lib/nebula-commander/db.sqlite) | sqlite+aiosqlite:////var/lib/nebula-commander/db.sqlite |
NEBULA_COMMANDER_DATABASE_PATH | Override for SQLite path | — |
NEBULA_COMMANDER_CERT_STORE_PATH | Directory for CA and host certificates | /var/lib/nebula-commander/certs |
Encryption at rest
Required. The backend refuses to boot if this is left at a placeholder/unset
value — unlike most settings here, there’s no insecure-but-working default.
| Variable | Description | Default |
|---|
NEBULA_COMMANDER_ENCRYPTION_KEY | Fernet key used to encrypt certificates and private keys at rest. Generate one with python -c "from cryptography.fernet import Fernet; print(Fernet.generate_key().decode())". | — (required) |
NEBULA_COMMANDER_ENCRYPTION_KEY_FILE | Path to a file containing the Fernet key (overrides the plain env var when present). On NixOS this is auto-generated into a oneshot service the first time the module runs. | — |
JWT
| Variable | Description | Default |
|---|
NEBULA_COMMANDER_JWT_SECRET_KEY | Secret for signing tokens (generate with e.g. openssl rand -base64 32) | change-this-in-production |
NEBULA_COMMANDER_JWT_SECRET_FILE | Path to file containing JWT secret (overrides secret key when present) | — |
NEBULA_COMMANDER_JWT_ALGORITHM | JWT algorithm | HS256 |
NEBULA_COMMANDER_JWT_EXPIRATION_MINUTES | Token expiration in minutes | 1440 (24 hours) |
Public URL and OIDC
| Variable | Description | Default |
|---|
NEBULA_COMMANDER_PUBLIC_URL | Base URL where users reach the app (FQDN or host:port). Used to derive redirect URI and for redirect validation. | — |
NEBULA_COMMANDER_STANDALONE_ADMIN_BOOTSTRAP | Allow the unauthenticated /api/auth/dev-token admin-bootstrap endpoint when no OIDC provider is configured below. Standalone (no-IdP) deployments must opt in explicitly — this grants unauthenticated system-admin access to anyone who can reach the backend, so only enable it for a genuinely no-IdP deployment. Deployments with OIDC configured are unaffected (always 404). | false |
NEBULA_COMMANDER_OIDC_ISSUER_URL | OIDC issuer URL used by the backend to reach the provider (internal; e.g. http://keycloak:8080/realms/nebula-commander) | — |
NEBULA_COMMANDER_OIDC_PUBLIC_ISSUER_URL | OIDC issuer URL as seen by the browser (FQDN or host:port) | — |
NEBULA_COMMANDER_OIDC_CLIENT_ID | OIDC client ID | — |
NEBULA_COMMANDER_OIDC_CLIENT_SECRET | OIDC client secret | — |
NEBULA_COMMANDER_OIDC_CLIENT_SECRET_FILE | Path to file containing OIDC client secret | — |
NEBULA_COMMANDER_OIDC_REDIRECT_URI | Callback URL (optional; derived as PUBLIC_URL + /api/auth/callback when PUBLIC_URL is set) | — |
NEBULA_COMMANDER_OIDC_SCOPES | OIDC scopes (space-separated) | openid profile email |
NEBULA_COMMANDER_OIDC_ADMIN_ROLE_CLAIM | Top-level claim name used to detect the system-admin role (e.g. roles, groups, or an Auth0-style namespaced claim). Leave unset to use Keycloak’s default resource_access.<client_id>.roles shape. | — |
NEBULA_COMMANDER_OIDC_ADMIN_ROLE_VALUE | Value that must appear in the admin-role claim to grant system-admin | system-admin |
CORS and session
| Variable | Description | Default |
|---|
NEBULA_COMMANDER_CORS_ORIGINS | Allowed CORS origins: * or comma-separated list. Include your public app URL. Using * with credentials is insecure. | http://localhost:3000, http://localhost:5173 |
NEBULA_COMMANDER_SESSION_HTTPS_ONLY | Set session cookie to HTTPS-only (use true in production with HTTPS) | false |
NEBULA_COMMANDER_ALLOWED_REDIRECT_HOSTS | Allowed hosts for OAuth/OIDC redirects (comma-separated). When empty and PUBLIC_URL is set, derived from PUBLIC_URL. | — |
Certificates and device tokens
| Variable | Description | Default |
|---|
NEBULA_COMMANDER_DEFAULT_CERT_EXPIRY_DAYS | Default certificate expiry in days | 365 |
NEBULA_COMMANDER_DEVICE_TOKEN_EXPIRATION_DAYS | Device token (enrollment) expiry in days | 365 |
SMTP (optional)
| Variable | Description | Default |
|---|
NEBULA_COMMANDER_SMTP_ENABLED | Enable sending email (e.g. for invitations) | false |
NEBULA_COMMANDER_SMTP_HOST | SMTP host | localhost |
NEBULA_COMMANDER_SMTP_PORT | SMTP port | 587 |
NEBULA_COMMANDER_SMTP_USERNAME | SMTP username | — |
NEBULA_COMMANDER_SMTP_PASSWORD | SMTP password | — |
NEBULA_COMMANDER_SMTP_PASSWORD_FILE | Path to file containing SMTP password | — |
NEBULA_COMMANDER_SMTP_USE_TLS | Use TLS | true |
NEBULA_COMMANDER_SMTP_FROM_EMAIL | From address | noreply@example.com |
NEBULA_COMMANDER_SMTP_FROM_NAME | From name | Nebula Commander |
Analytics (optional)
Exposed publicly via GET /api/public-config (no auth) so the frontend can inject the corresponding script tags.
| Variable | Description | Default |
|---|
NEBULA_COMMANDER_PLAUSIBLE_DOMAIN | Plausible domain (e.g. example.com); set to enable Plausible analytics | — |
NEBULA_COMMANDER_PLAUSIBLE_SCRIPT_SRC | Custom Plausible script URL (e.g. behind your own proxy), overriding the default script source | — |
NEBULA_COMMANDER_GA_MEASUREMENT_ID | Google Analytics measurement ID (e.g. G-XXXXXXXXXX); set to enable GA | — |
NEBULA_COMMANDER_ANALYTICS_CUSTOM_SCRIPTS | JSON array of custom scripts to inject, each {"src": "https://...", "defer": true} or {"inline": "..."} | — |
Server (advanced)
| Variable | Description | Default |
|---|
NEBULA_COMMANDER_HOST | Bind host | 0.0.0.0 |
NEBULA_COMMANDER_PORT | Bind port | 8081 |
Security notes
- Generate a strong JWT secret for production (e.g.
openssl rand -base64 32). Do not use the default. ENCRYPTION_KEY has no default to leave-unset-and-forget — the backend won’t start without one. Generate it once and keep it: losing it makes every stored certificate/private key unrecoverable.- Prefer
*_FILE options (JWT, encryption key, OIDC secret, SMTP password) over plain env vars when possible. - In production: set
DEBUG=false, use HTTPS for PUBLIC_URL and OIDC, and set CORS_ORIGINS to your actual frontend origin(s). For examples of putting Nebula Commander behind Nginx, Traefik, or Caddy with TLS and HSTS, see Reverse Proxy.
4.2 - OIDC Authentication
Nebula Commander can use OpenID Connect (OIDC) for login. Keycloak is supported with a pre-configured setup; other OIDC providers (Authentik, Auth0, etc.) work with the same environment variables.
Required variables
Set these in env.d/backend (Docker) or in the backend environment:
NEBULA_COMMANDER_PUBLIC_URL – URL where users reach the app (FQDN or host:port). The redirect URI is derived as PUBLIC_URL + /api/auth/callback if you do not set OIDC_REDIRECT_URI.NEBULA_COMMANDER_OIDC_ISSUER_URL – Issuer URL used by the backend to talk to the provider. Inside Docker use the container name and container port (e.g. http://keycloak:8080/realms/nebula-commander). Do not use the host-mapped port here.NEBULA_COMMANDER_OIDC_PUBLIC_ISSUER_URL – Issuer URL as seen by the browser (FQDN or host:port). Use the same URL users would use to open the provider’s login page.NEBULA_COMMANDER_OIDC_CLIENT_ID – OIDC client ID (e.g. nebula-commander).NEBULA_COMMANDER_OIDC_CLIENT_SECRET – Client secret from the provider. Prefer NEBULA_COMMANDER_OIDC_CLIENT_SECRET_FILE in production.
Optional: NEBULA_COMMANDER_OIDC_REDIRECT_URI – Override only if you need a callback URL different from PUBLIC_URL + /api/auth/callback.
Keycloak with Docker
- Copy example env files and edit
env.d/backend (set PUBLIC_URL, OIDC issuer URLs, client id/secret). - Start with Keycloak:
docker compose -f docker-compose.yml -f docker-compose-keycloak.yml up -d - Create a user in Keycloak Admin and assign client roles under the
nebula-commander client: system-admin, network-owner, or user.
Zero-touch Keycloak
The project provides a custom Keycloak image that imports the realm and theme at startup. Build the image (see Installation: Docker and docker/keycloak), set the same OIDC variables in env.d/backend, and start the stack. No manual realm creation is required; create users and assign roles in the Admin console.
Manual Keycloak setup
If you do not use the zero-touch image, create the realm and client in Keycloak:
- Client type: OpenID Connect, confidential, standard flow.
- Valid redirect URI: your PUBLIC_URL +
/api/auth/callback. - Valid post-logout redirect URIs: PUBLIC_URL +
/*. - Web origins: your PUBLIC_URL.
- Create client roles:
system-admin, network-owner, user. Assign them to users via Role mapping.
Then set the client secret in env.d/backend.
Backend cannot reach Keycloak
The backend talks to Keycloak on the Docker network. Use the container port in NEBULA_COMMANDER_OIDC_ISSUER_URL (e.g. http://keycloak:8080/realms/nebula-commander), not the host-mapped port. Use the host port or FQDN only in NEBULA_COMMANDER_OIDC_PUBLIC_ISSUER_URL and in NEBULA_COMMANDER_PUBLIC_URL.
External OIDC provider
Keycloak is the default, but Nebula Commander’s OIDC integration is fully
provider-agnostic: login, logout, and step-up reauth all use standard OIDC
discovery (.well-known/openid-configuration) to find the provider’s actual
endpoints, rather than assuming Keycloak’s URL conventions. Any standards-compliant
provider — Authentik, Auth0, Okta, and others — works with the same environment
variables.
Use the same variables as above. In the provider, set redirect URI to PUBLIC_URL +
/api/auth/callback, client type Confidential, grant type Authorization Code. Set
OIDC_ISSUER_URL and OIDC_PUBLIC_ISSUER_URL to the provider’s issuer URL (often
the same).
docker-compose.yml includes the Keycloak stack by default. To use an external
provider instead, comment out (or delete) the include: block at the top of
docker-compose.yml:
# include:
#   - path: ./docker-compose-keycloak.yml
then docker compose up -d starts only the backend and frontend.
Admin role mapping
Keycloak assigns roles via a client-roles claim shaped like
resource_access.<client_id>.roles, which most other providers don’t emit by
default. If you’re not using Keycloak, set:
NEBULA_COMMANDER_OIDC_ADMIN_ROLE_CLAIM – the top-level claim your provider
emits (e.g. roles, groups, or an Auth0-style namespaced claim like
https://nebula.example.com/roles).NEBULA_COMMANDER_OIDC_ADMIN_ROLE_VALUE – the value within that claim that
grants system-admin (default system-admin).
Leave OIDC_ADMIN_ROLE_CLAIM unset to keep using Keycloak’s default shape — this
is the default, so existing Keycloak deployments need no changes.
Roles and permissions
- system-admin – Manage users; view all networks/nodes with limited data; delete networks/nodes (with reauth); request access grants from owners.
- network-owner – Create and manage networks, nodes, invitations, node requests, and access; set default node parameters and auto-approval.
- user – Access only what network owners grant; request nodes and higher access.
See the repository docker/README for detailed RBAC and permission features.
5 - Web UI Usage
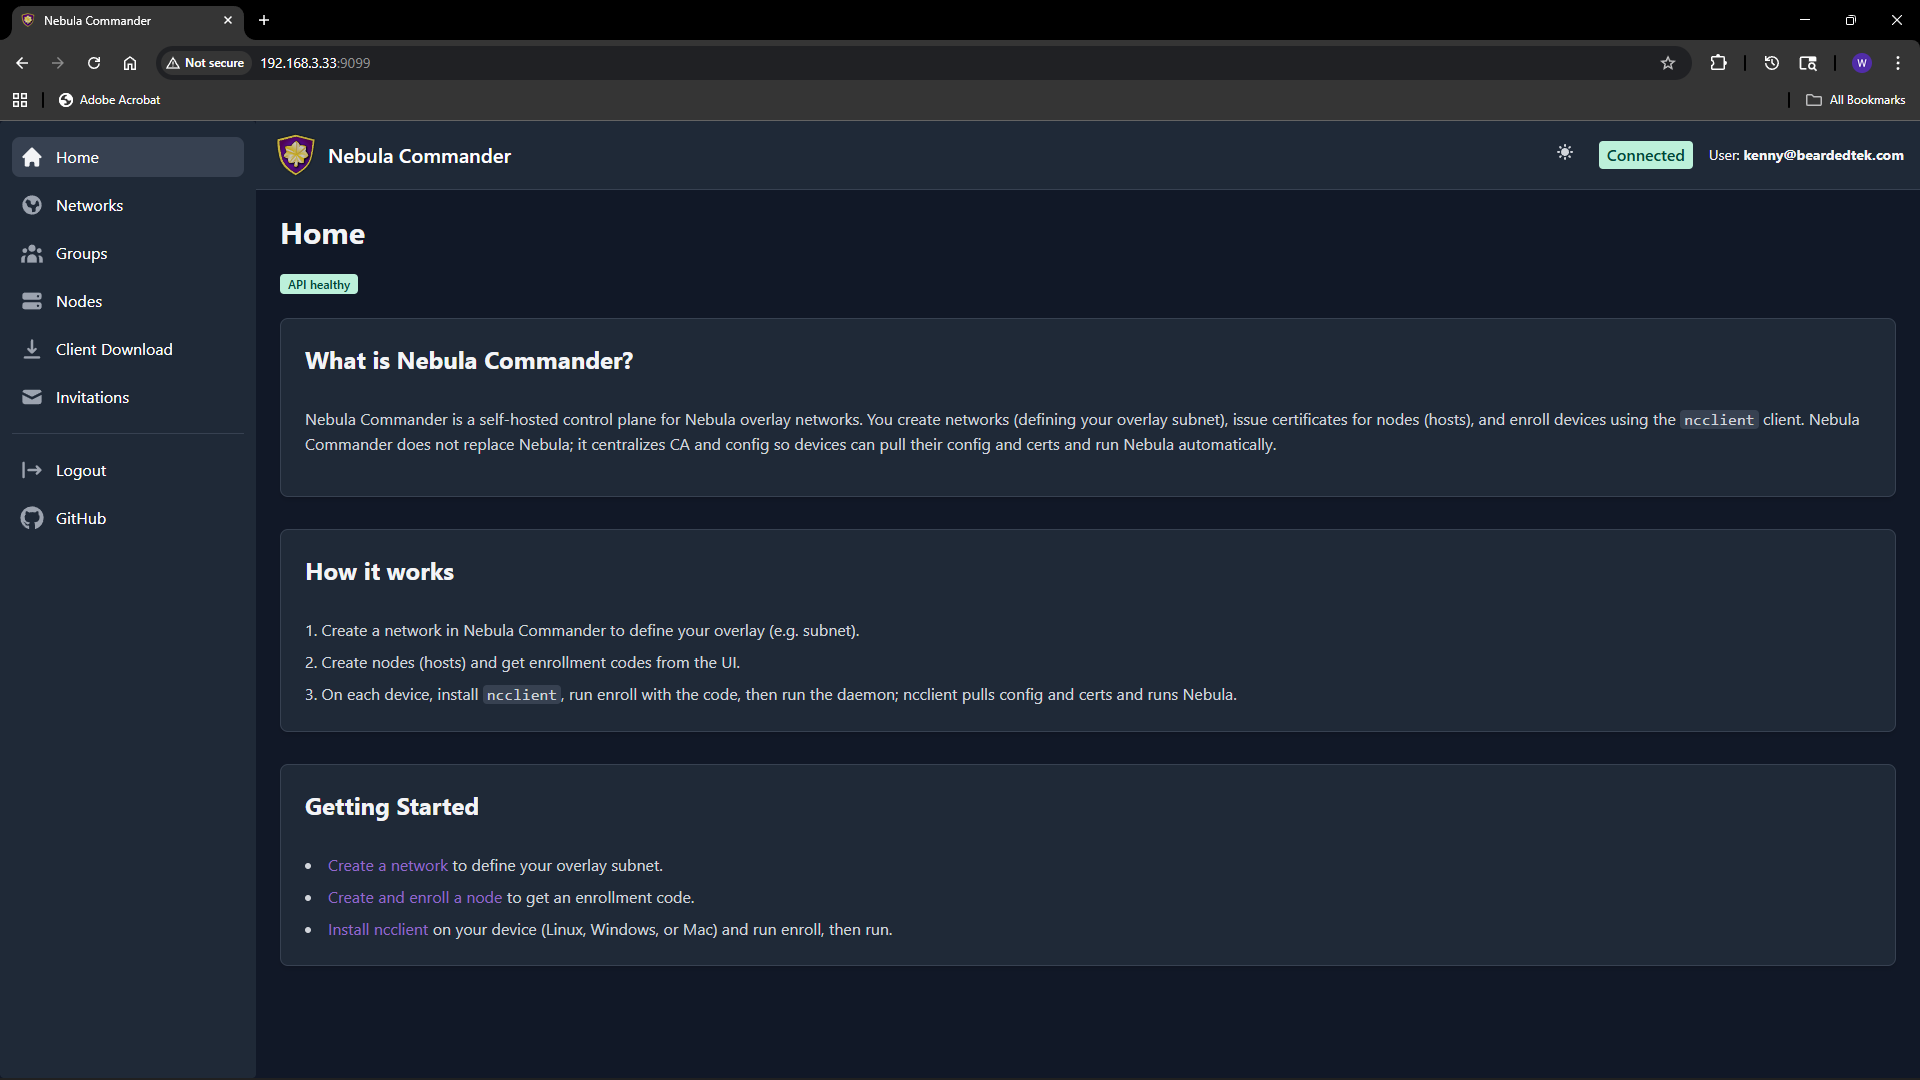
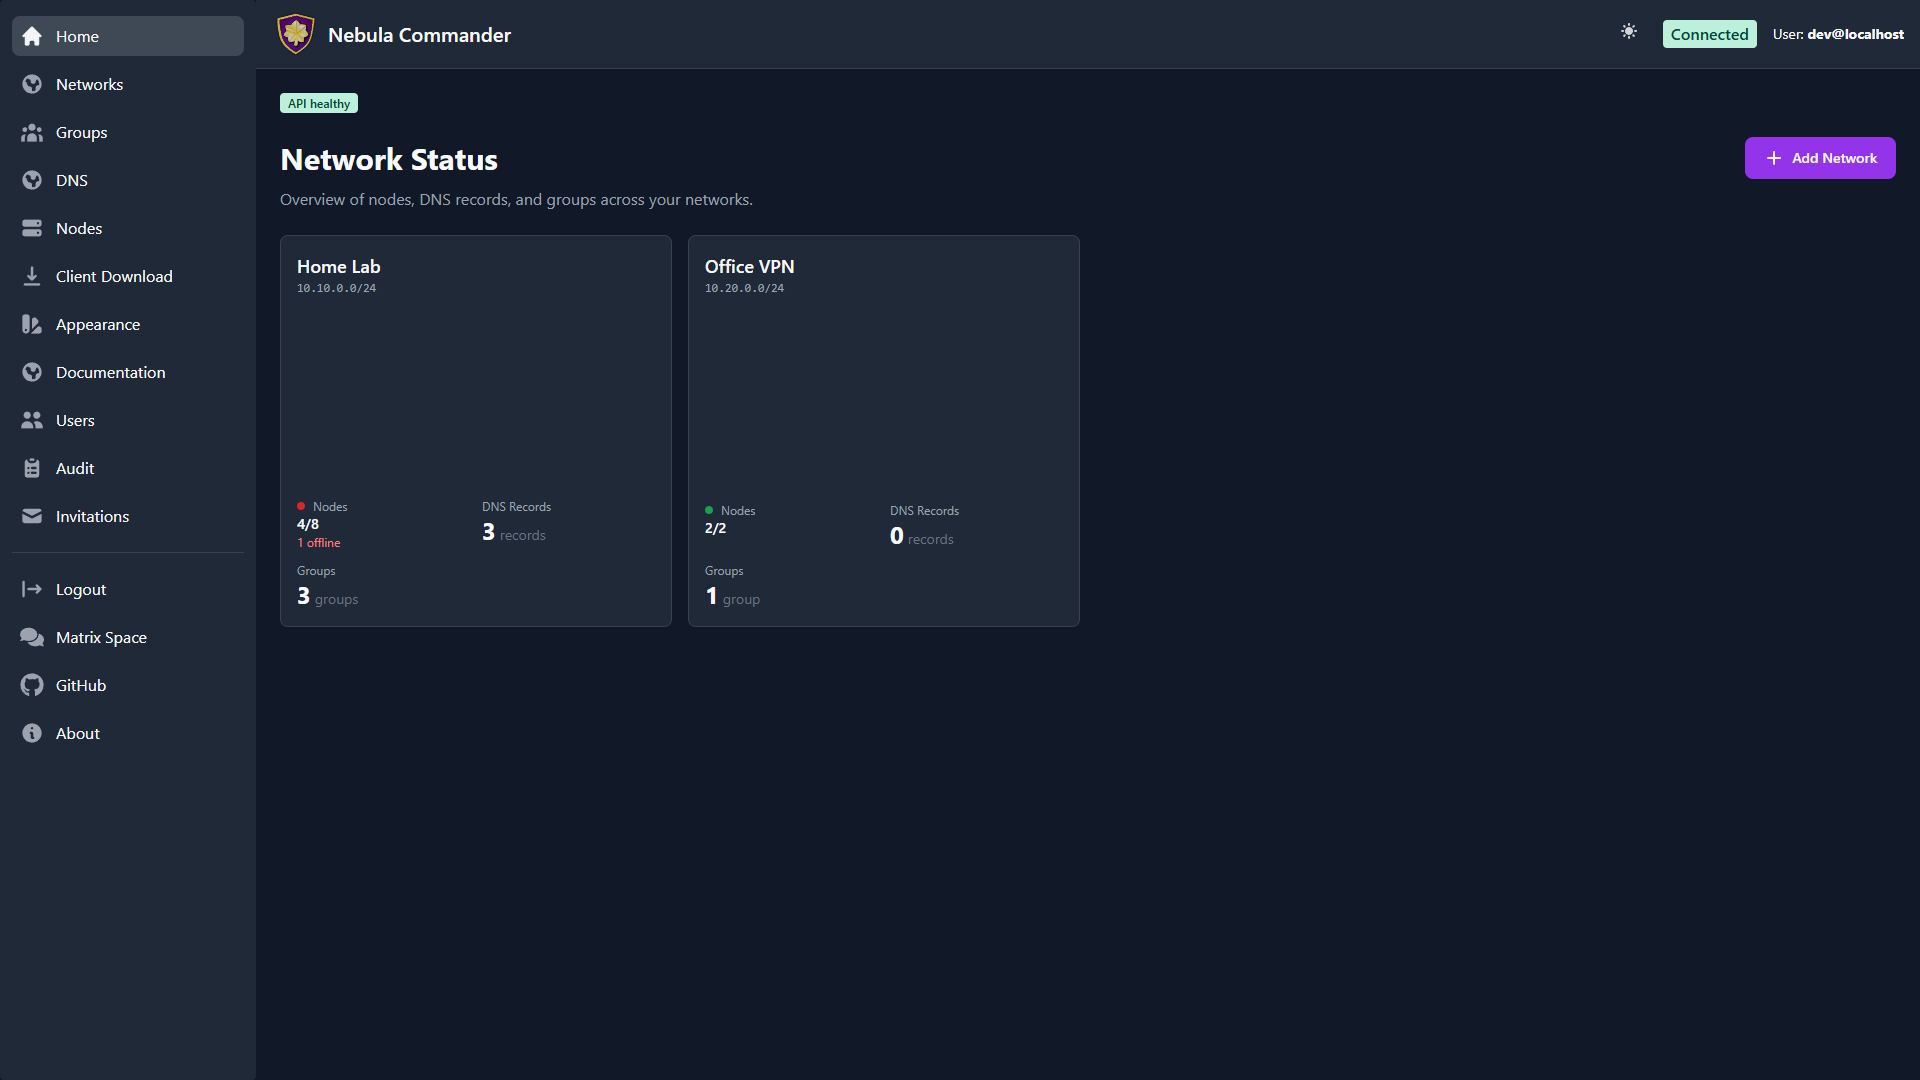
The Nebula Commander web UI is a React dashboard that talks to the backend API. You use it to manage networks, nodes, certificates, and users. Most list pages — Networks, Nodes, Groups, Users, and the Home dashboard — use the same square-card grid layout, so once one feels familiar the rest do too.
| Light | Dark |
|---|
 |  |
Logging in
- With OIDC – When OIDC is configured (OIDC), open the app URL and you are redirected to the provider (e.g. Keycloak). After login, you are sent back to the UI with a session.
- Without OIDC (development) – When the backend has
DEBUG=true and OIDC is not configured, the backend exposes a dev-token endpoint. The UI can log you in without a real IdP. Do not enable this in production.
Home
The Home dashboard is the first thing you see after logging in. Before you’ve
created a network and enrolled a node, it shows a getting-started walkthrough;
after that, it becomes a card-grid overview of every network you can access — the
same layout as the Networks page, so it doubles as a
quick jumping-off point.
Main flows
- Networks – Create and manage Nebula networks. As a network owner you control nodes, IP allocation, and firewall groups.
- Groups – Define security groups and inbound firewall rules per group.
- DNS – Configure split-horizon DNS per network (domain and hostname aliases). Used by ncclient with
--accept-dns and by the Docker lighthouse client. - Nodes – Add nodes to networks, assign IPs, create or sign certificates, generate enrollment codes for ncclient, and configure subnet routers and exit nodes.
- Client Download – Download ncclient (CLI, Linux
.deb/.rpm/Flatpak, Windows app/MSI) served from this server. - Invitations – Invite users to networks with roles and permissions (when OIDC is enabled).
- Users – System admins manage every user account and their system role.
- Backup & export – System admins download an encrypted copy of the whole instance, or import one to move servers.
- Appearance – Customize your own color theme, light and dark mode.
Certificates are created or signed from the Nodes page (Create or Sign flow). For Sign flow, the server does not have the private key; place host.key on the device (e.g. in the ncclient output directory).
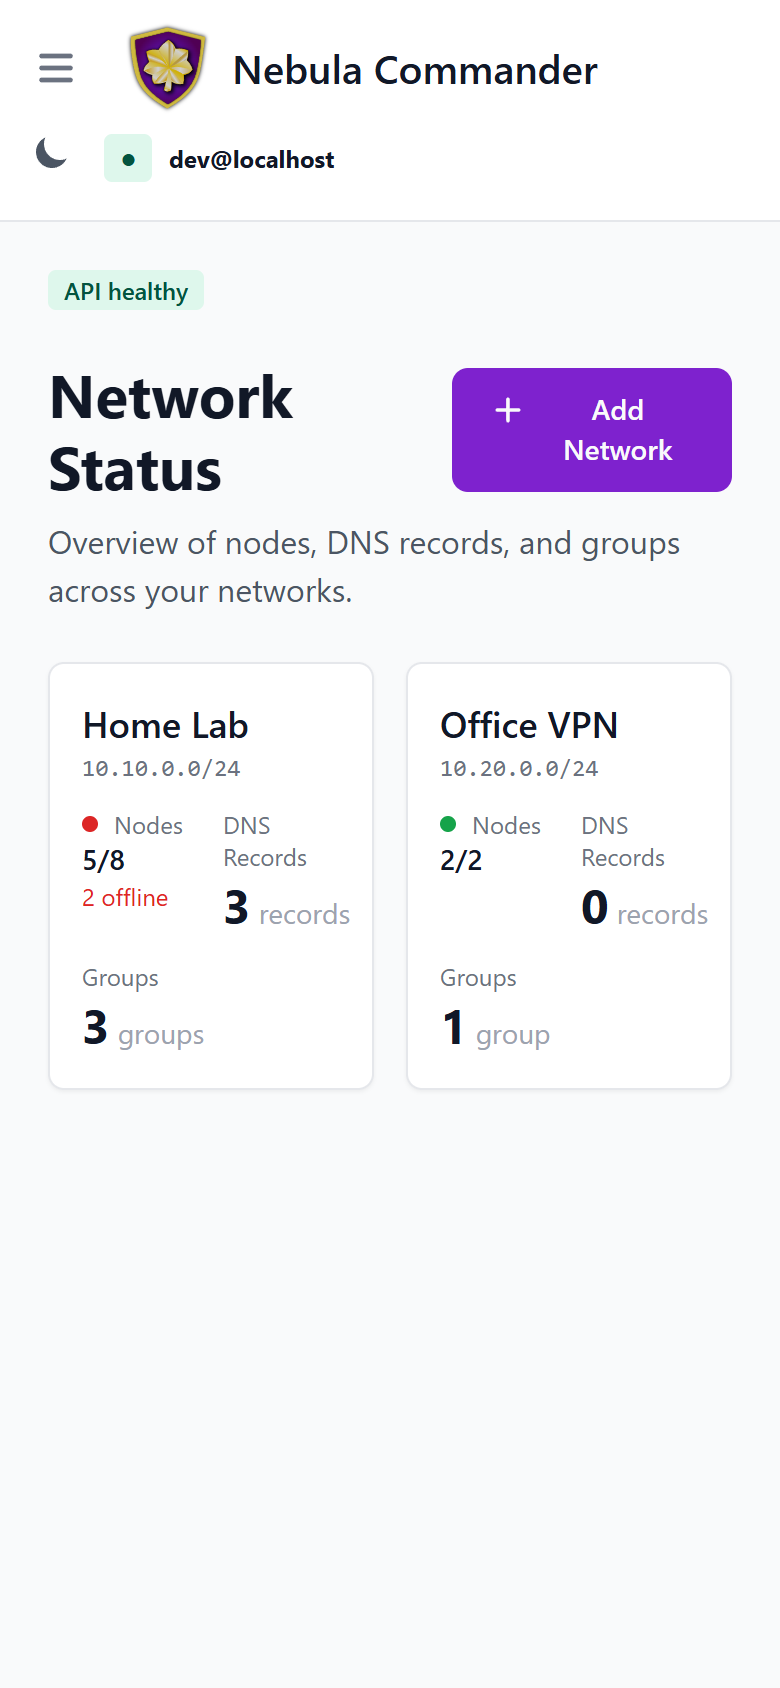
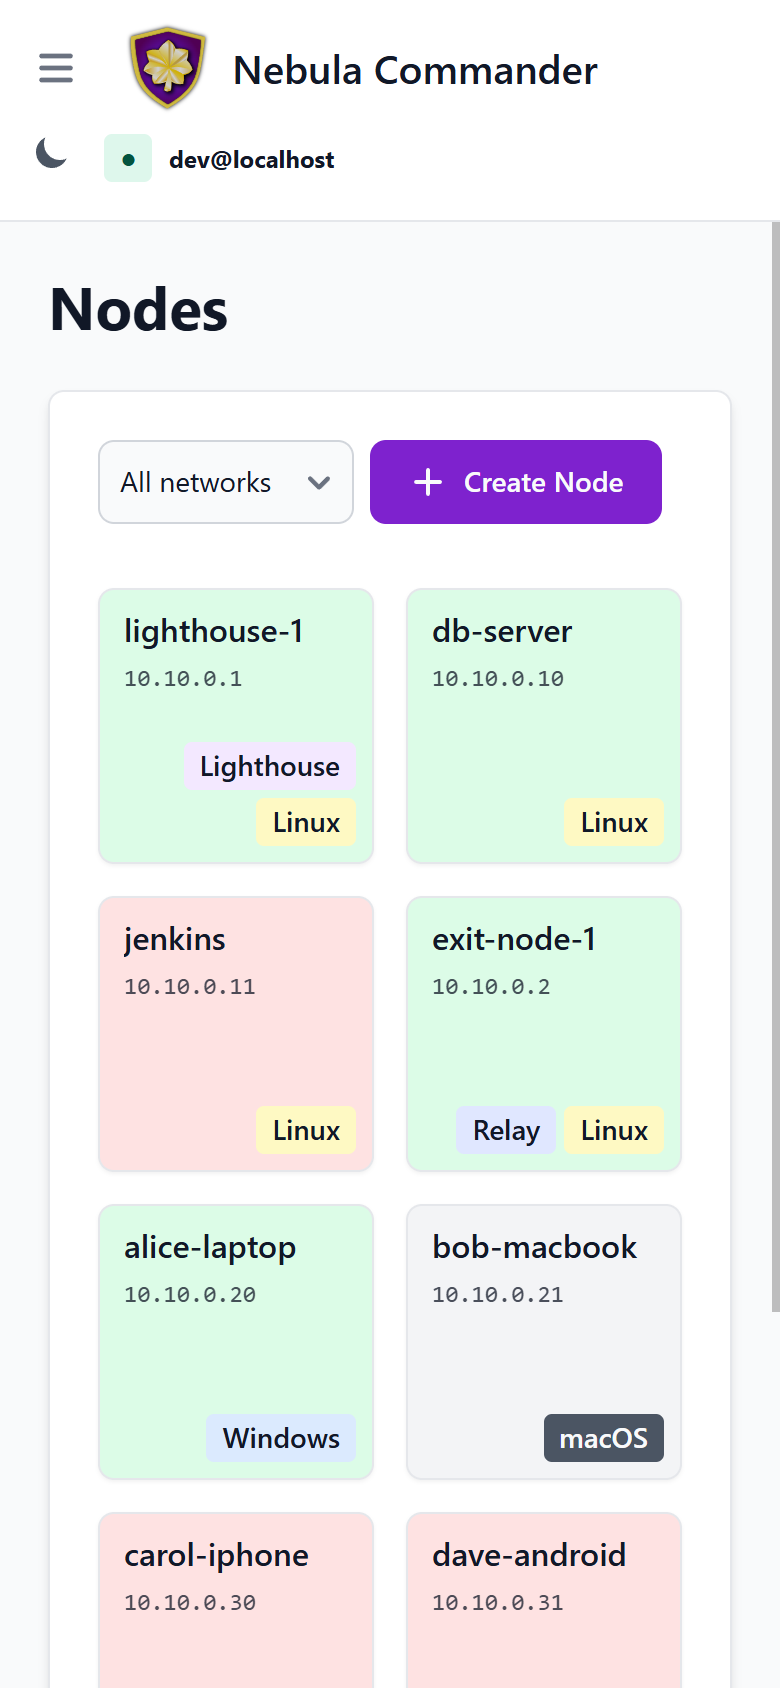
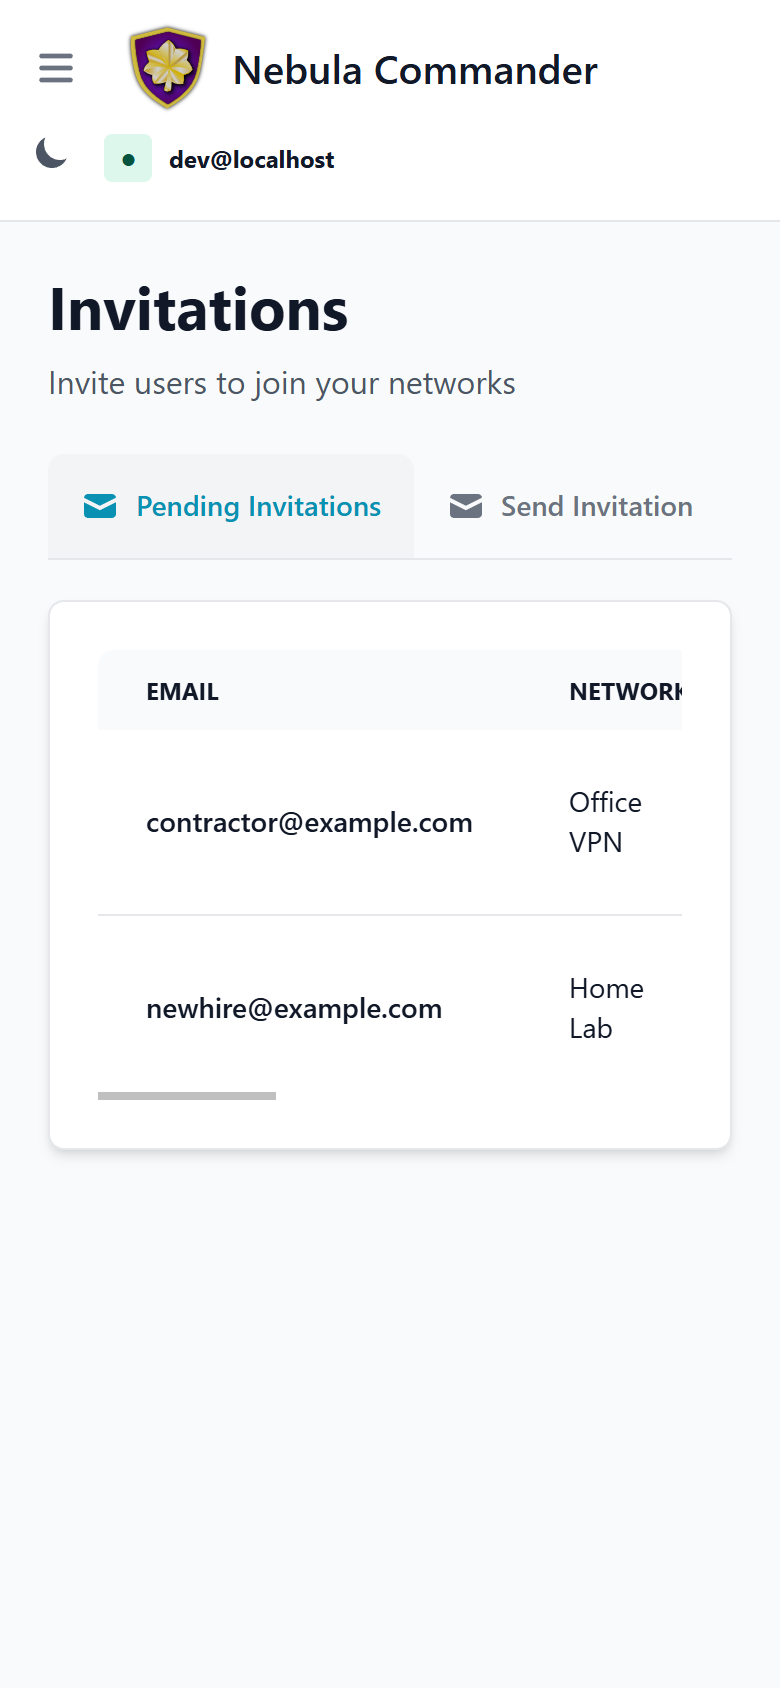
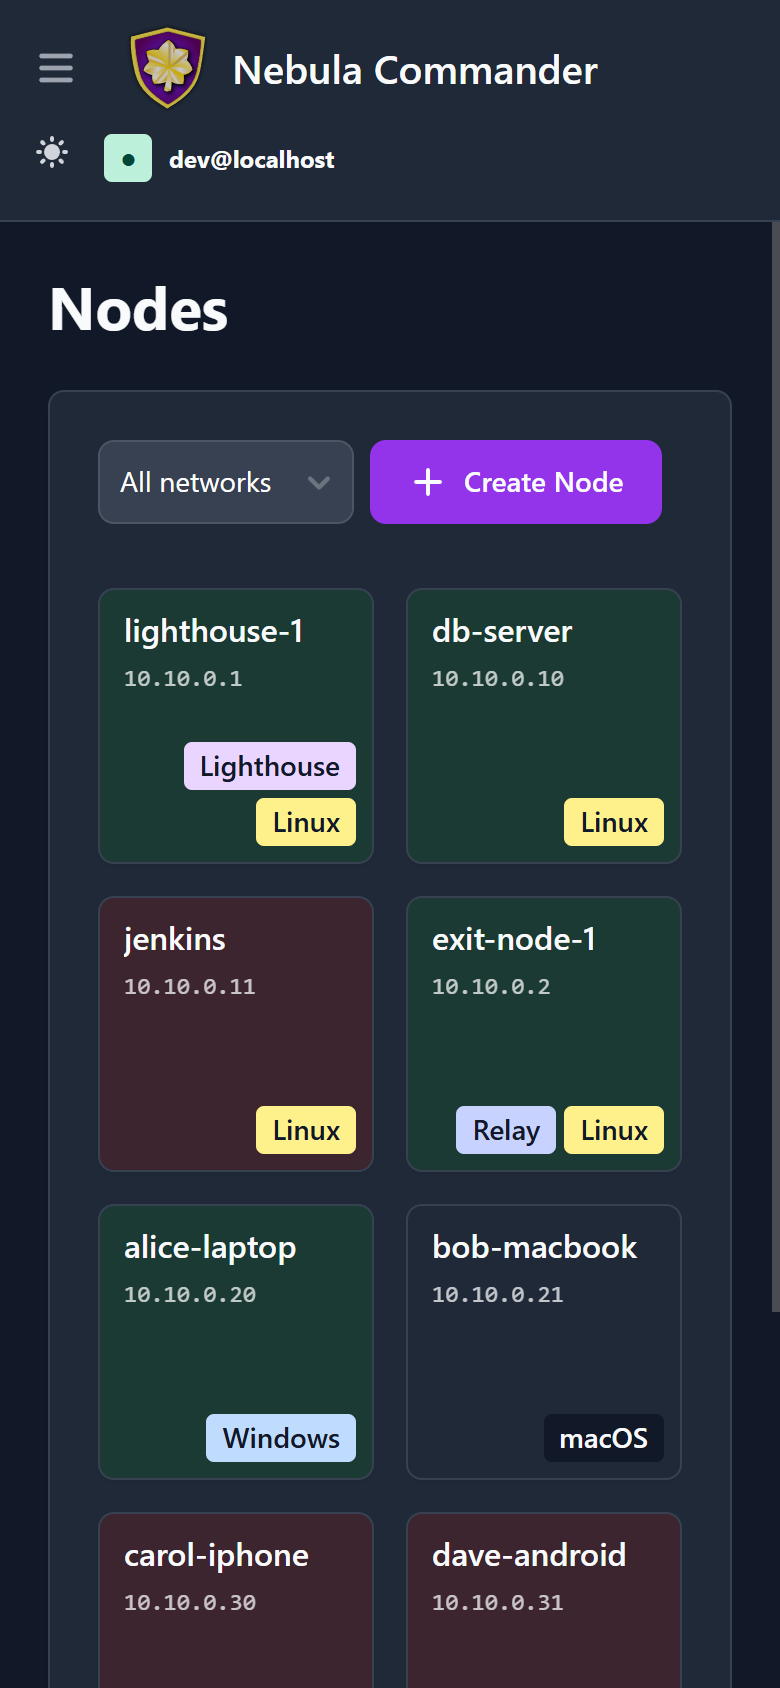
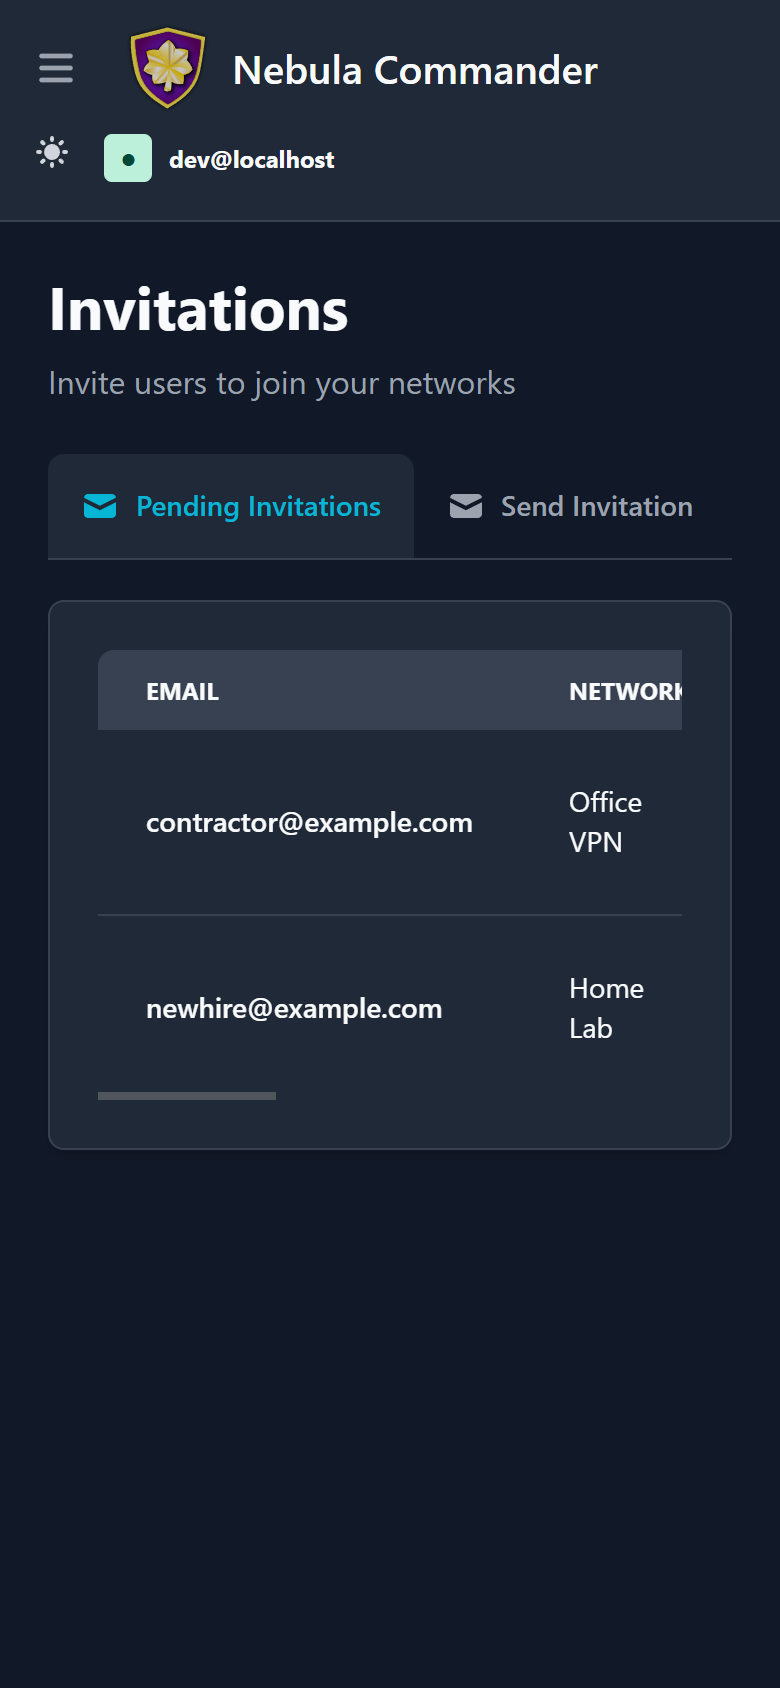
Responsive / mobile
The whole web UI is responsive - the same React app adapts down to phone-width
screens rather than being a separate mobile build. The sidebar collapses to a
hamburger menu, card grids reflow to fewer columns, and wide tables (like
Invitations) scroll horizontally within their own container instead of the
whole page:
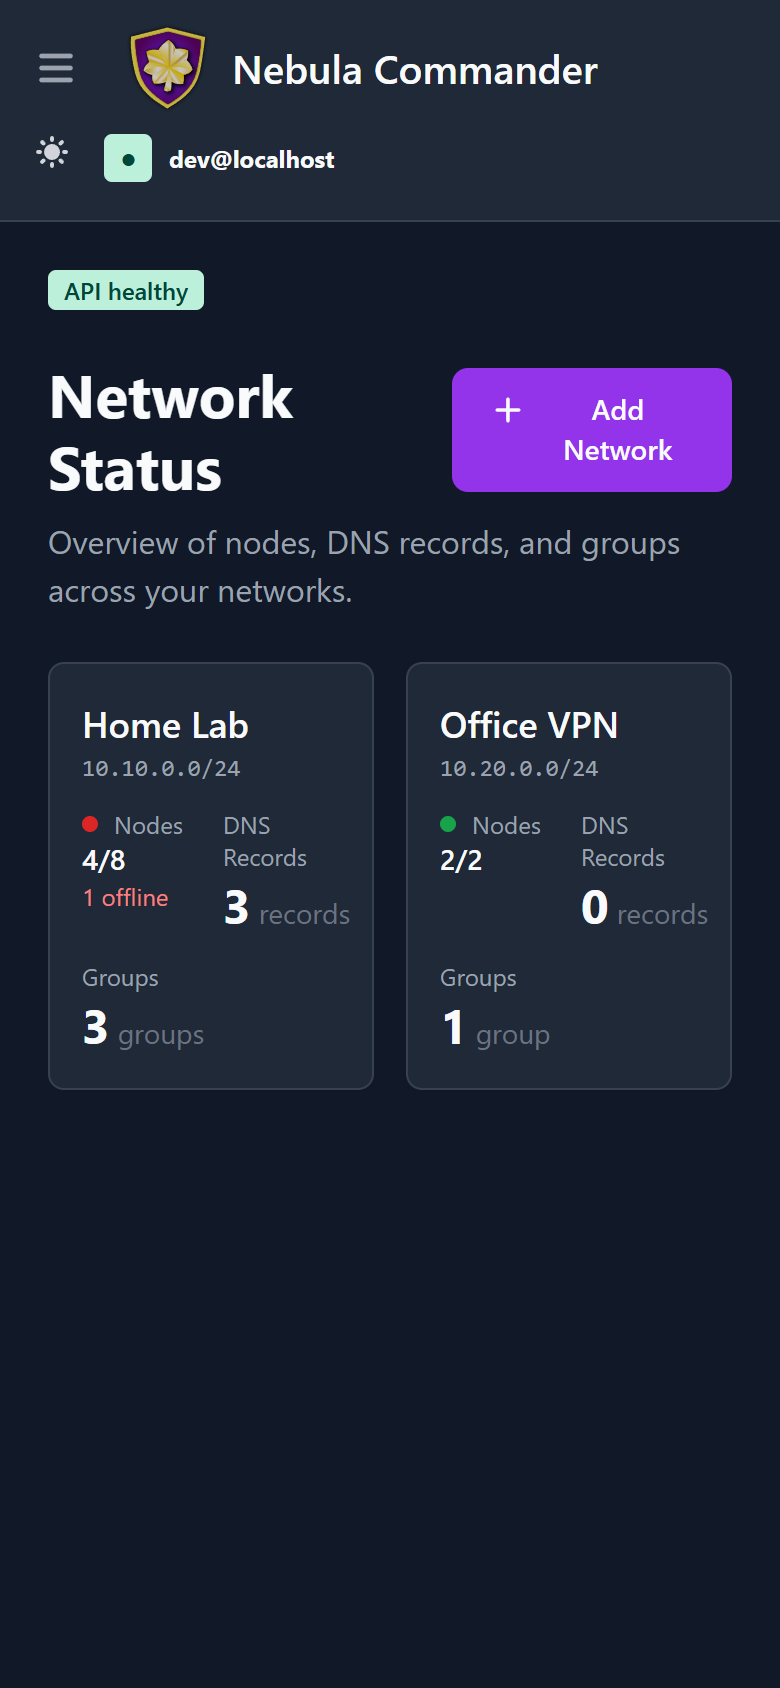
Dark mode works the same way on mobile:
Access control
Access is role-based: system-admin, network-owner, and user. Permissions include network-level and node-level access, plus access grants for temporary elevated admin access. Critical actions (e.g. delete network, node, or user) require reauthentication. Details are in the repository docker/README.
5.1 - Networks
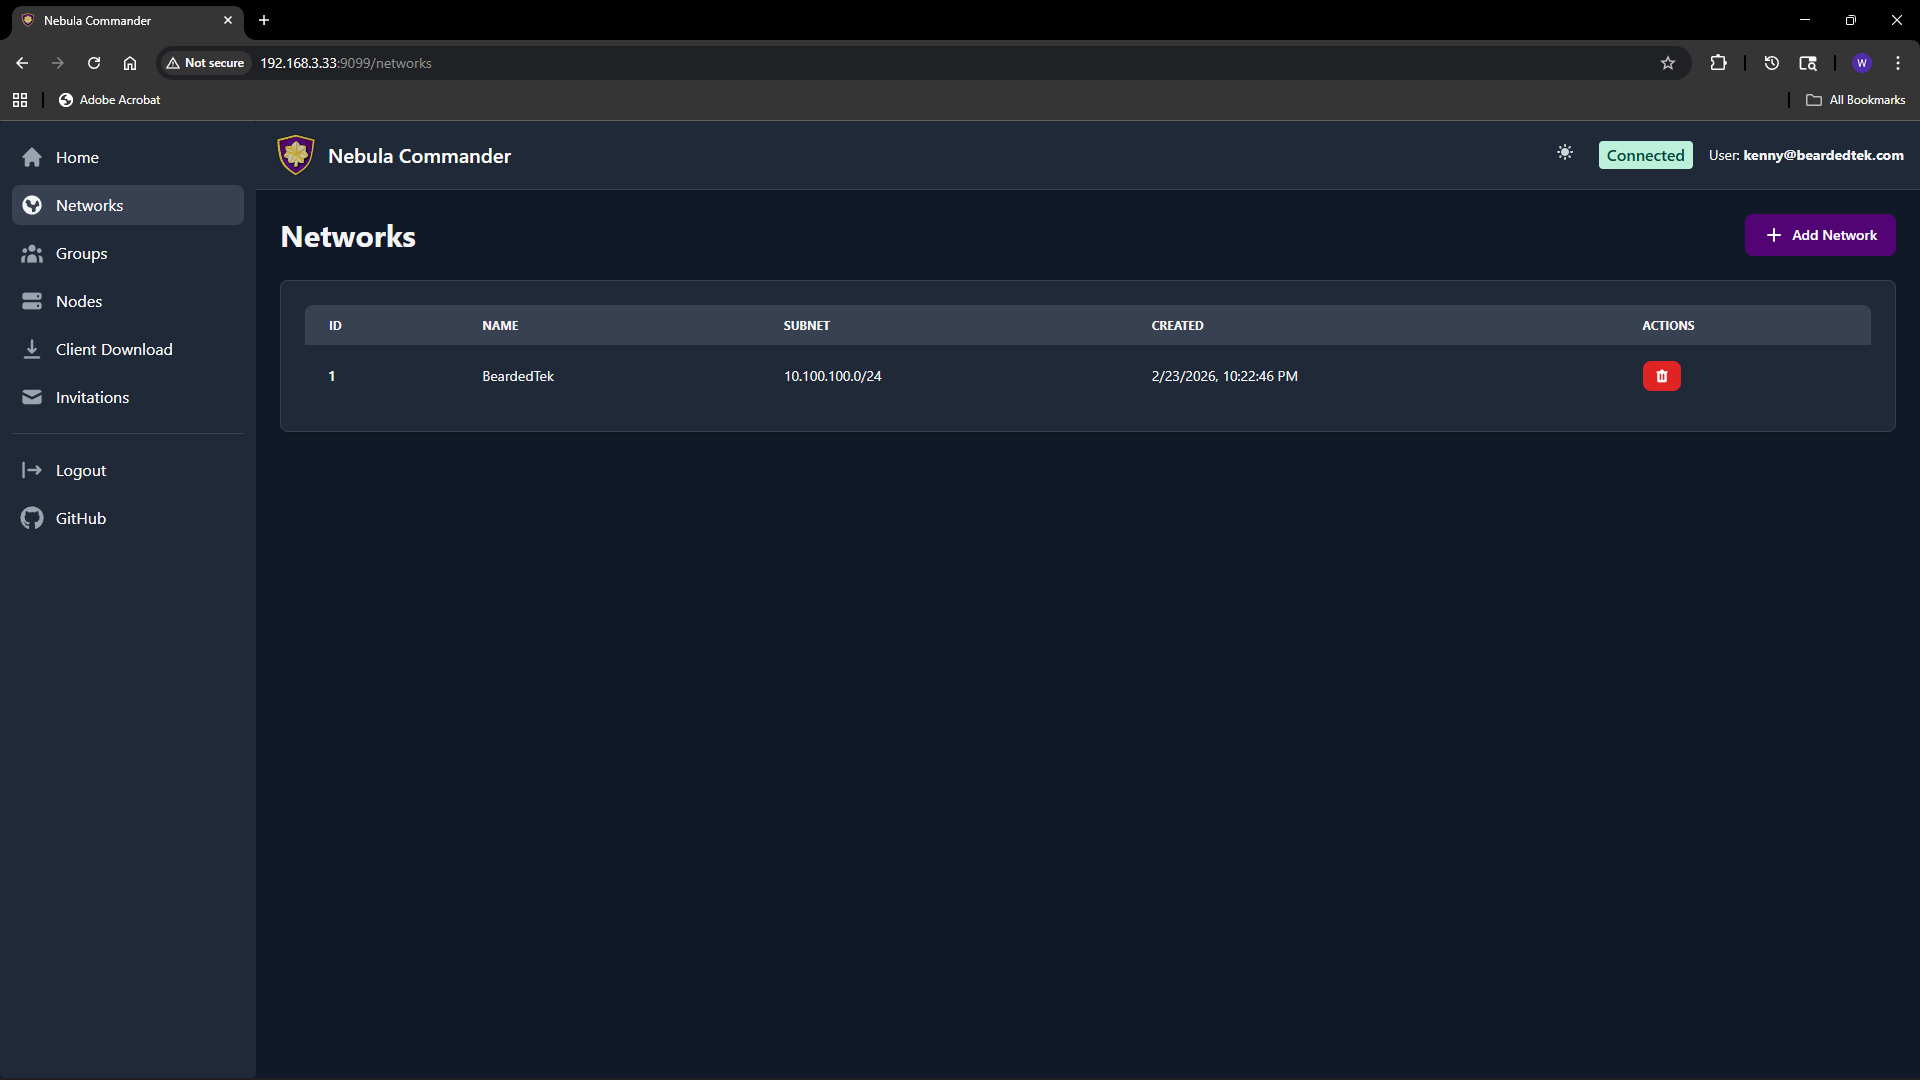
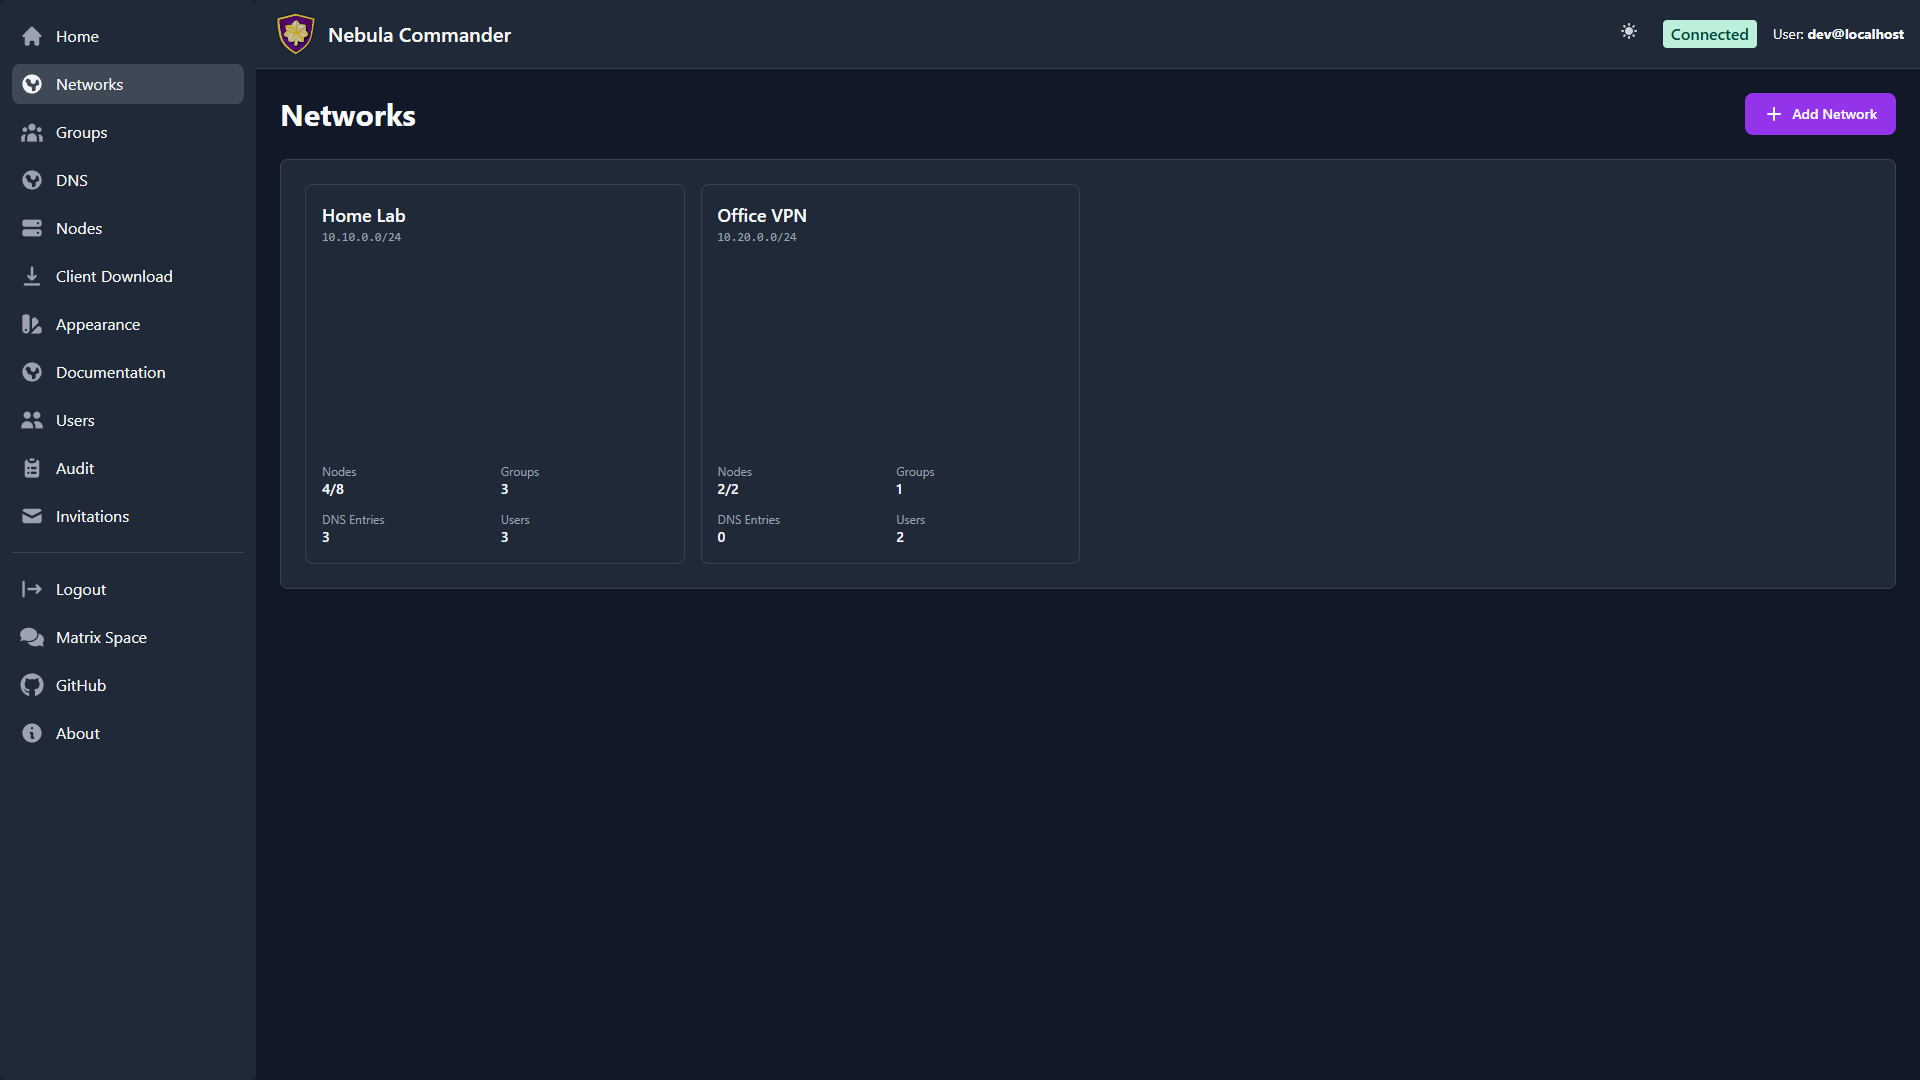
The Networks page shows every Nebula network you can access as a grid of square
cards, and lets you create networks. Each network has a name and a subnet (CIDR)
used for IP allocation to nodes.
| Light | Dark |
|---|
 |  |
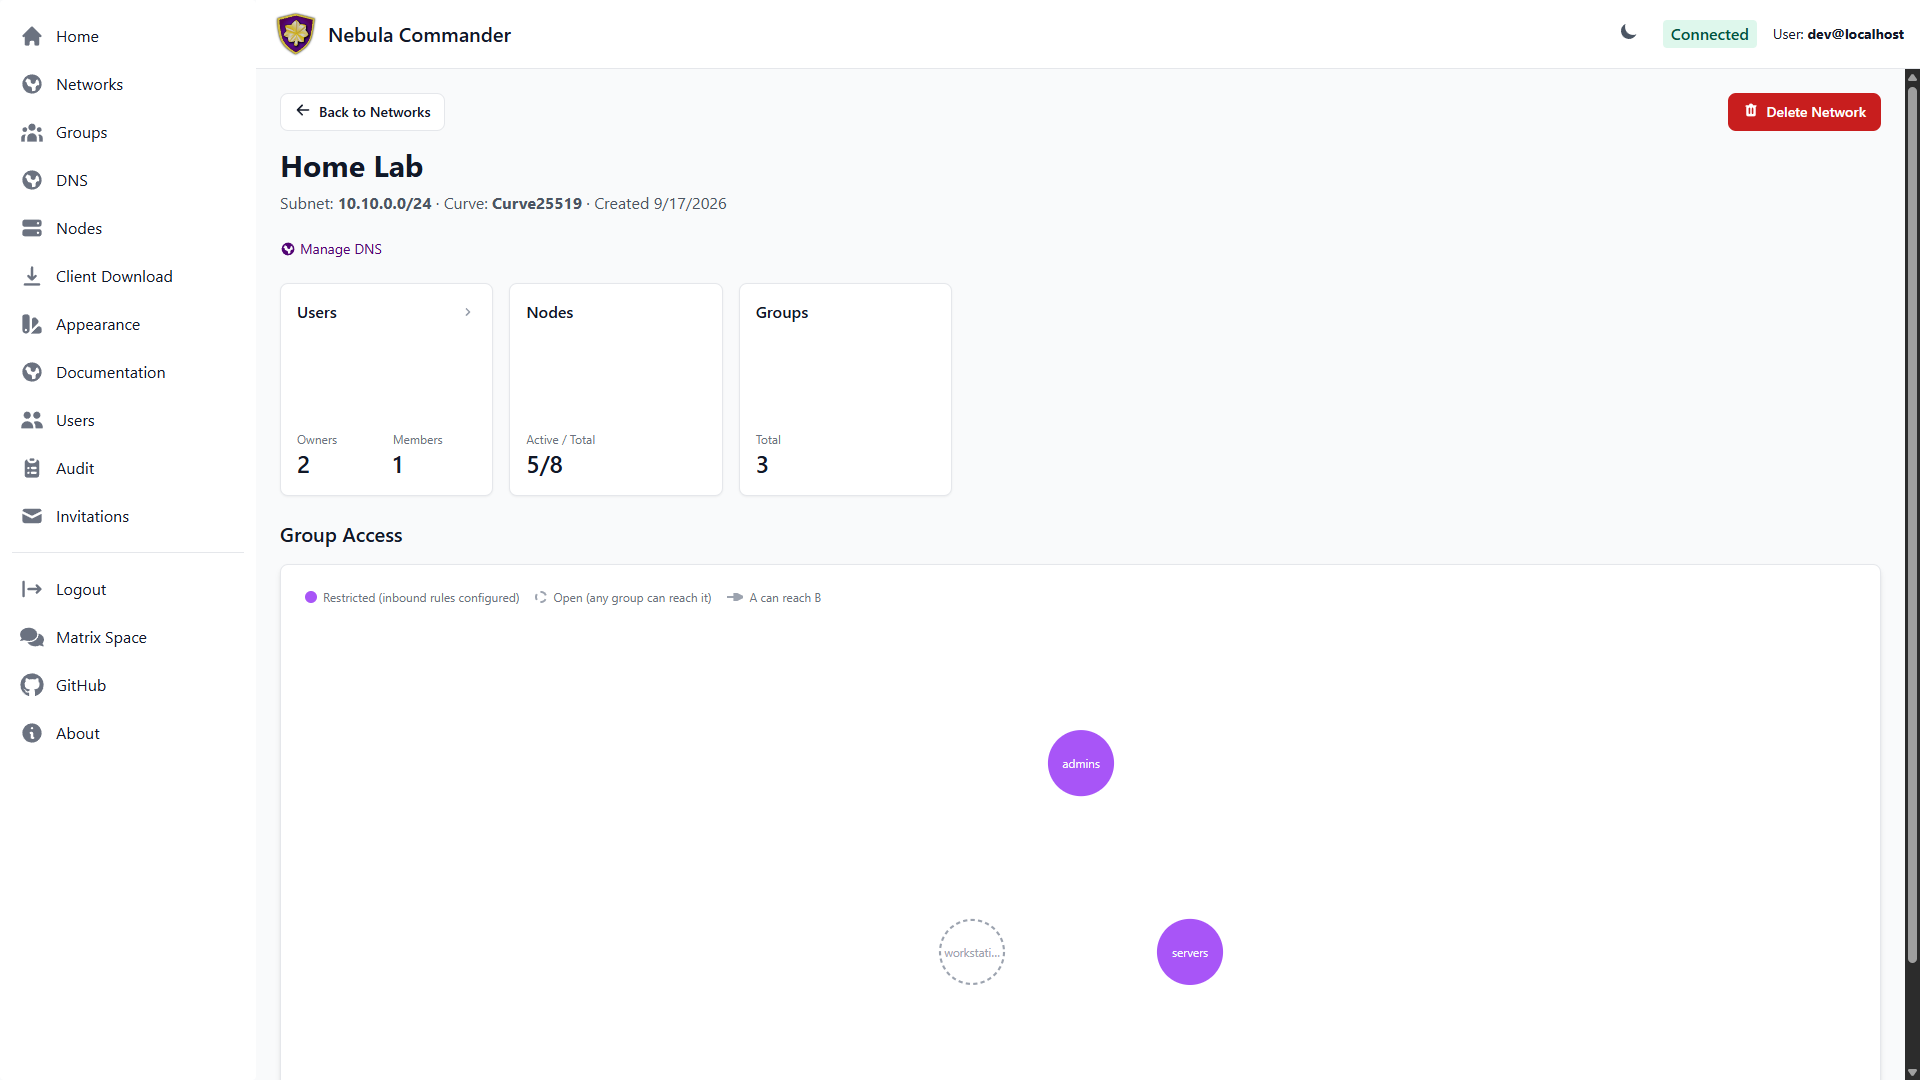
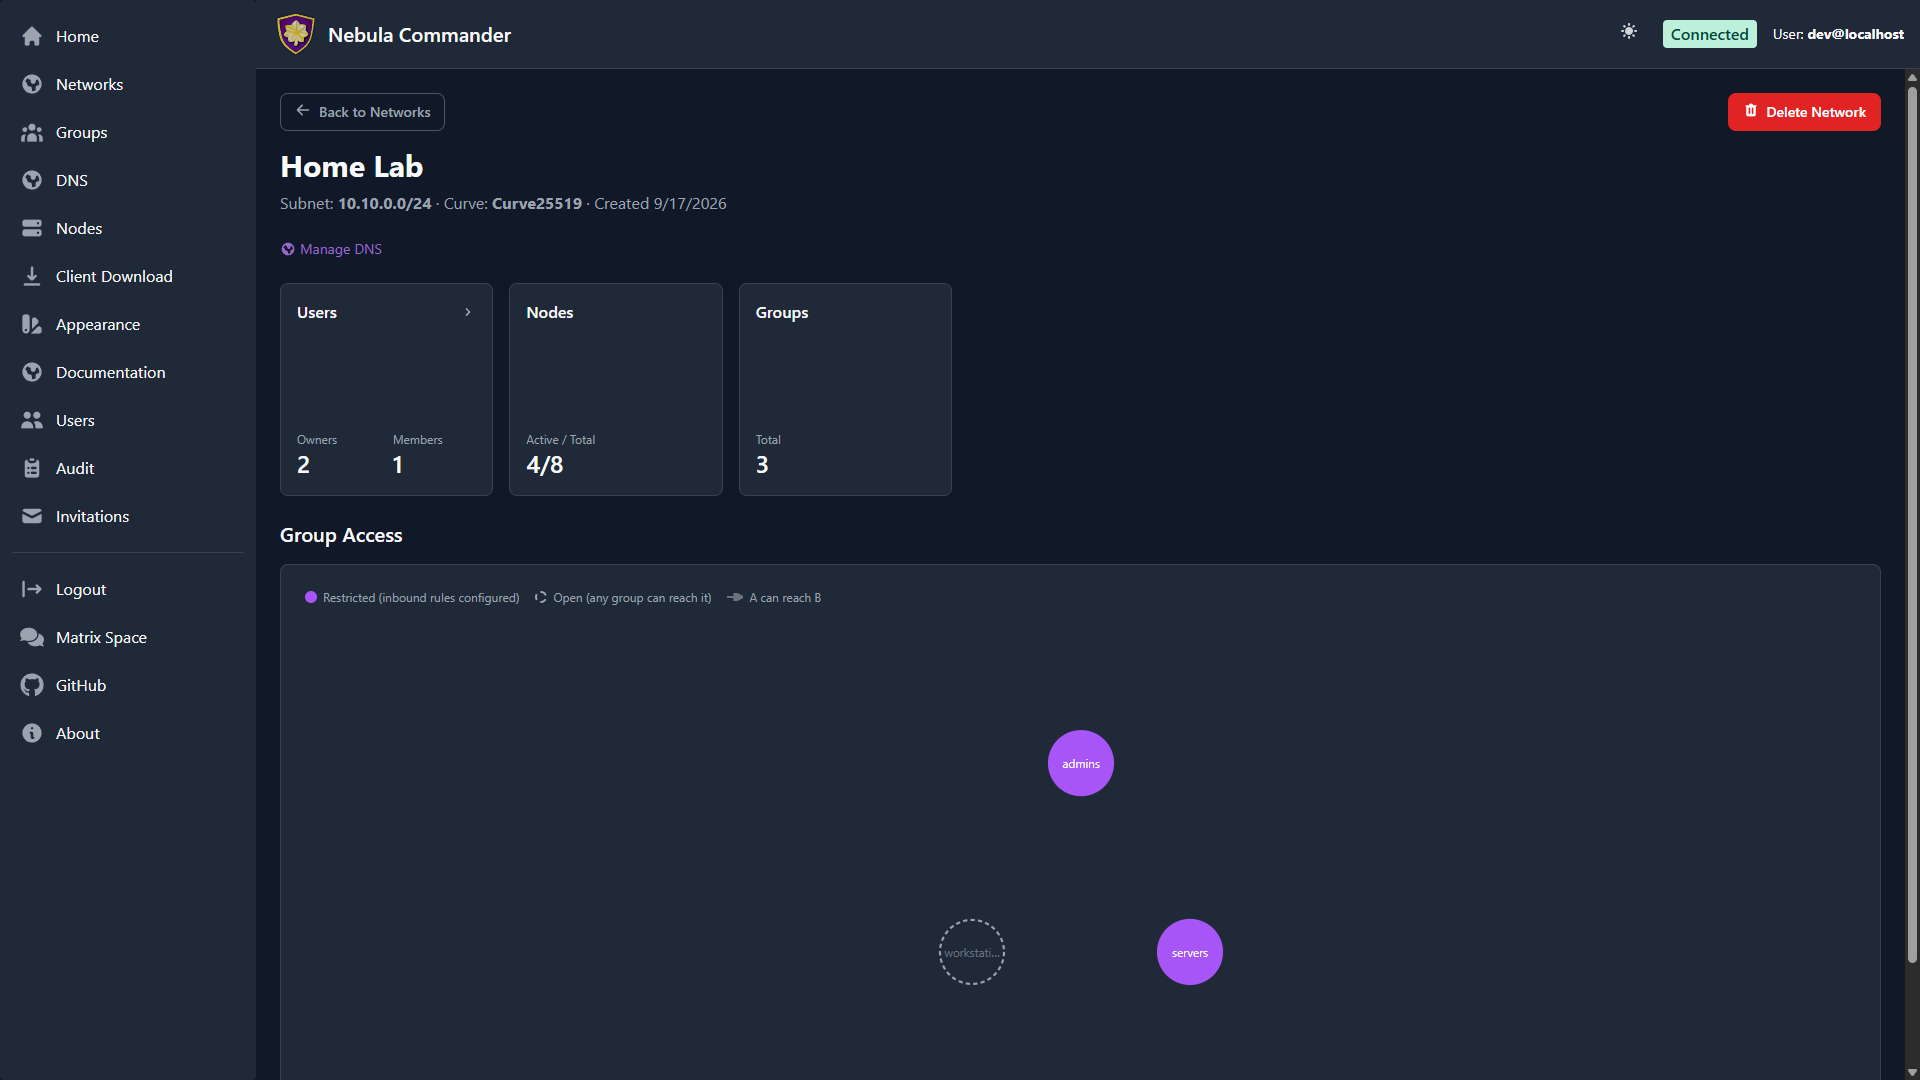
Click a network’s card to open its detail view: node/user/group counts and the
Group Access Diagram, a live visualization of which groups can reach which
(see Groups for what restricted vs. open means).
| Light | Dark |
|---|
 |  |
Adding a new network
- Open Networks in the sidebar.
- Click Add Network.
- Fill in the form:
- Network Name – A label for the network (e.g.
production, home). Must be unique and non-empty. - Subnet CIDR – The IPv4 range for this network. Example:
10.100.0.0/24. Node IPs are assigned from this range. Choose a range that does not overlap with your existing networks or LAN. - Certificate Curve – Curve25519 (default) or P256, opt-in per network. Applies to every node’s certificate on this network and can’t be changed after creation.
- Click Create Network. The new network’s card appears in the grid.
You can create multiple networks to separate environments (e.g. dev, staging, prod) or teams.
The network grid
Each card shows the network’s name and subnet CIDR, plus a 2×2 stat grid: Nodes
(active/total), Groups, DNS Entries, and Users — all computed
server-side, so they’re accurate the instant the page loads. Click a card to open
its detail page.
The Home dashboard shows the same card grid for a quick at-a-glance overview
across all your networks — the Nodes stat there additionally shows an offline count
when any node has gone dark, and the DNS/Groups stats are scoped to what you
specifically have permission to see on each network (you’ll see “Restricted”
instead of a number on a network where you don’t have that access).
Network detail page
Clicking a network card opens its detail page: three summary cards for Users
(owners/members, click to manage — add, edit role, or remove — in place), Nodes
(active/total, click to jump to the filtered Nodes page), and
Groups (total count, click to jump to the filtered Groups
page). Below the summary cards is the Group Access Diagram — a graph of every
group on the network, showing which groups can reach which others based on the
inbound firewall rules configured on the Groups page. A
solid circle means the group has at least one inbound rule configured
(“restricted”); a dashed circle means it has none, which under Nebula’s own default
means any group can reach it (“open”), not that it’s unreachable.
As a network owner you can also configure DNS (split-horizon
domain and aliases) for the network from here.
Deleting a network
Deleting a network is a critical action, moved to the network’s detail page. The UI
requires you to reauthenticate before the delete is performed.
- Open the network’s detail page and use the Delete Network action.
- A modal opens asking you to type the network name to confirm.
- Type the exact network name and confirm. You are redirected to the OIDC provider (or dev login) to reauthenticate.
- After reauthentication, you are returned to the UI and the network is deleted.
Ensure no nodes or critical services depend on the network before deleting. Deletion removes the network and its node/certificate data from Nebula Commander.
5.2 - Groups
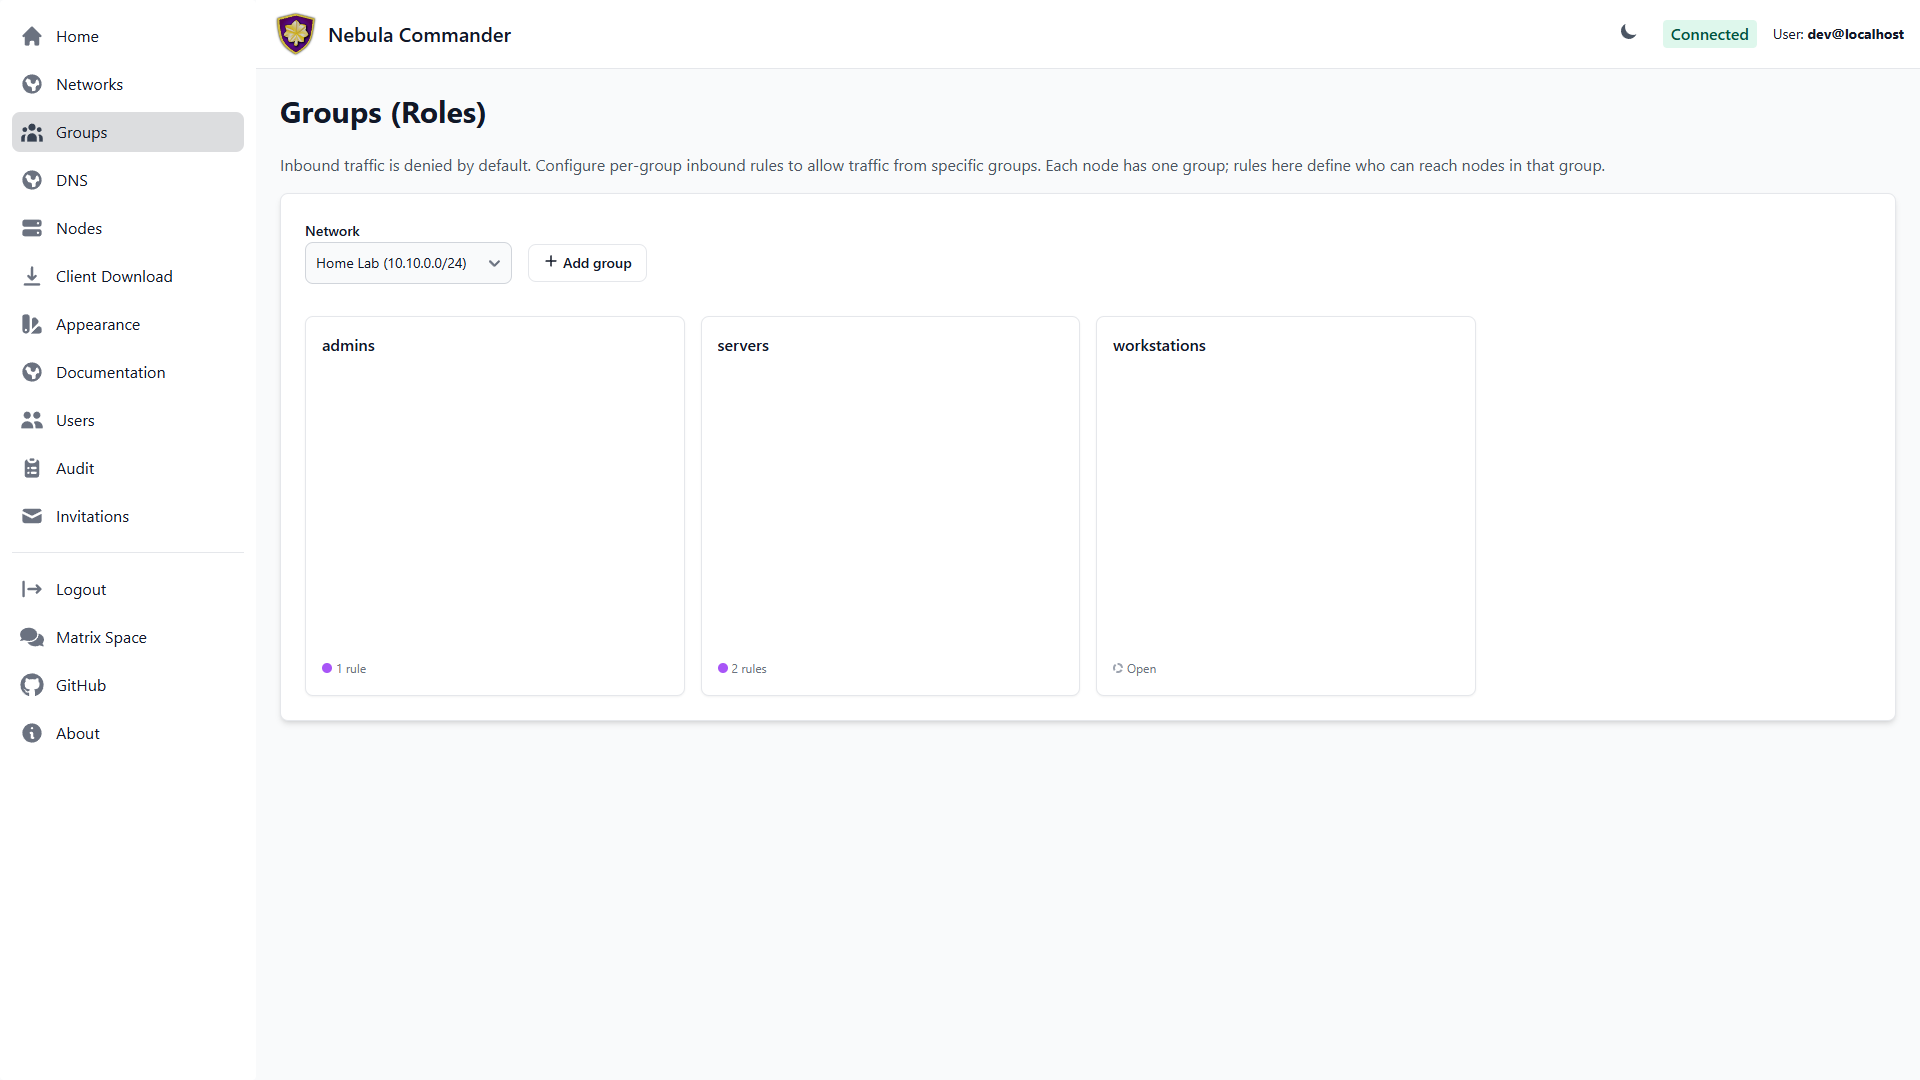
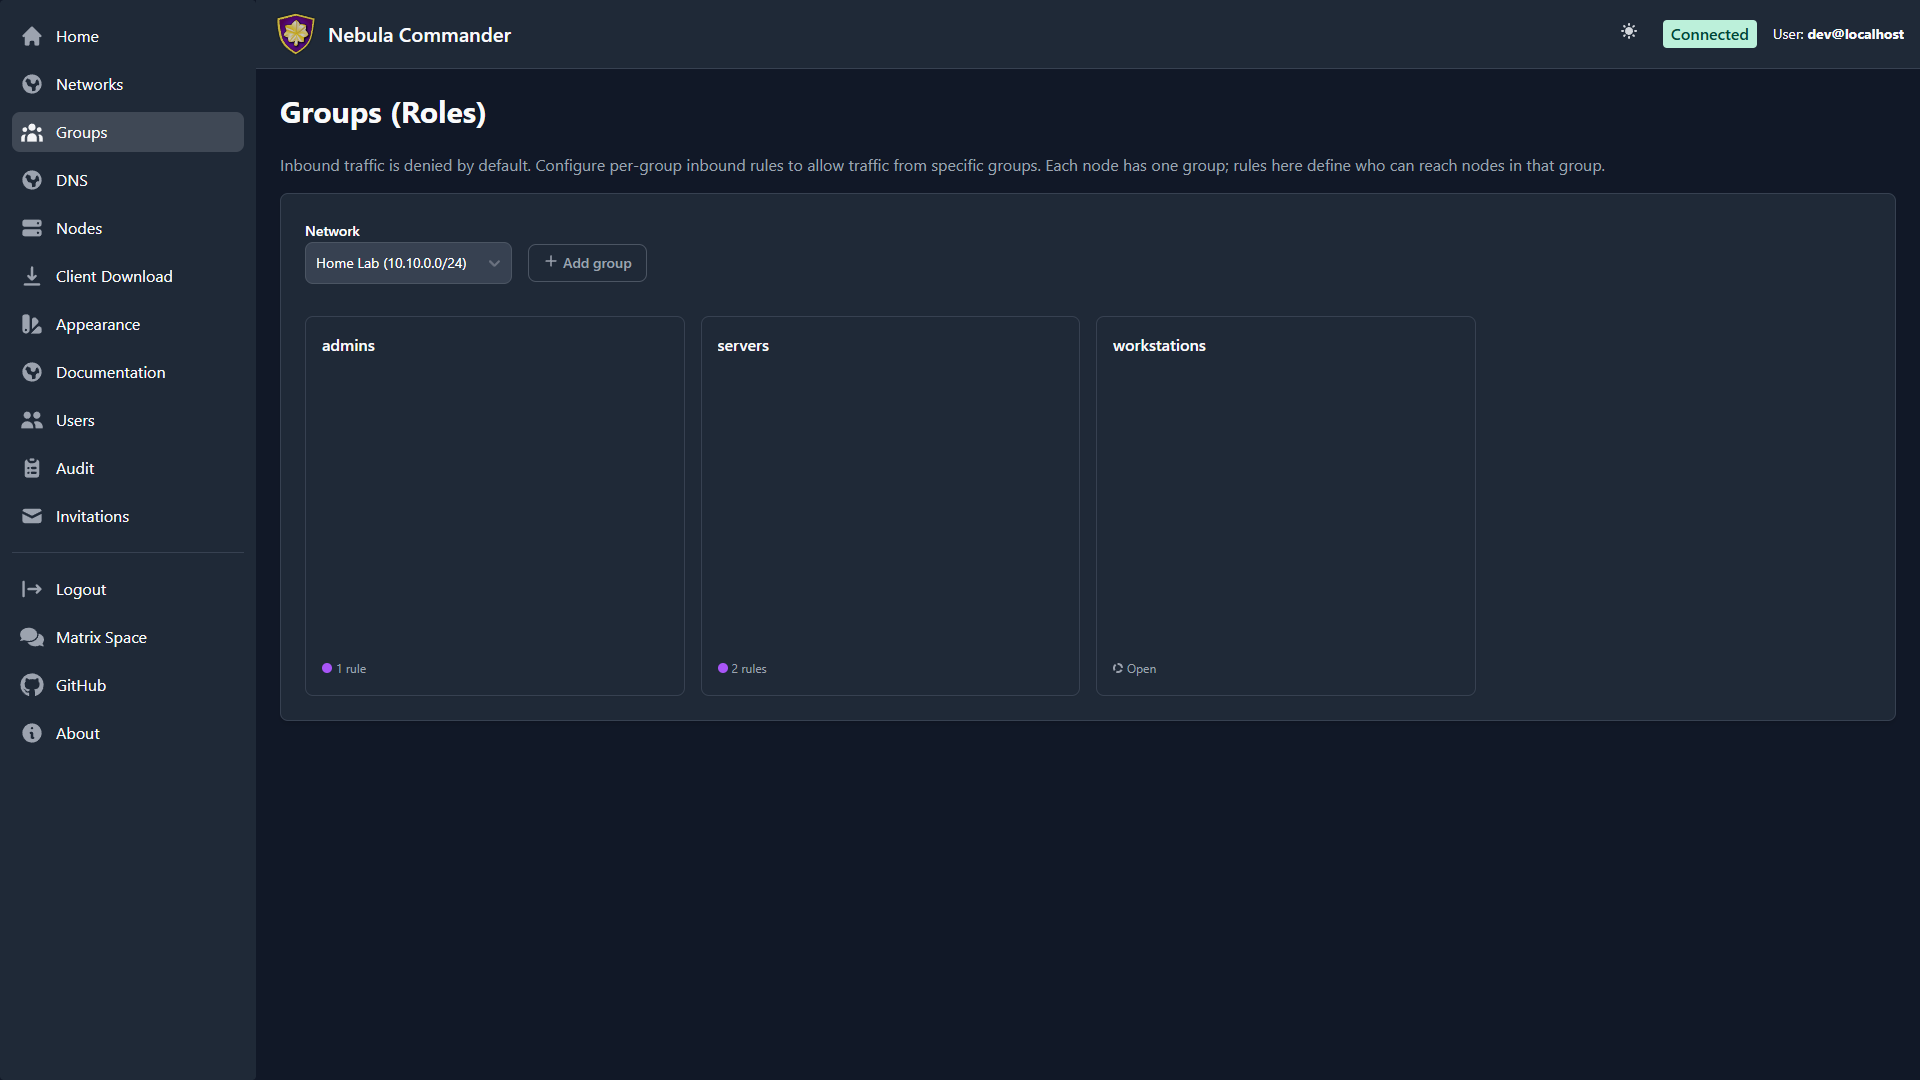
The Groups page lets you define Nebula security groups and their inbound firewall rules per network. Groups are used by nodes (each node has one group). Firewall rules control which other groups can send traffic to this group and on what protocol and ports.
| Light | Dark |
|---|
 |  |
Selecting a network
At the top of the Groups page, choose a network from the dropdown. Groups and rules are per network. Only networks you have access to appear in the list.
What groups are
In Nebula, a group is a tag (e.g. laptops, servers, admin) that you assign to nodes. The firewall then allows or denies traffic based on group membership. On this page you define the inbound rules for each group: which other groups can connect to this group, and on which protocol and port range.
The group grid
Groups show as a grid of square cards, one per group. Each card shows the group
name and a status indicator at the bottom: a solid dot and rule count if the group
has inbound rules configured (“restricted”), or a dashed outline reading “Open” if
it has none — under Nebula’s own default, a group with no inbound rules can be
reached by any other group, not by none. The same restricted/open coloring
appears in the Network detail page’s
Group Access Diagram.
Adding a group
- Select the network.
- Click Add group and enter a name (e.g.
servers). Group names are case-sensitive and must be unique within the network. - Submit. The group’s card appears in the grid with an empty set of inbound rules — click it to add rules (see below).
Groups are also created implicitly when you create a node and assign it a group that doesn’t exist yet.
Firewall rules per group
Click a group’s card to open its rule editor in a modal. For each group you configure inbound rules: who can send traffic to this group.
| Field | Description |
|---|
| Allowed group | The name of the other group that is allowed to send traffic to this group. |
| Protocol | any, tcp, udp, or icmp. |
| Port range | Port or range (e.g. 80, 443, 8000-8010) or any for all ports. |
| Description | Optional note for the rule. |
Example: To allow the group laptops to reach the group servers on TCP ports 80 and 443, add an inbound rule on the servers group with allowed group laptops, protocol tcp, and port range 80,443 (or two rules if your UI uses one port per rule).
Rules are stored per group. After editing rules, click Save in the modal. Changes apply when Nebula config is regenerated (e.g. when ncclient polls or you re-download config).
How to leverage groups
- Segment by role – Put nodes in groups like
laptops, servers, iot. Then allow only laptops and servers to reach iot on specific ports, and only servers to talk to each other on admin ports. - Least privilege – Only add inbound rules that are needed. Avoid
any/any unless intentional. - Node assignment – On the Nodes page, when you create or edit a node you set its group. That node is then subject to the inbound rules defined for that group on this page.
A group with no inbound rules is open, not blocked — Nebula’s own default is
that any group can reach a group with an empty rule list, the opposite of what
you might expect from “inbound rules.” Add rules only once you want to start
restricting who can reach a group; an empty rule list is not a safe default-deny
state.
5.3 - DNS
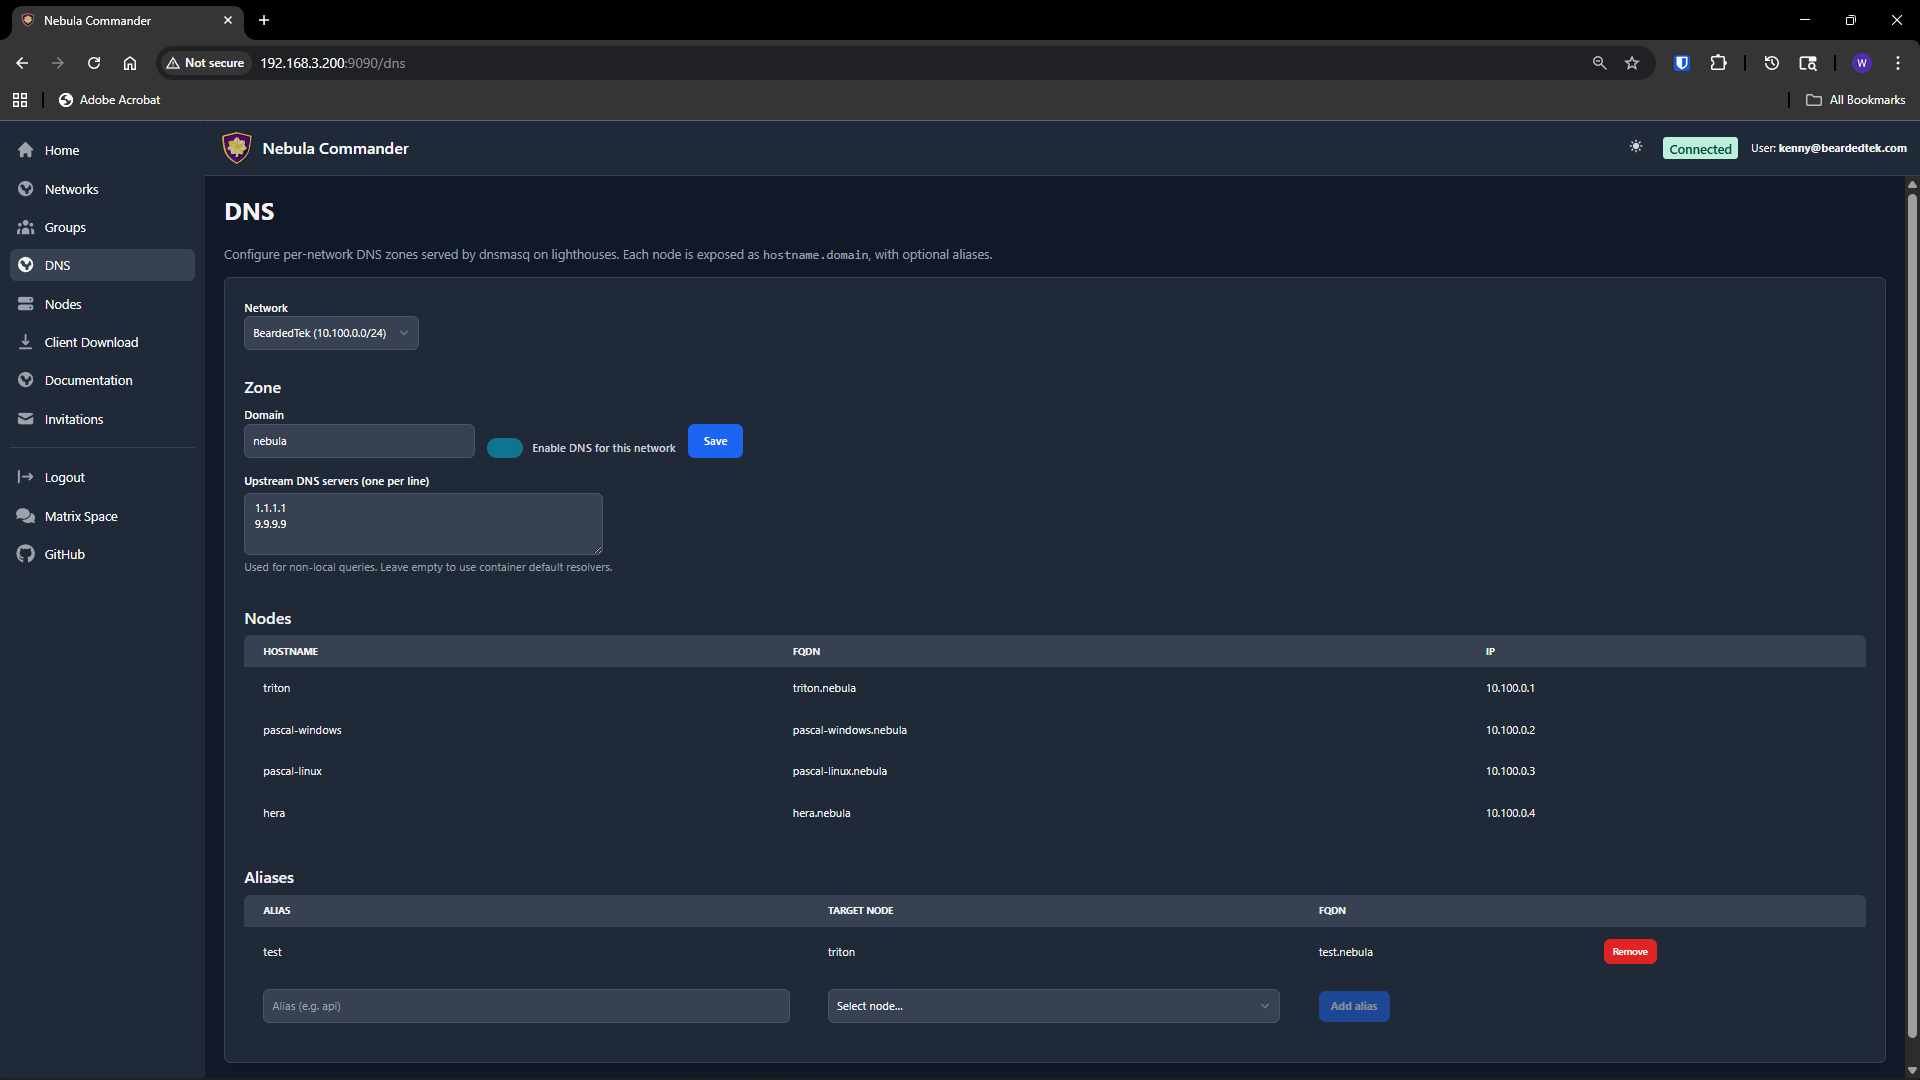
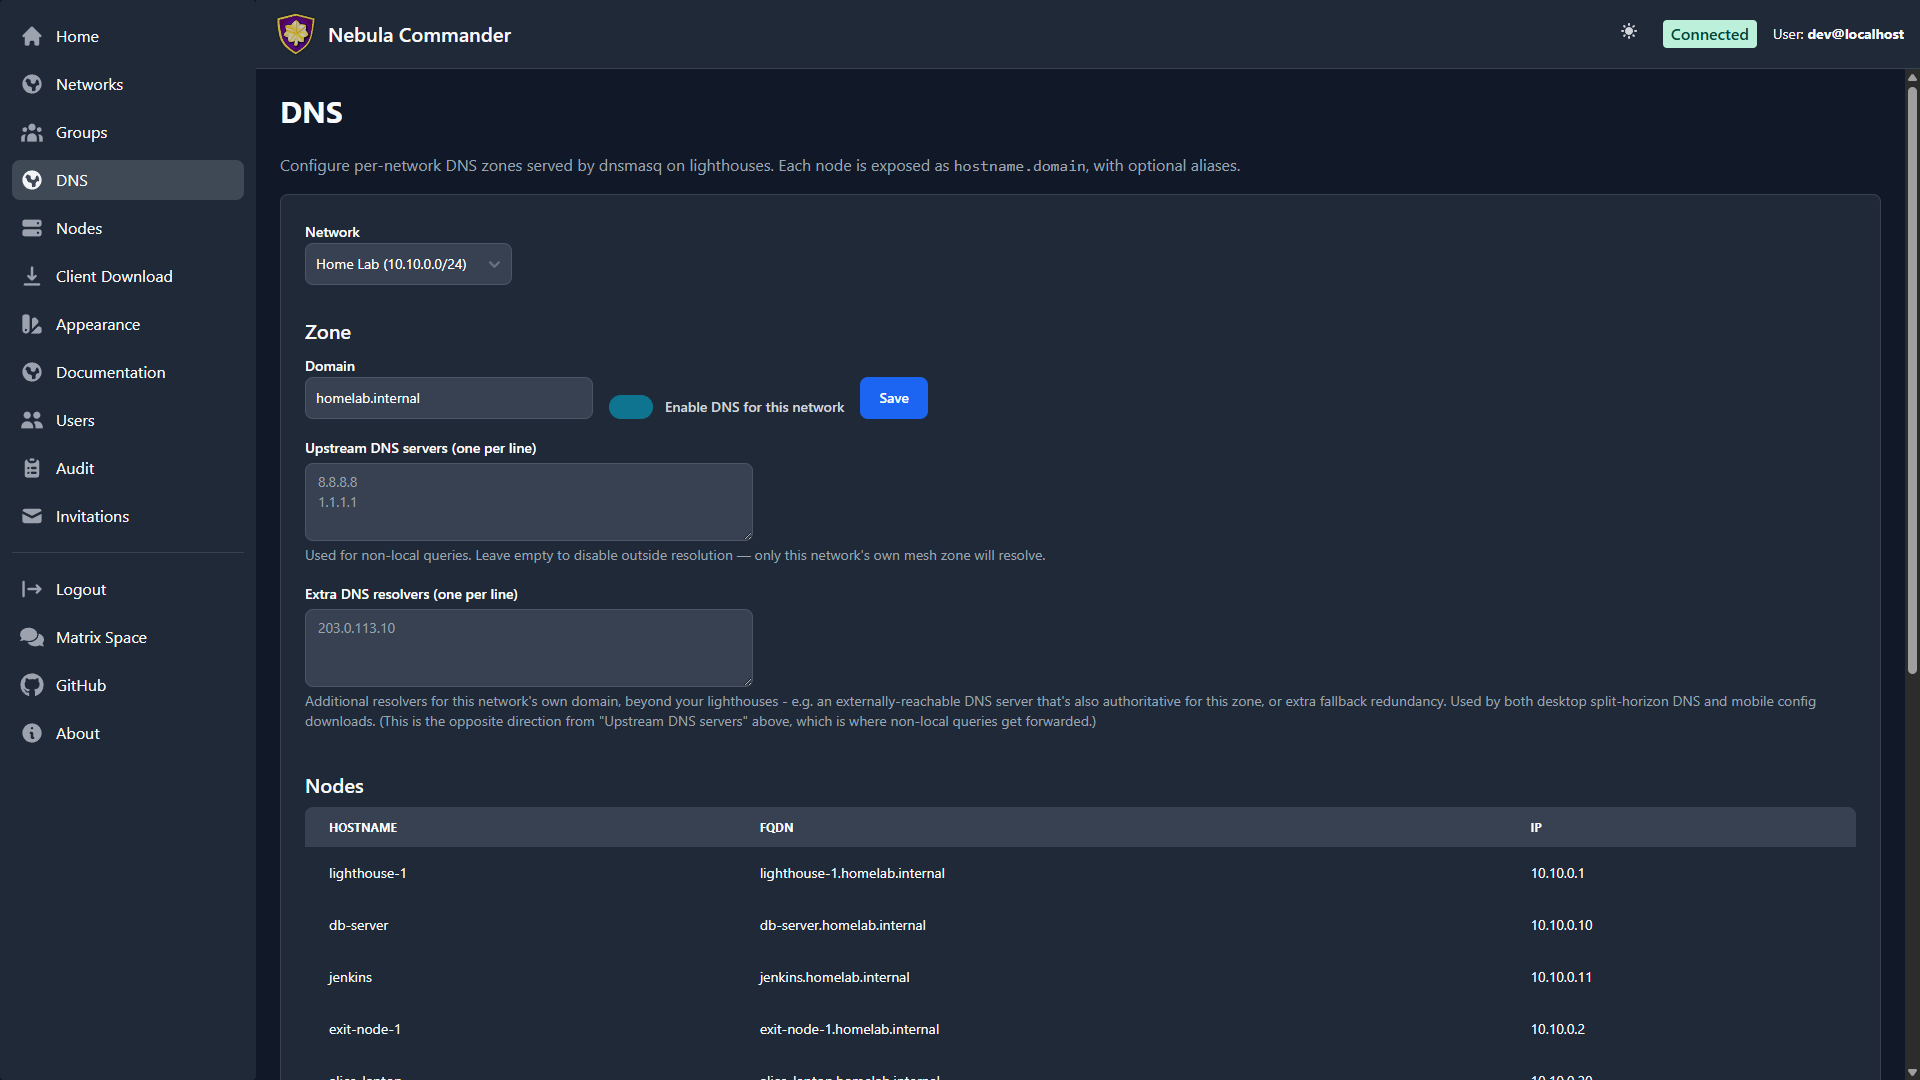
The DNS page configures split-horizon DNS per network: a domain and optional hostname aliases that resolve to nodes inside the Nebula overlay. When enabled, lighthouses (or the Docker ncclient stack) can run dnsmasq to serve this domain; enrolled devices can use ncclient with --accept-dns to resolve the Nebula domain via the overlay.
| Light | Dark |
|---|
 |  |
Access
Only network owners can view or change DNS for a network. Select a network from the dropdown at the top; the page shows the current DNS config and aliases for that network.
DNS config
- Domain – The DNS domain for this network (e.g.
mynet). By default it is the network name. Queries for *.<domain> (e.g. node1.mynet) are resolved by the server’s dnsmasq using the aliases and node IPs. - Enabled – Turn DNS on or off for the network. When disabled, device endpoints
/api/device/dns-client-config and /api/device/dnsmasq.conf return 404 for devices in this network. - Upstream servers – Optional list of upstream DNS servers (one per line) used by dnsmasq for non-Nebula queries when running in the lighthouse/container client.
Save changes with the Save button. The domain is used when generating dnsmasq config for devices (e.g. the Docker ncclient container) and in the dns-client config returned to ncclient when using --accept-dns.
Aliases
Aliases map hostnames to nodes. For example, alias server1 pointing to node prod-1 lets users reach that node as server1.<domain> over the overlay.
- Add alias – Enter a hostname label (e.g.
gateway, db) and choose the node it should resolve to. The alias must be unique within the network. Click add to create it. - Delete – Use the delete action next to an alias to remove it.
Aliases are used in the dnsmasq zone served to devices; only nodes that are lighthouses in the network can serve DNS to other devices (e.g. the Docker client runs dnsmasq in the same container as Nebula).
Device and API
- Enrolled devices fetch dns-client config from
GET /api/device/dns-client-config (domain + DNS server IPs) and, when running in a container or lighthouse, dnsmasq config from GET /api/device/dnsmasq.conf. See API: Device and API: Networks DNS.
5.4 - Nodes
The Nodes page shows every node across networks (or filtered to one network) as
a grid of square cards. You create nodes, assign IPs and groups, create or sign
certificates, generate enrollment codes for ncclient,
download config, and — new since v0.3.7 — pick which other node each one should
route through as a subnet router or exit node.
| Light | Dark |
|---|
 | 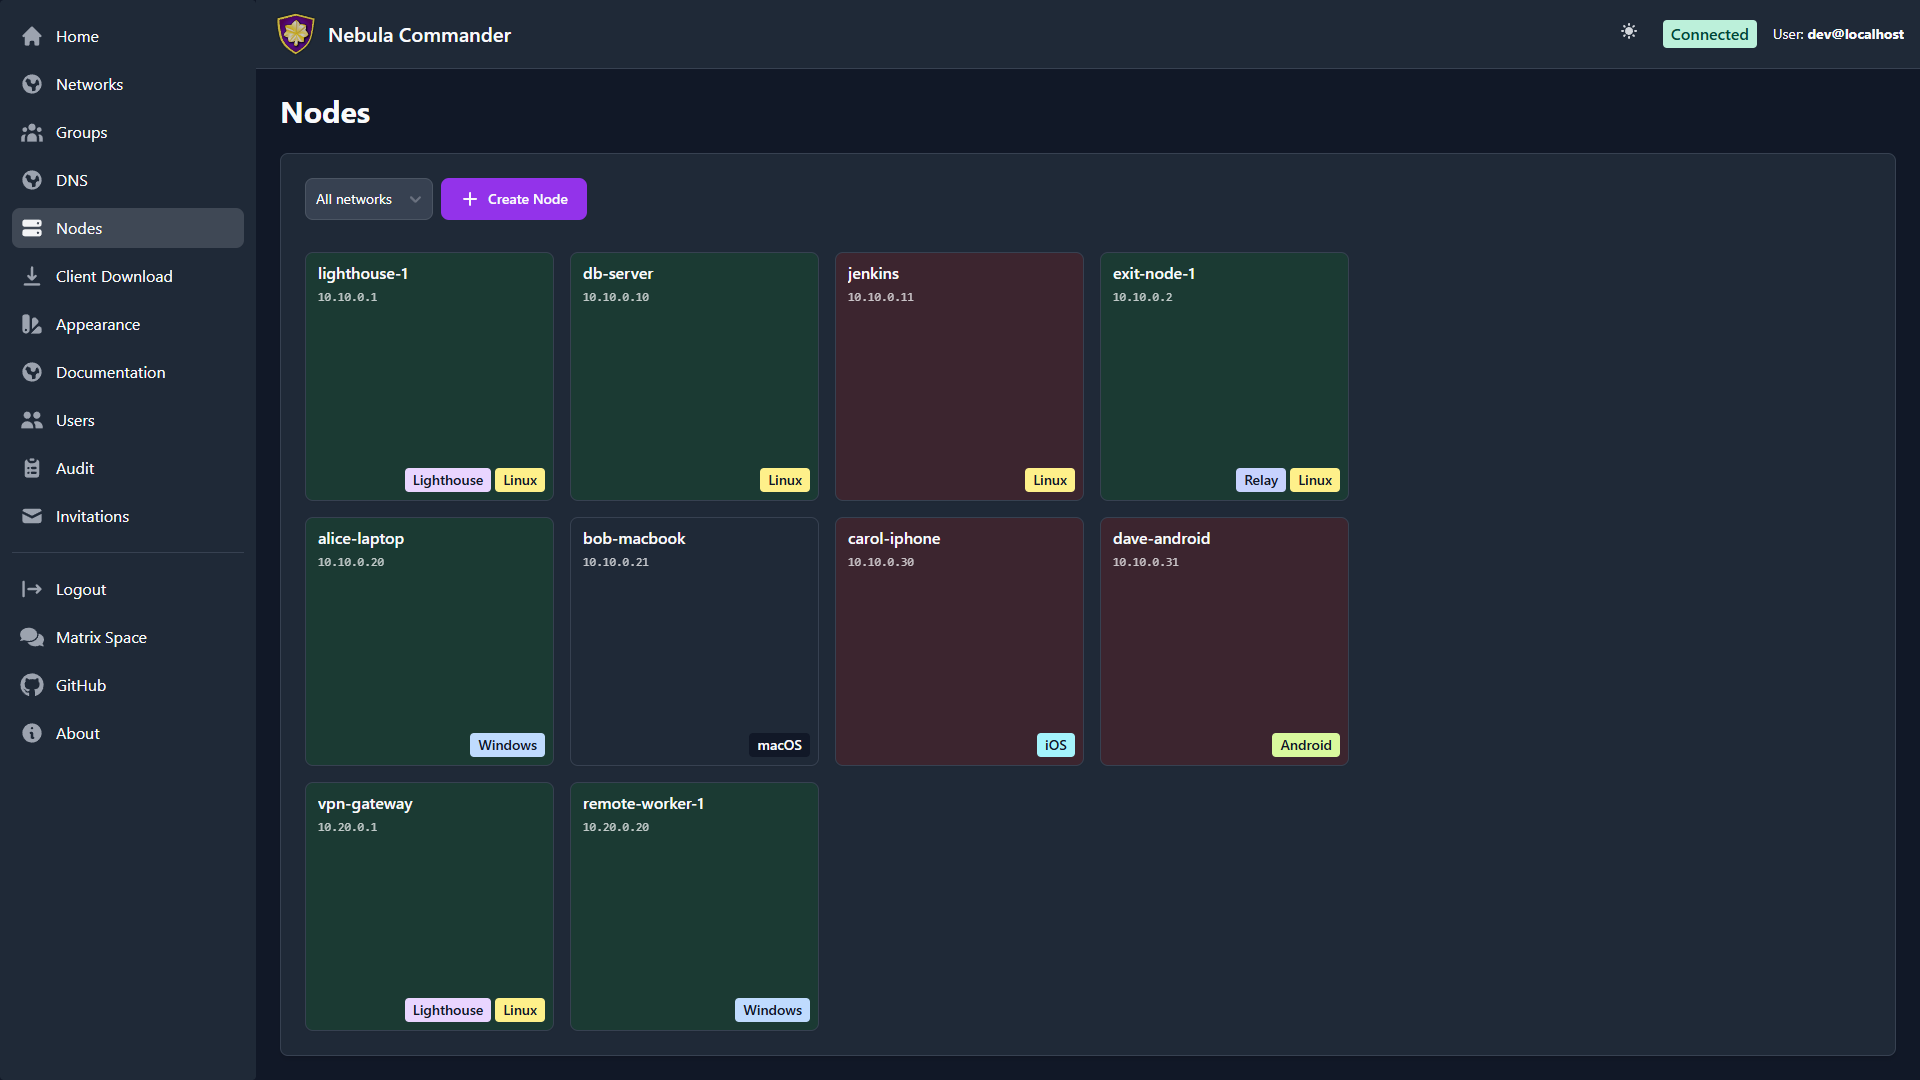 |
The node grid
Each card is color-coded by status — never checked in, active, or inactive — and
carries a bottom-right badge cluster: Lighthouse, Relay, and a type/OS badge
(iOS, Android, Windows, Linux, macOS, or a generic Node
fallback until the platform is known). Hostname and IP sit at the top of the card,
always drawn above the badges so a long badge row can never hide them, even on a
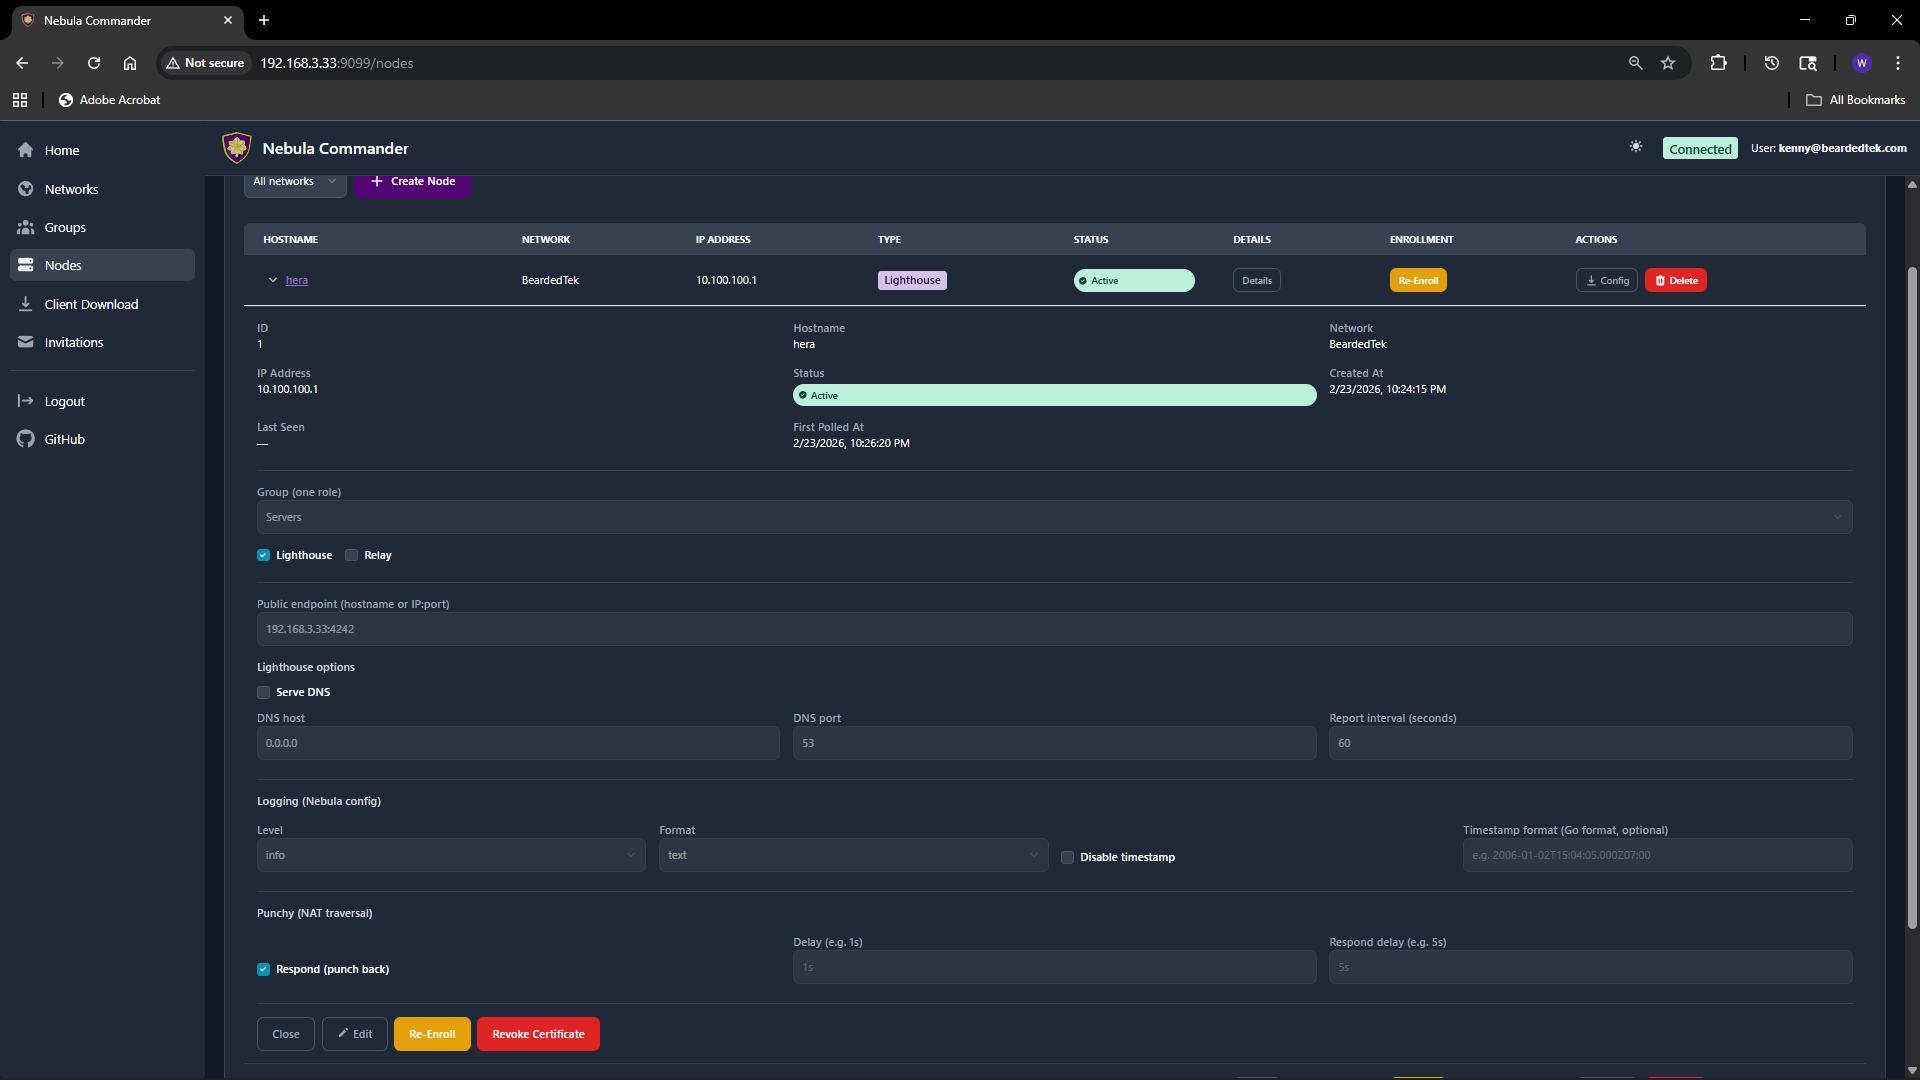
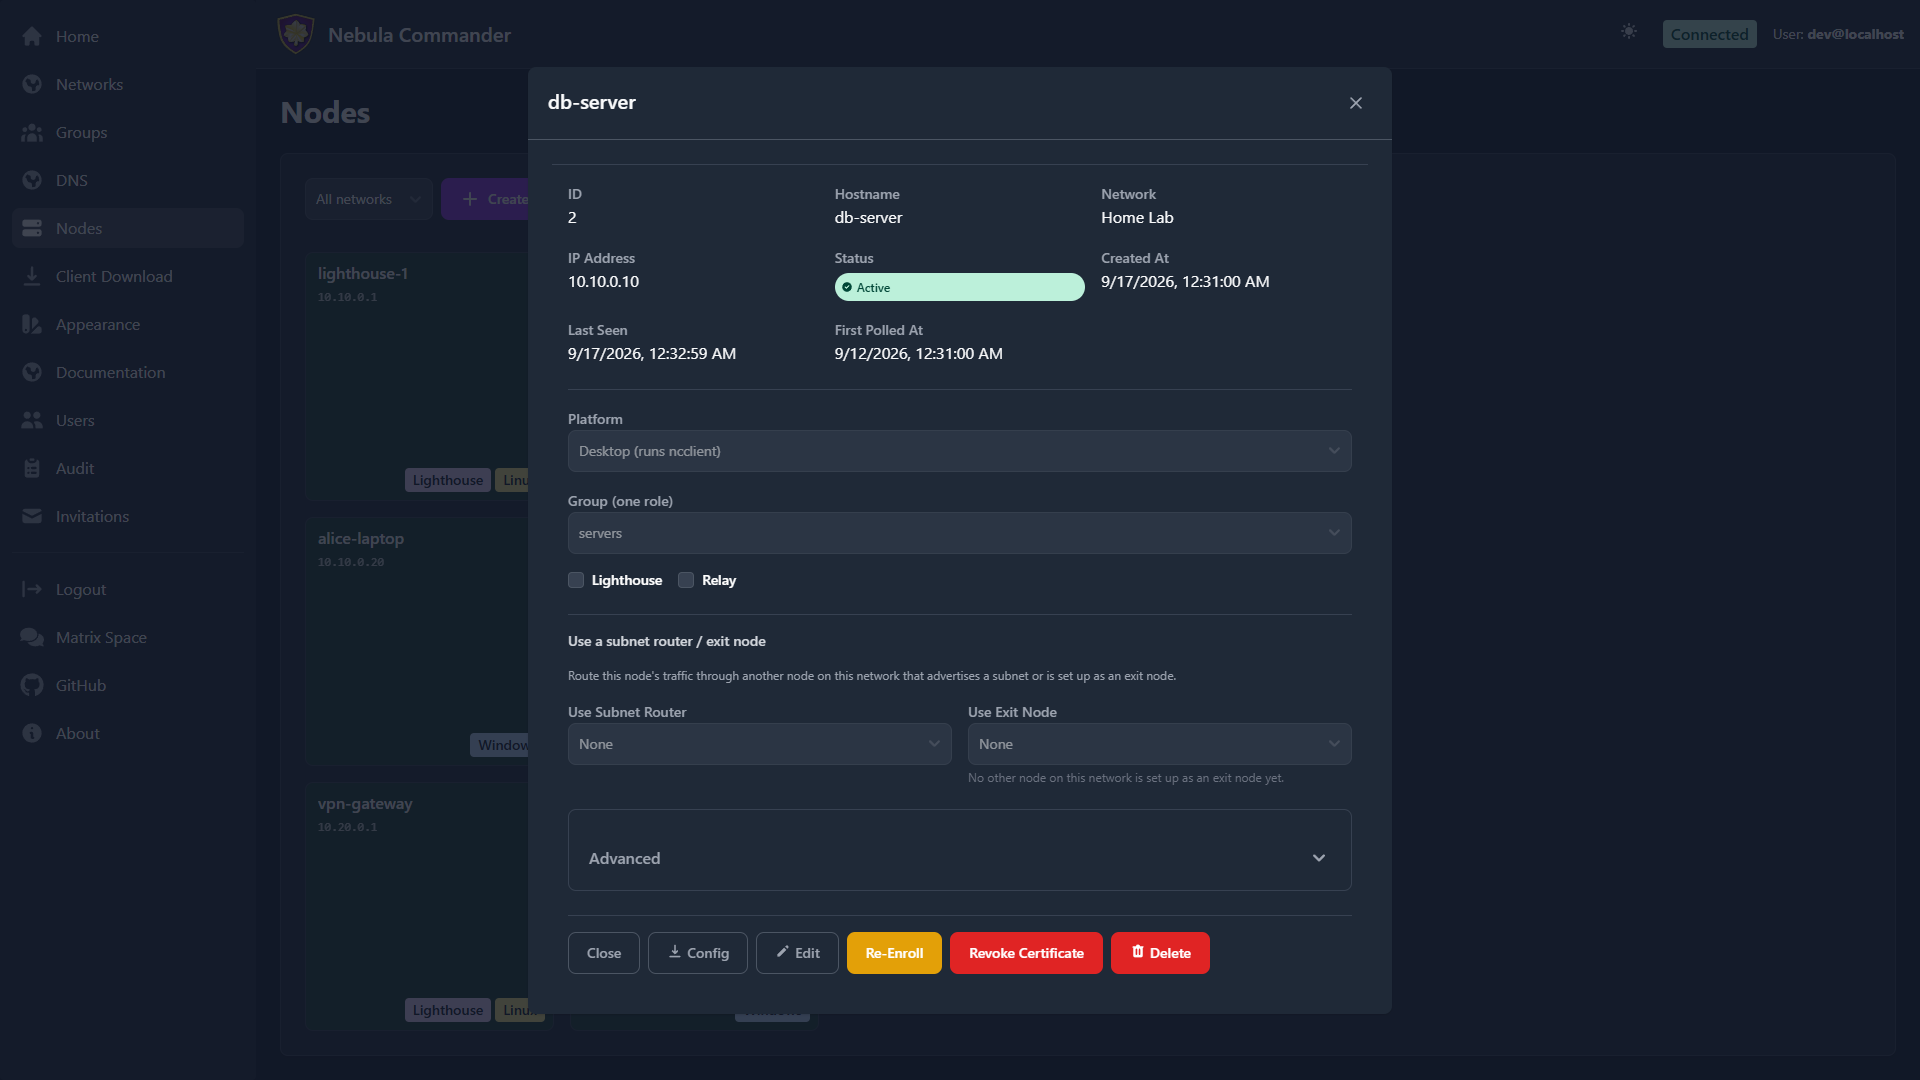
narrow phone screen. Click a card to open its details panel:
| Light | Dark |
|---|
 |  |
All of these colors,
including the status backgrounds and badge colors, are user-configurable — see
Appearance.
Creating a node
- Open Nodes and optionally filter by network.
- Click Create Node. Pick a network first if you haven’t filtered to one.
- Enter a hostname (e.g.
laptop-alice, server-1). The hostname identifies the node and is used in certificates and config. - The server assigns an IP address from the network’s subnet, or you may suggest one.
- Set the node’s group (e.g.
laptops, servers). The group is used for firewall rules and must match a group defined for that network. - Set the platform — Desktop (runs
ncclient), iOS, or Android. - Optionally set a public endpoint (
hostname:port or IP:port) if other nodes can reach this one at a fixed address. See the details panel below. - Submit. The node is created, its certificate is issued, and its card appears in the grid.
The node details panel
Click a card to open its details. The fields visible by default are the ones you’re
likely to change often:
| Field | Description |
|---|
| Platform | Desktop, iOS, or Android. Converting an existing node changes how it’s enrolled — see Mobile nodes below. |
| Group | Nebula security group for this node. Used for firewall (see Groups). |
| Lighthouse | If enabled, this node acts as a Nebula lighthouse (others can punch through to it). Desktop only. |
| Relay | If enabled, this node can relay traffic for other nodes. Desktop only. |
| Public endpoint | Optional hostname:port or IP:port where other nodes can reach this one directly (Nebula’s UDP port, usually 4242; IPv6 as [2001:db8::1]:4242). Every node’s endpoint is added to every other node’s static_host_map, so peers can connect without asking a lighthouse first. Lighthouses and relays need one. Clear the field to remove it. For more addresses, see Additional reachable addresses under Advanced and Public Endpoints & Reachable Addresses. |
| Use Subnet Router | Pick another node on this network to route this node’s traffic to its advertised subnets through. See Subnet Routers and Exit Nodes. |
| Use Exit Node | Pick another node to route all of this node’s traffic through (full-tunnel). Same doc as above. |
Advanced
Settings you set once and rarely touch again are tucked under an Advanced
disclosure at the bottom of the panel:
- Logging — Nebula’s own log level, format, and timestamp options.
- Punchy — NAT hole-punching behavior (respond, delay, respond delay).
- Additional reachable addresses — extra
IP:port addresses this node reports
to the lighthouses (a port forward, a second uplink), added one at a time with a
delete button on each. Not shown for lighthouses. See
Public Endpoints & Reachable Addresses. - Subnet Router & Exit Node Config — the gateway side of routing: which local
subnets this node advertises (auto-discovered on Linux nodes running
ncclient,
or entered by hand under Other), plus a “Used by” list per route where you
add the groups and individual hosts that may consume it. - Exit Node — the gateway-side exit-node toggle (Exit node (route all
traffic)) and its own “Used by” picker.
If you’re setting up a node to be a subnet router or exit node for others, that’s
all under Advanced. If you just want this node to use one that already exists,
the visible Use Subnet Router/Use Exit Node dropdowns are all you need.
Certificates: Create vs Sign
For each node you need a host certificate. Two flows:
- Create certificate – The server generates the private key and certificate. You can download a bundle that includes
host.key, host.crt, and ca.crt. Use this when the device does not already have a key (e.g. ncclient or you will copy the bundle to the device). - Sign certificate – You generate the private key on the device; the server only signs the cert. The server never has
host.key. After signing, download host.crt and ca.crt and place them on the device next to your existing host.key.
Choose Create for simplicity when the server can hold the key (or when you will deploy the bundle once). Choose Sign when you want the key to never leave the device.
Enrollment code (for ncclient)
After the node exists and has a certificate, you can generate an enrollment code for ncclient. Open the node’s card and click Get Enrollment Code. Copy the one-time code. On the device run:
ncclient enroll --server https://YOUR_NEBULA_COMMANDER_URL --code XXXXXXXX
The device stores a token and can then use ncclient run to pull config and certs. See Client Download for binaries.
Download config
You can download the node’s Nebula config and certs (e.g. config.yaml, ca.crt, host.crt, and host.key if Create was used). Use this for manual (nebula) setup or backup.
Revoke, re-enroll and delete
- Revoke certificate: takes the node off the network but keeps its record, so it can be re-enrolled later. Requires reauthentication and typing the node’s hostname to confirm.
- Re-enroll: issues the node a new certificate and enrollment code (for example if the device’s token was lost, or the device is being replaced), and retires the old certificate.
- Delete node: removes the node and its certificate from Nebula Commander. Requires reauthentication and typing the node’s hostname to confirm.
All three retire the node’s current certificate in the same way:
- Every other node rejects it. Its fingerprint goes on the network’s certificate blocklist (Nebula’s
pki.blocklist), which every node picks up on its next config poll (within its poll interval, 60 seconds by default). Existing tunnels using it are dropped. This works even if the device keeps a copy of its key and ignores the server. - The device shuts itself down. Its token stops working;
ncclient then stops Nebula and deletes its config and key from disk, and waits to be enrolled again. - Its IP address is held until the old certificate would have expired, so it isn’t given to a different node in the meantime. A re-enrolled node gets its own address back.
Changing a node’s group, or which subnets it advertises, re-issues its certificate; the previous certificate is blocklisted the same way, so the old group’s firewall access really goes away.
Certificates revoked before v0.7.0 can’t be blocklisted retroactively, because no fingerprint was kept for them. If that matters for your network, re-create the network to get a new CA.
If Nebula Commander is unreachable
Nodes keep working: the mesh doesn’t depend on the server, only on lighthouses. A node that restarts while the server is down starts Nebula from its last known config. Config, route and DNS changes, and revocations, reach a node once it can poll the server again.
Mobile nodes (iOS/Android)
There’s no ncclient agent for mobile, so mobile nodes skip the enroll-code flow
entirely. Set a node’s platform (Desktop, iOS, or Android) when creating or
editing it — a mobile node can’t also be a lighthouse or relay. Instead of an
Enroll button, a mobile node’s card shows a download config.yaml action: that
file is the same one GET /nodes/{id}/config always generates (inline
cert/key/CA already embedded), which is exactly the format the official Nebula
app from defined.net’s “Add Site → From file” import
expects.
Split-horizon DNS for mobile is platform-specific: iOS applies it
automatically whenever the network has DNS enabled (no per-node opt-in needed);
Android has no scoped equivalent, so it’s an explicit opt-in checkbox — when
enabled, all device DNS routes through the network’s lighthouse(s) while
connected.
5.5 - Client Download
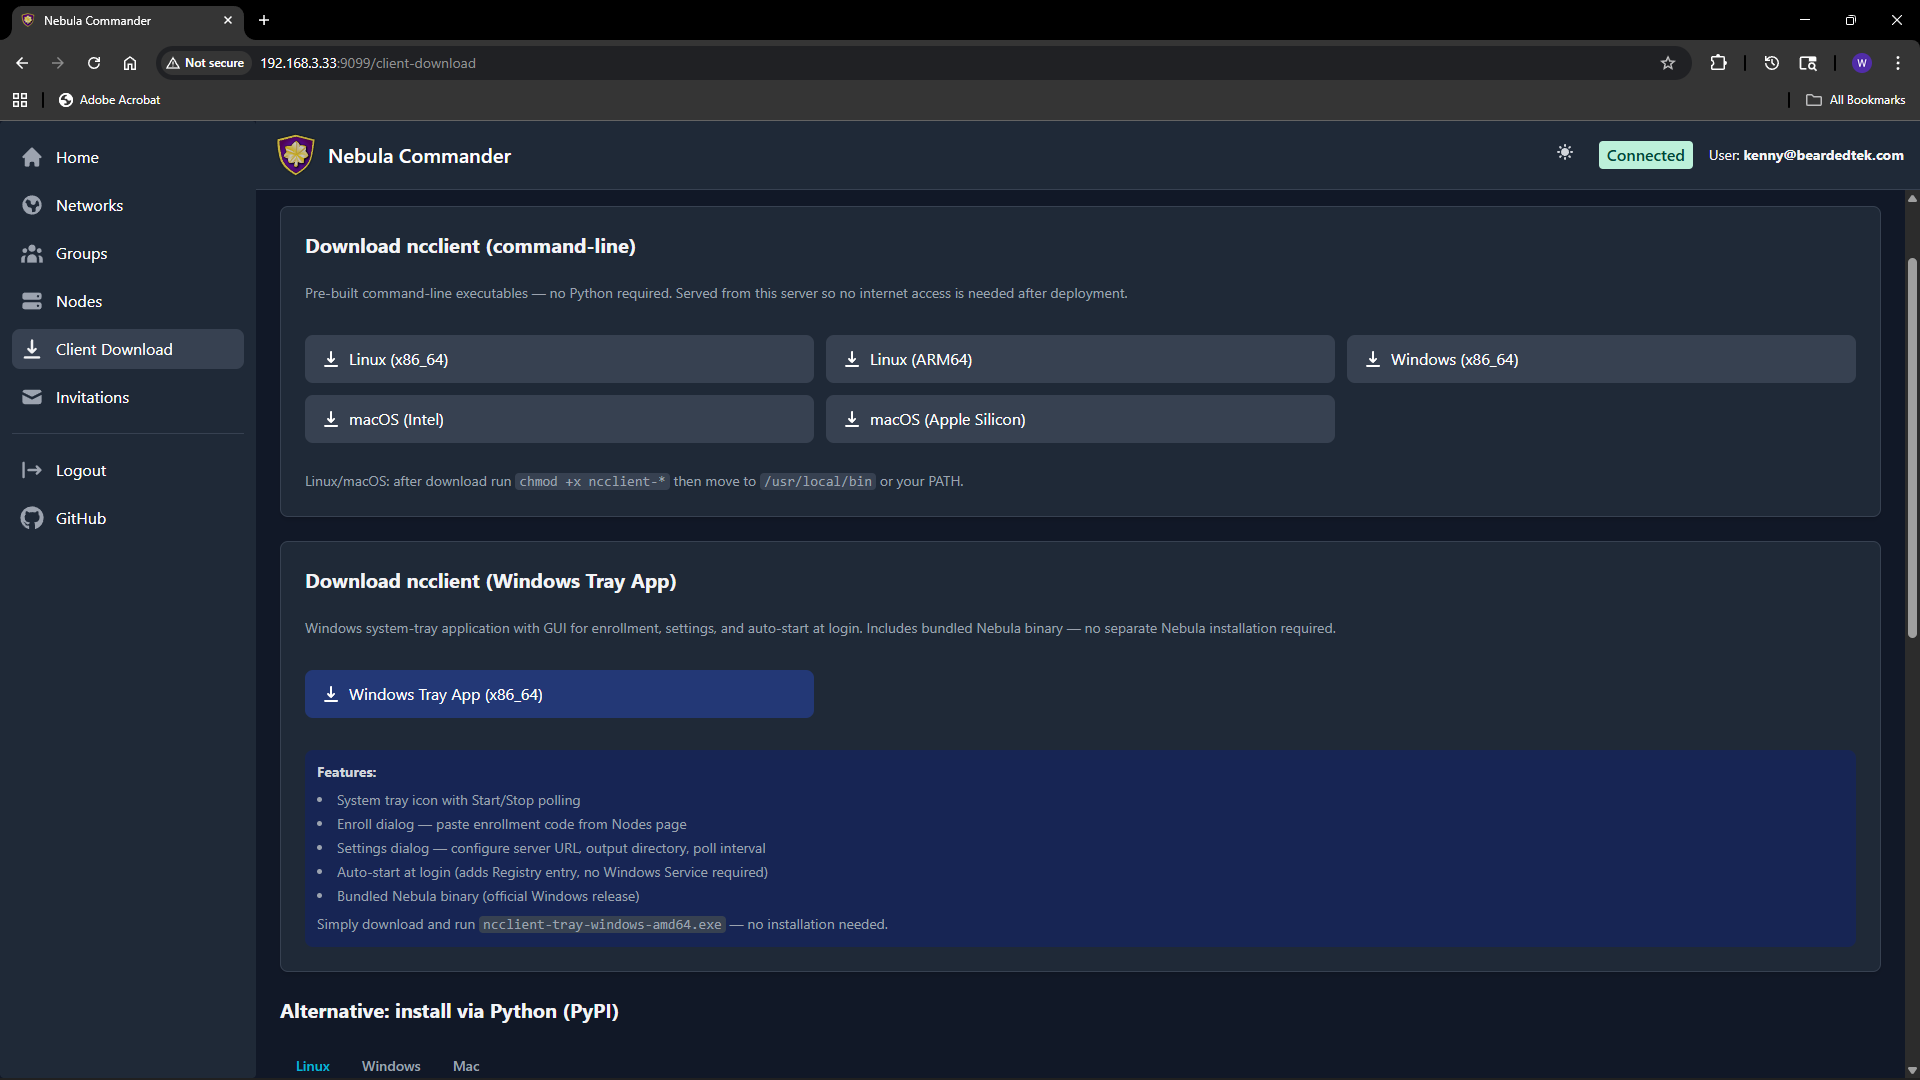
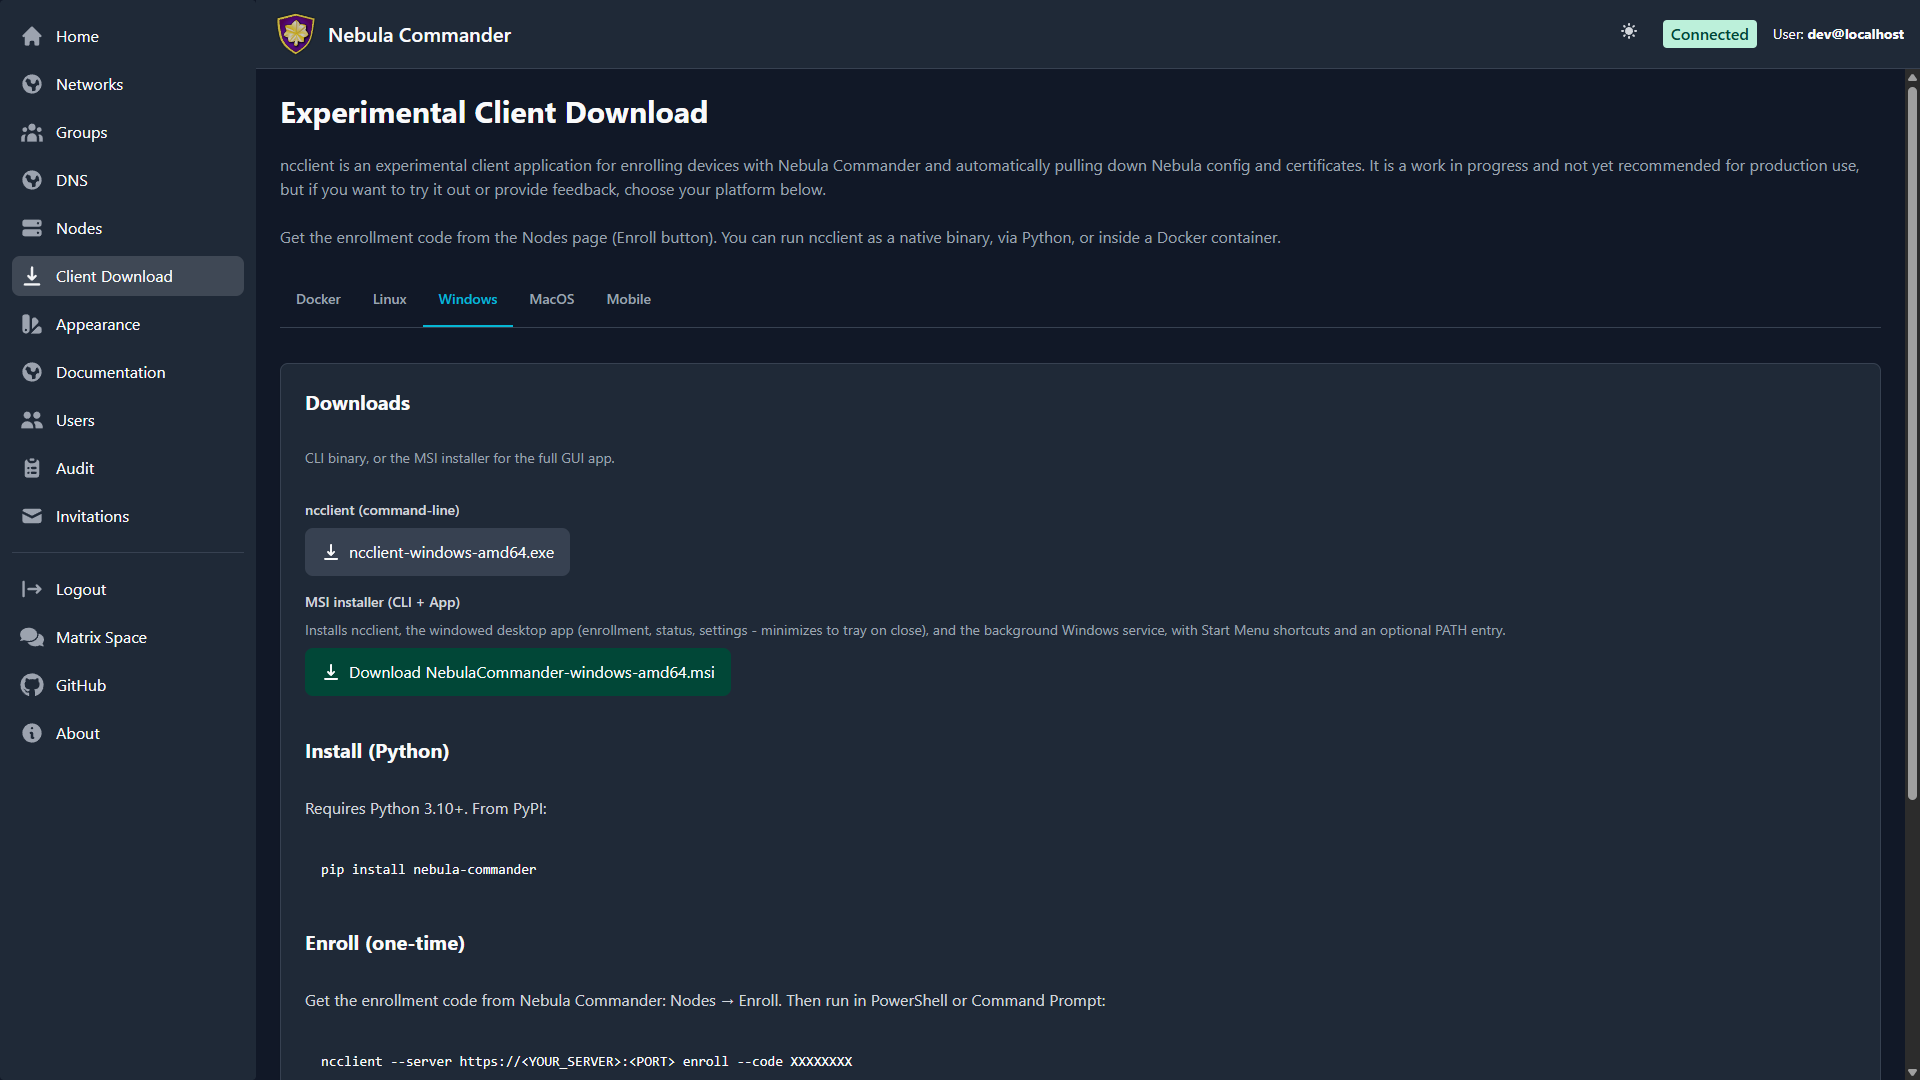
The Client Download page (also reachable from the sidebar or at /client-download) lets users download ncclient binaries served directly from your Nebula Commander instance. No internet access to GitHub is required after deployment.
| Light | Dark |
|---|
 |  |
Purpose
Install and run ncclient on a device to enroll with Nebula Commander and pull config and certificates. The enrollment code is obtained from the Nodes page (Enroll button for the node). The page is organized into tabs (Docker, Linux, Windows, macOS, Mobile) and provides the CLI for every platform, the Linux desktop app packages, and the Windows installer.
CLI binaries (command-line ncclient)
Pre-built executables for:
| Platform | File name |
|---|
| Linux x86_64 | ncclient-linux-amd64 |
| Linux ARM64 | ncclient-linux-arm64 |
| Windows x86_64 | ncclient-windows-amd64.exe |
| macOS Intel | ncclient-macos-amd64 |
| macOS Apple Silicon | ncclient-macos-arm64 |
Downloads are served from /downloads/ (e.g. /downloads/ncclient-linux-amd64). These binaries are only available if the frontend was built with client binaries included (e.g. Docker image built with DOWNLOAD_BINARIES=1). If the page shows no downloads or 404, use ncclient installation from releases or pip instead.
After download on Linux or macOS, make the file executable and place it on your PATH:
chmod +x ncclient-linux-amd64   # or the file you downloaded
# Move to /usr/local/bin or add the directory to PATH
On Windows, add the directory containing ncclient-windows-amd64.exe to your PATH or run it by full path.
Linux desktop app packages
The Linux tab offers the Linux desktop app as three packages, in both .deb and .rpm form, plus a Flatpak:
| File | Contents |
|---|
nebula-commander-client.deb / .rpm | The ncclient CLI |
nebula-commander-service.deb / .rpm | The ncclient systemd service and the D-Bus/polkit integration the app uses |
nebula-commander-desktop.deb / .rpm | The GTK4 desktop app |
org.beardedtek.NebulaCommander.flatpak | The desktop app only; still needs nebula-commander-service installed on the host |
Install all three together so the package manager resolves the order:
sudo apt install ./nebula-commander-client.deb ./nebula-commander-service.deb ./nebula-commander-desktop.deb
# or
sudo dnf install ./nebula-commander-client.rpm ./nebula-commander-service.rpm ./nebula-commander-desktop.rpm
Windows installer
The Windows tab offers the CLI on its own and the MSI installer (/downloads/NebulaCommander-windows-amd64.msi). The MSI installs the CLI, the Windows app, and a background Windows Service together, and can add them to PATH. The service does the actual work (polling, running Nebula, split-horizon DNS) as LocalSystem, so nothing here needs an admin prompt after installation.
The standalone app and service executables (NebulaCommanderApp-windows-amd64.exe, ncclient-service-windows-amd64.exe) are published on GitHub Releases but not on this page. They’re mainly for development: the service is only ever registered by the MSI, so for normal use install the MSI.
Getting the enrollment code
- In the Web UI, go to Nodes.
- Open the node for this device (or create one and create/sign a certificate).
- Click Enroll and copy the one-time code.
- On the device: if you installed the Windows MSI or the Linux desktop app, open Nebula Commander, go to the Enrollment tab, and enter the server URL and code - the service picks it up automatically. Otherwise (CLI, Docker, other platforms), run:
ncclient enroll --server https://YOUR_SERVER_URL --code XXXXXXXX, then ncclient run --server https://YOUR_SERVER_URL to start polling for config and certs.
See ncclient usage for full steps for each client, including how to re-enroll.
5.6 - Invitations
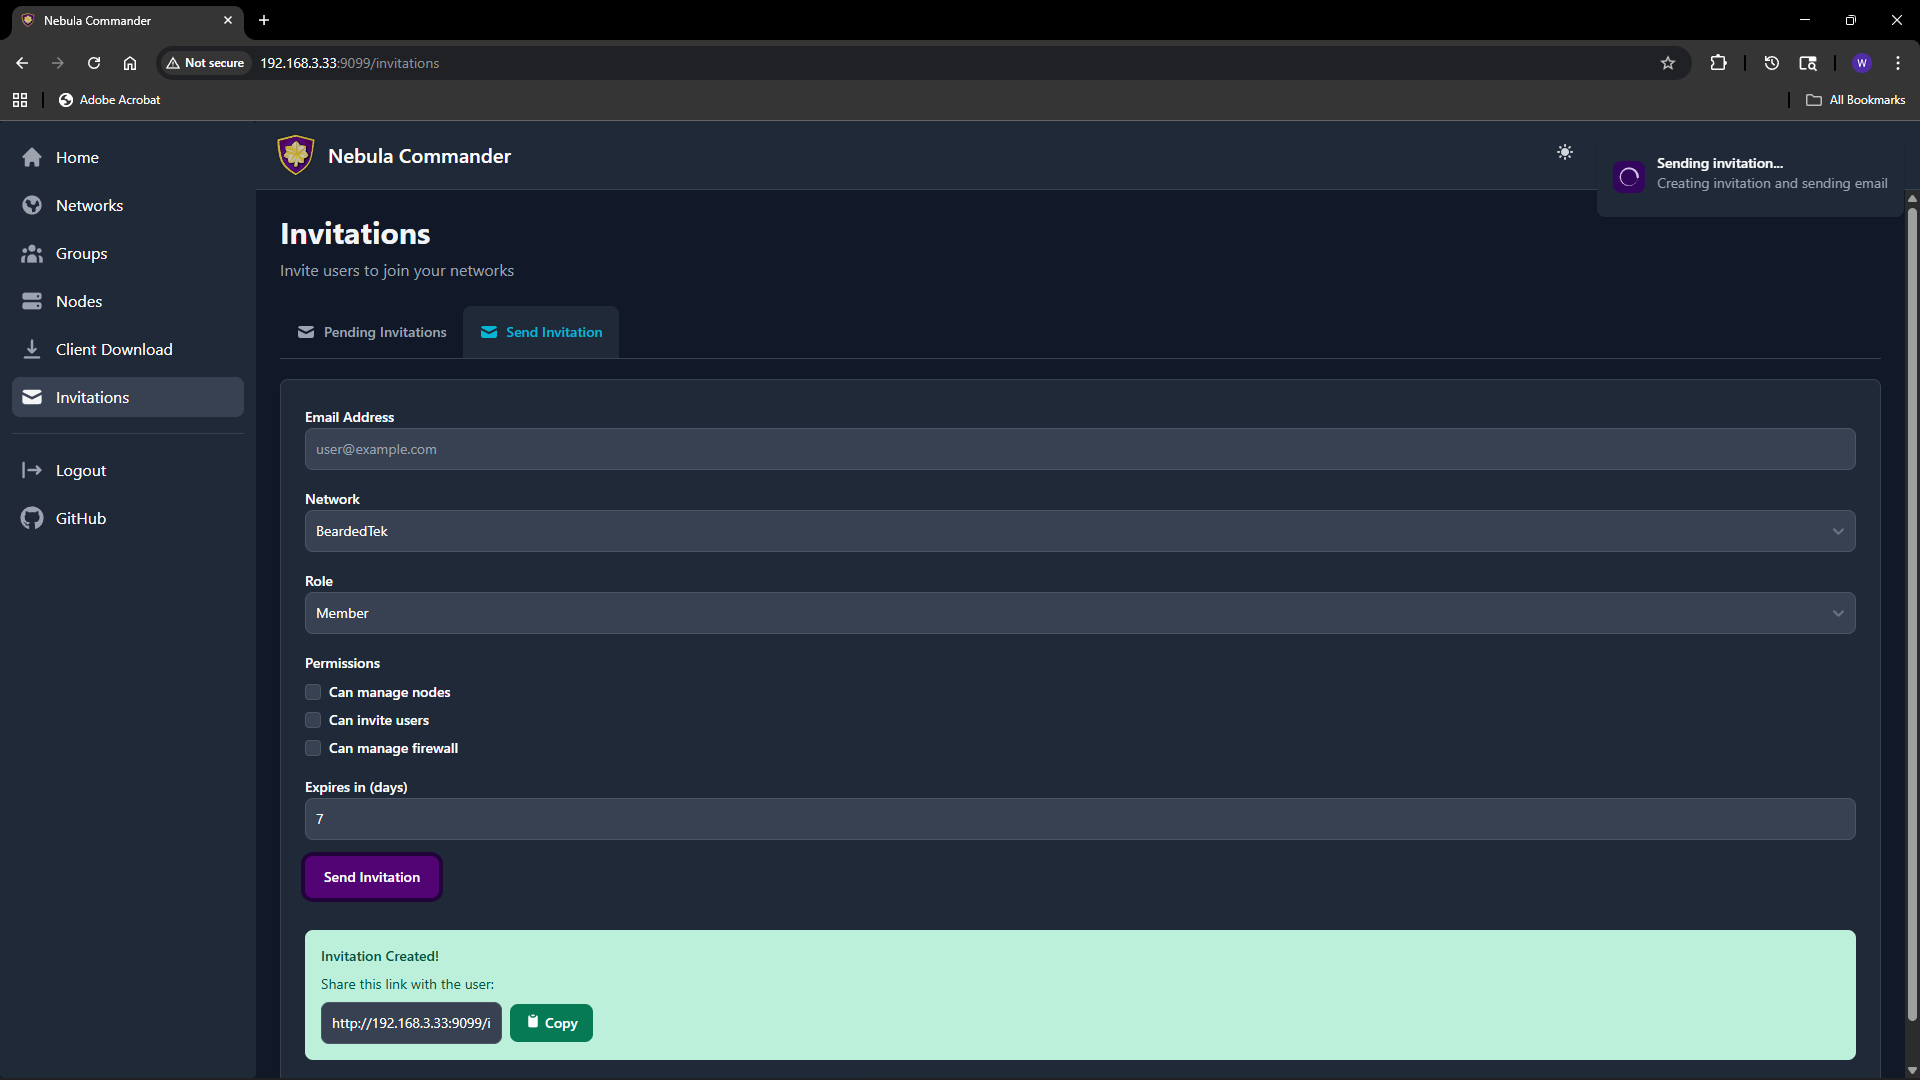
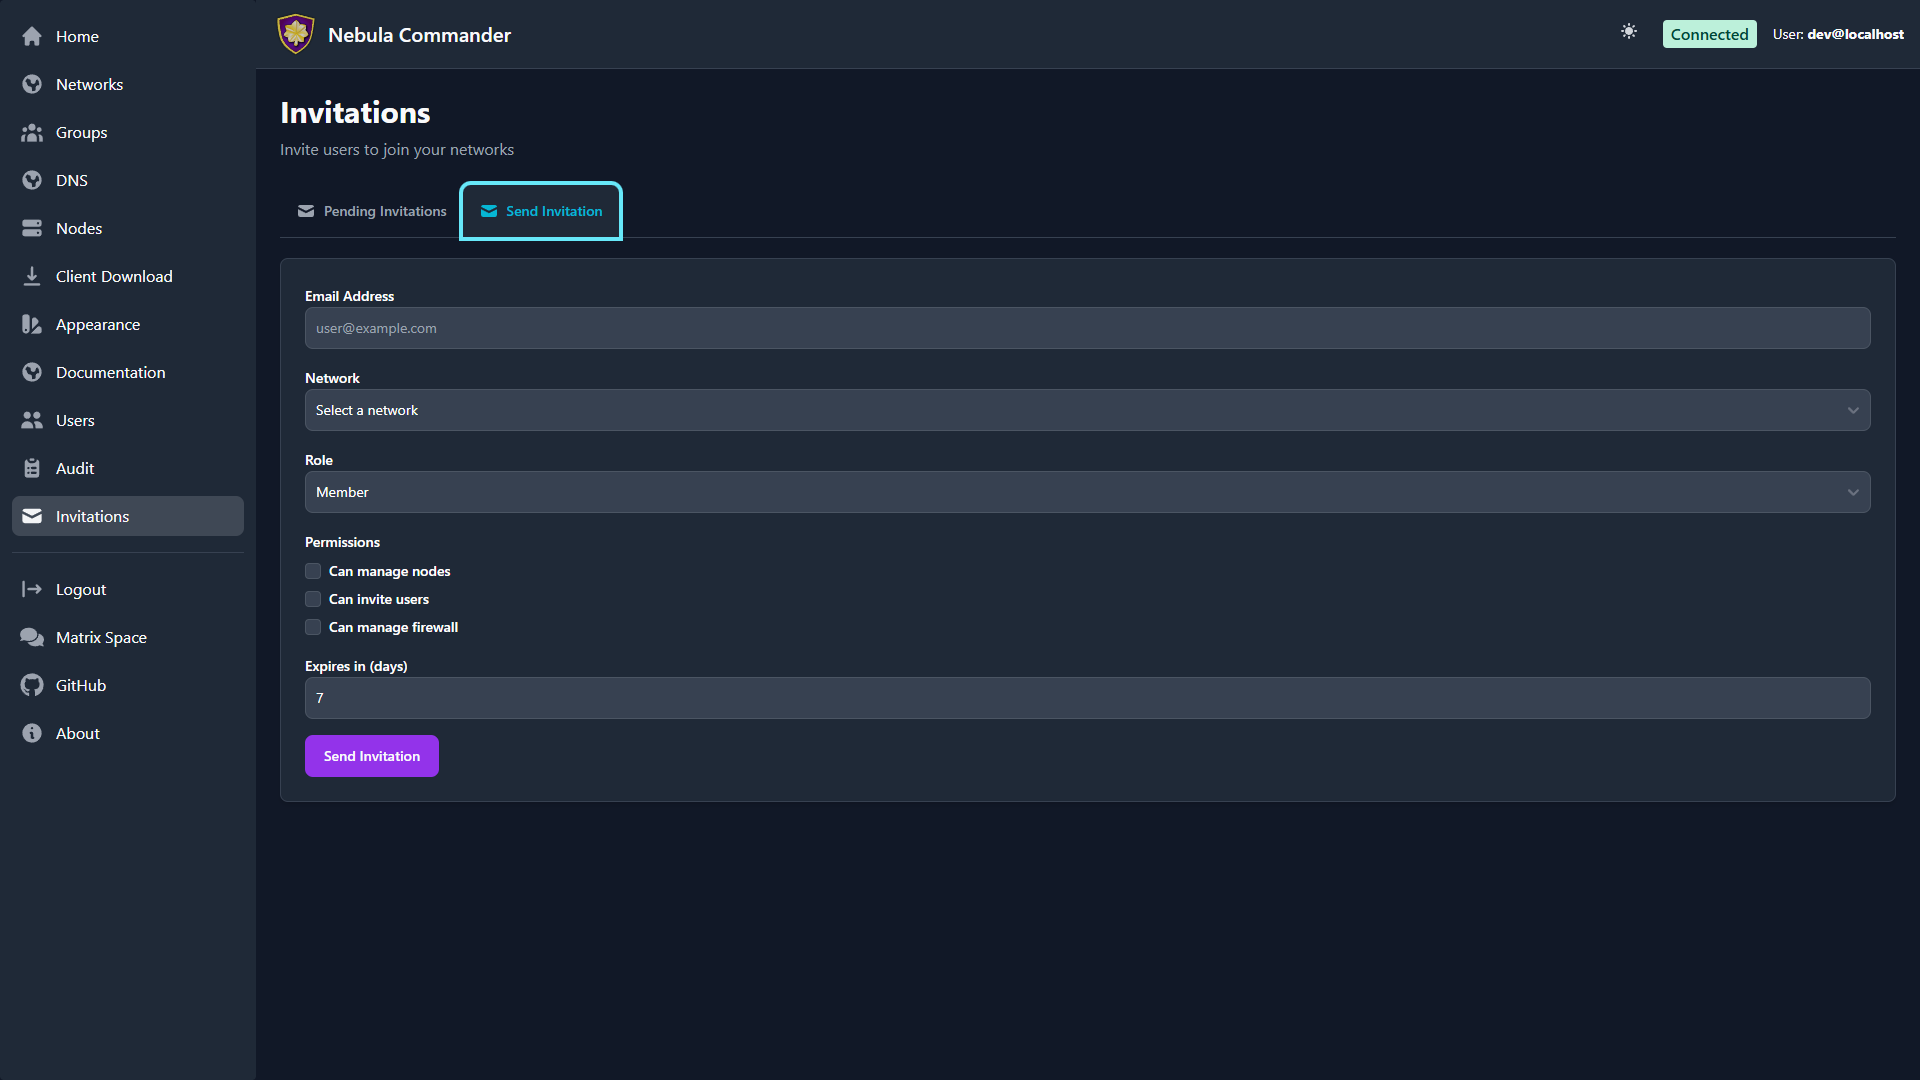
The Invitations page lets network owners (and system admins) invite users to a network with a chosen role and permissions. Invitations work when OIDC is configured; invited users sign in via the IdP and then gain access to the specified network.
| Light | Dark |
|---|
 |  |
What invitations are
An invitation associates an email (or link) with a network, a role (e.g. member, admin), and optional permissions (can manage nodes, can invite users, can manage firewall). The invitee accepts by clicking a link or using a token; after acceptance they appear as a user with access to that network according to the role and permissions.
Creating an invitation
- Open Invitations in the sidebar.
- Use the “Invite user” or similar form.
- Fill in:
- Email – Invitee’s email (used for the invite link and, if SMTP is configured, to send the email).
- Network – The network to grant access to.
- Role – e.g.
member or admin. Affects default permissions. - Can manage nodes – Allow the user to add, edit, delete nodes in this network.
- Can invite users – Allow the user to send further invitations for this network.
- Can manage firewall – Allow the user to edit groups and firewall rules for this network.
- Expires in (days) – How long the invitation link is valid (e.g. 7 days).
- Submit. You can either send email (if SMTP is configured) or copy link to send manually.
The invitation appears in the list with status (e.g. pending, accepted, expired).
Accepting an invitation
The invitee opens the invitation link (from email or shared link). The link contains a token and typically looks like /invitations/accept/TOKEN. They are prompted to log in with OIDC if not already logged in. After accepting, they have access to the network according to the role and permissions set in the invitation.
Listing and revoking
The Invitations page lists all invitations you created (or all invitations in the system if you are a system admin).
| Light | Dark |
|---|
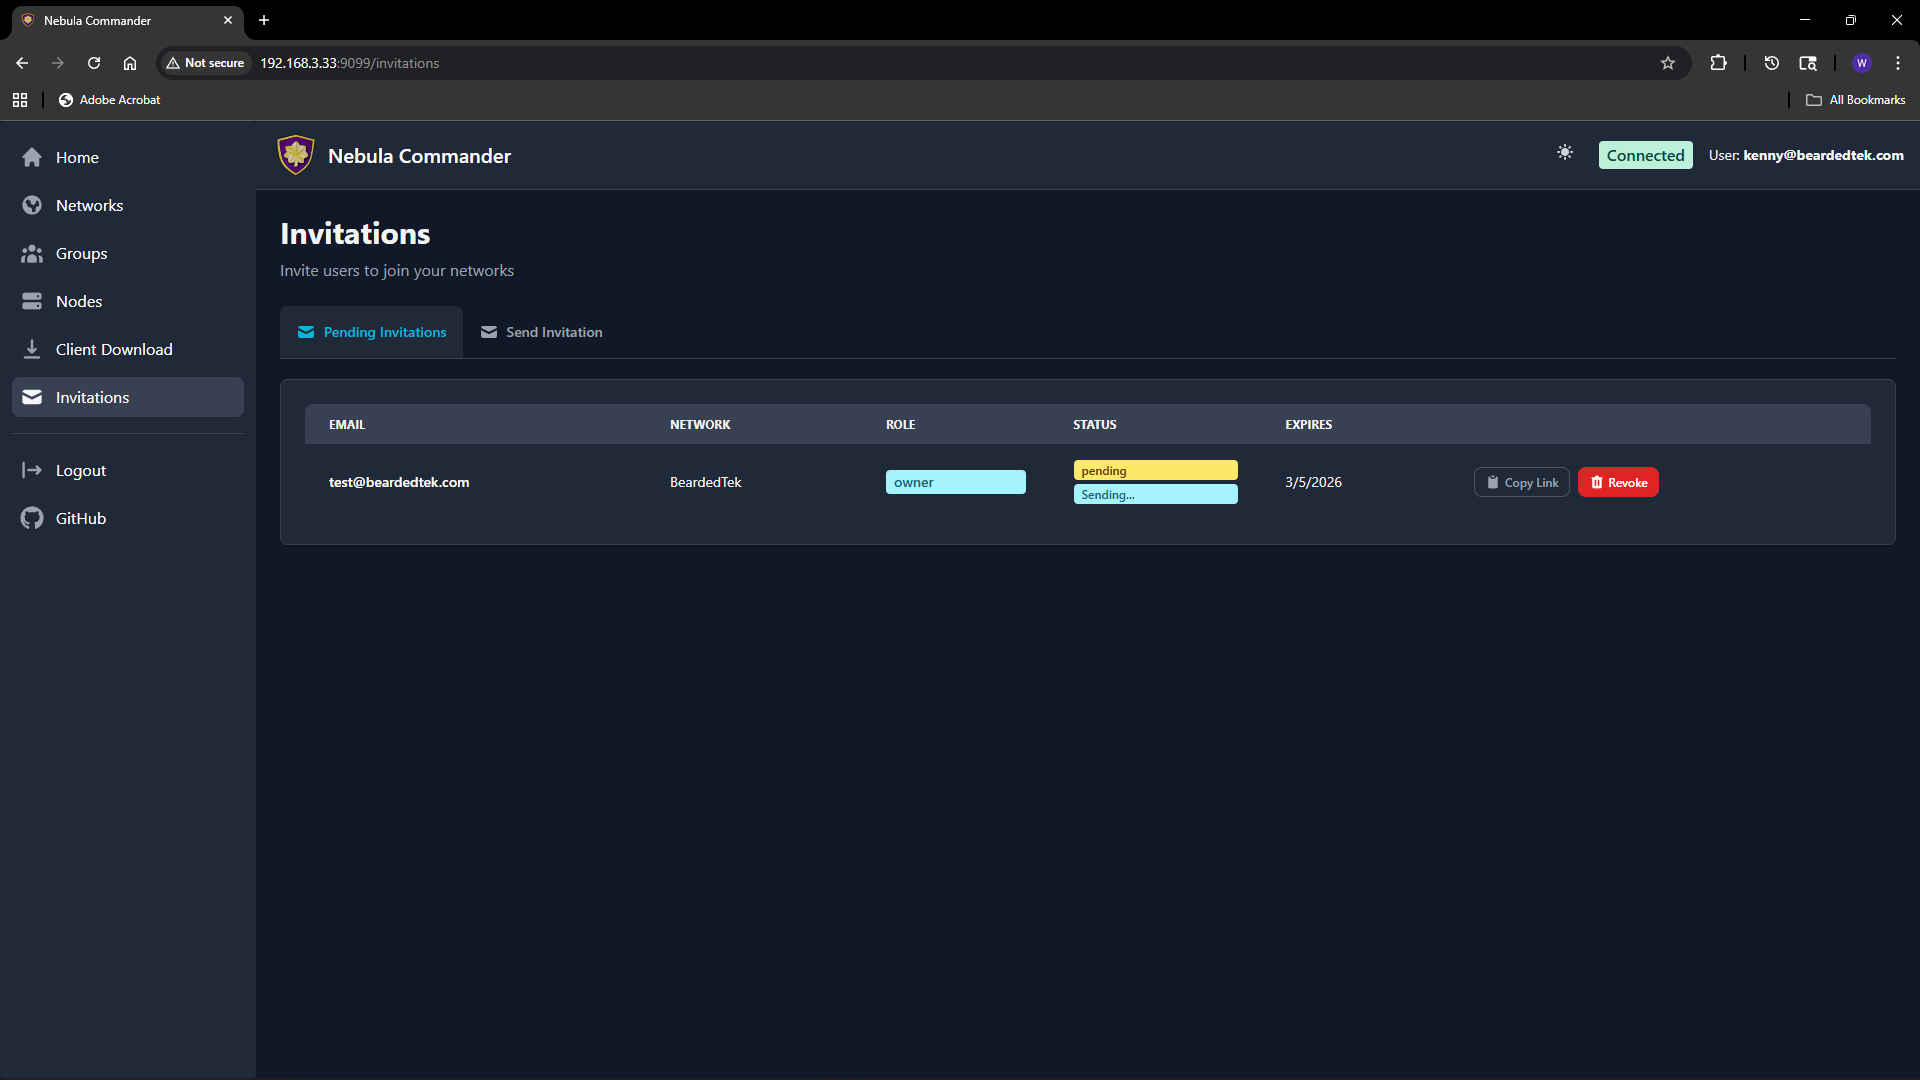 | 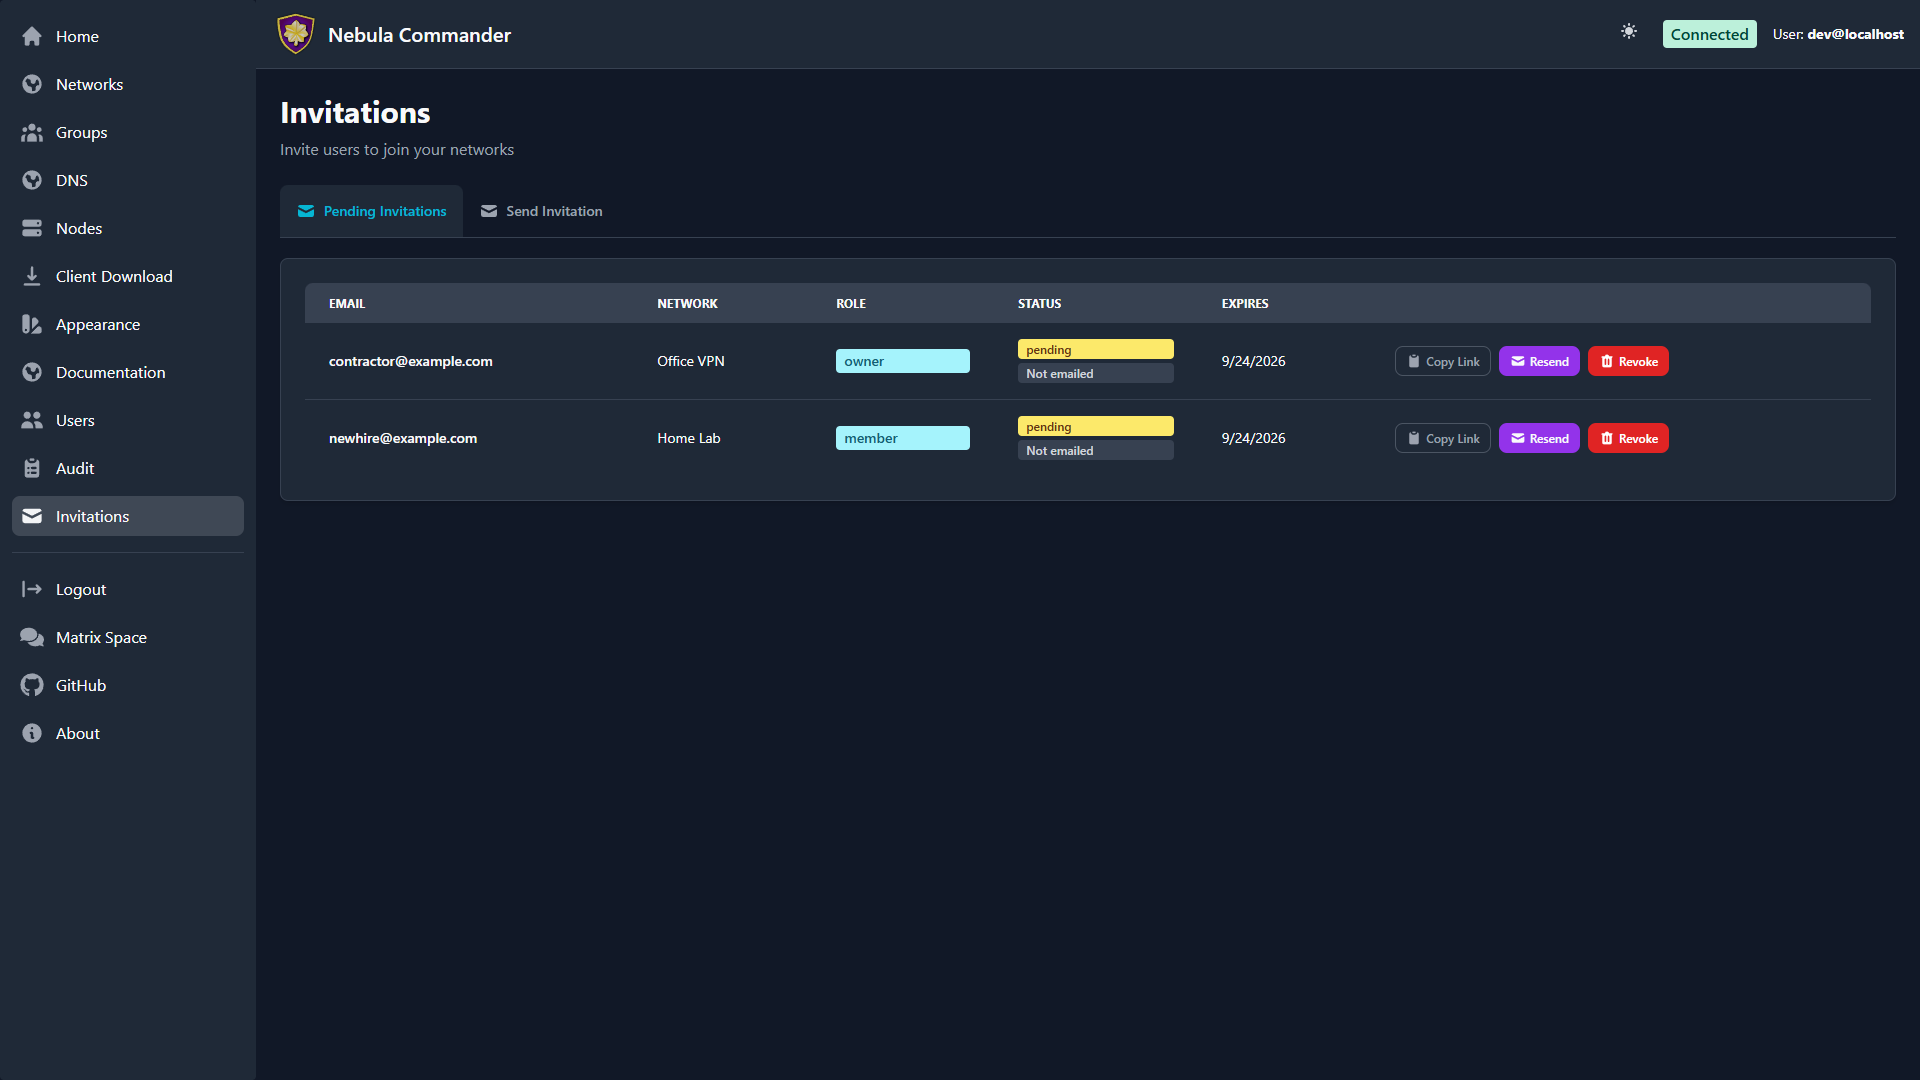 |
You can see status (pending, accepted, expired), email, network, role, and expiry. To revoke a pending invitation, use the revoke or delete action; the link will no longer work.
Email delivery
If the backend has SMTP configured, invitation emails are sent automatically when you create an invitation. If SMTP is not configured, use “Copy link” and share the URL manually. Email status (sent, failed) may be shown on the invitation row; check the Environment docs for SMTP options.
5.7 - Users
System-admin user management: view accounts, change system roles, and delete users.
The Users page (sidebar → Users) lists every user account in Nebula
Commander as a grid of square cards. It’s visible only to system admins —
everyone else never sees this link.
| Light | Dark |
|---|
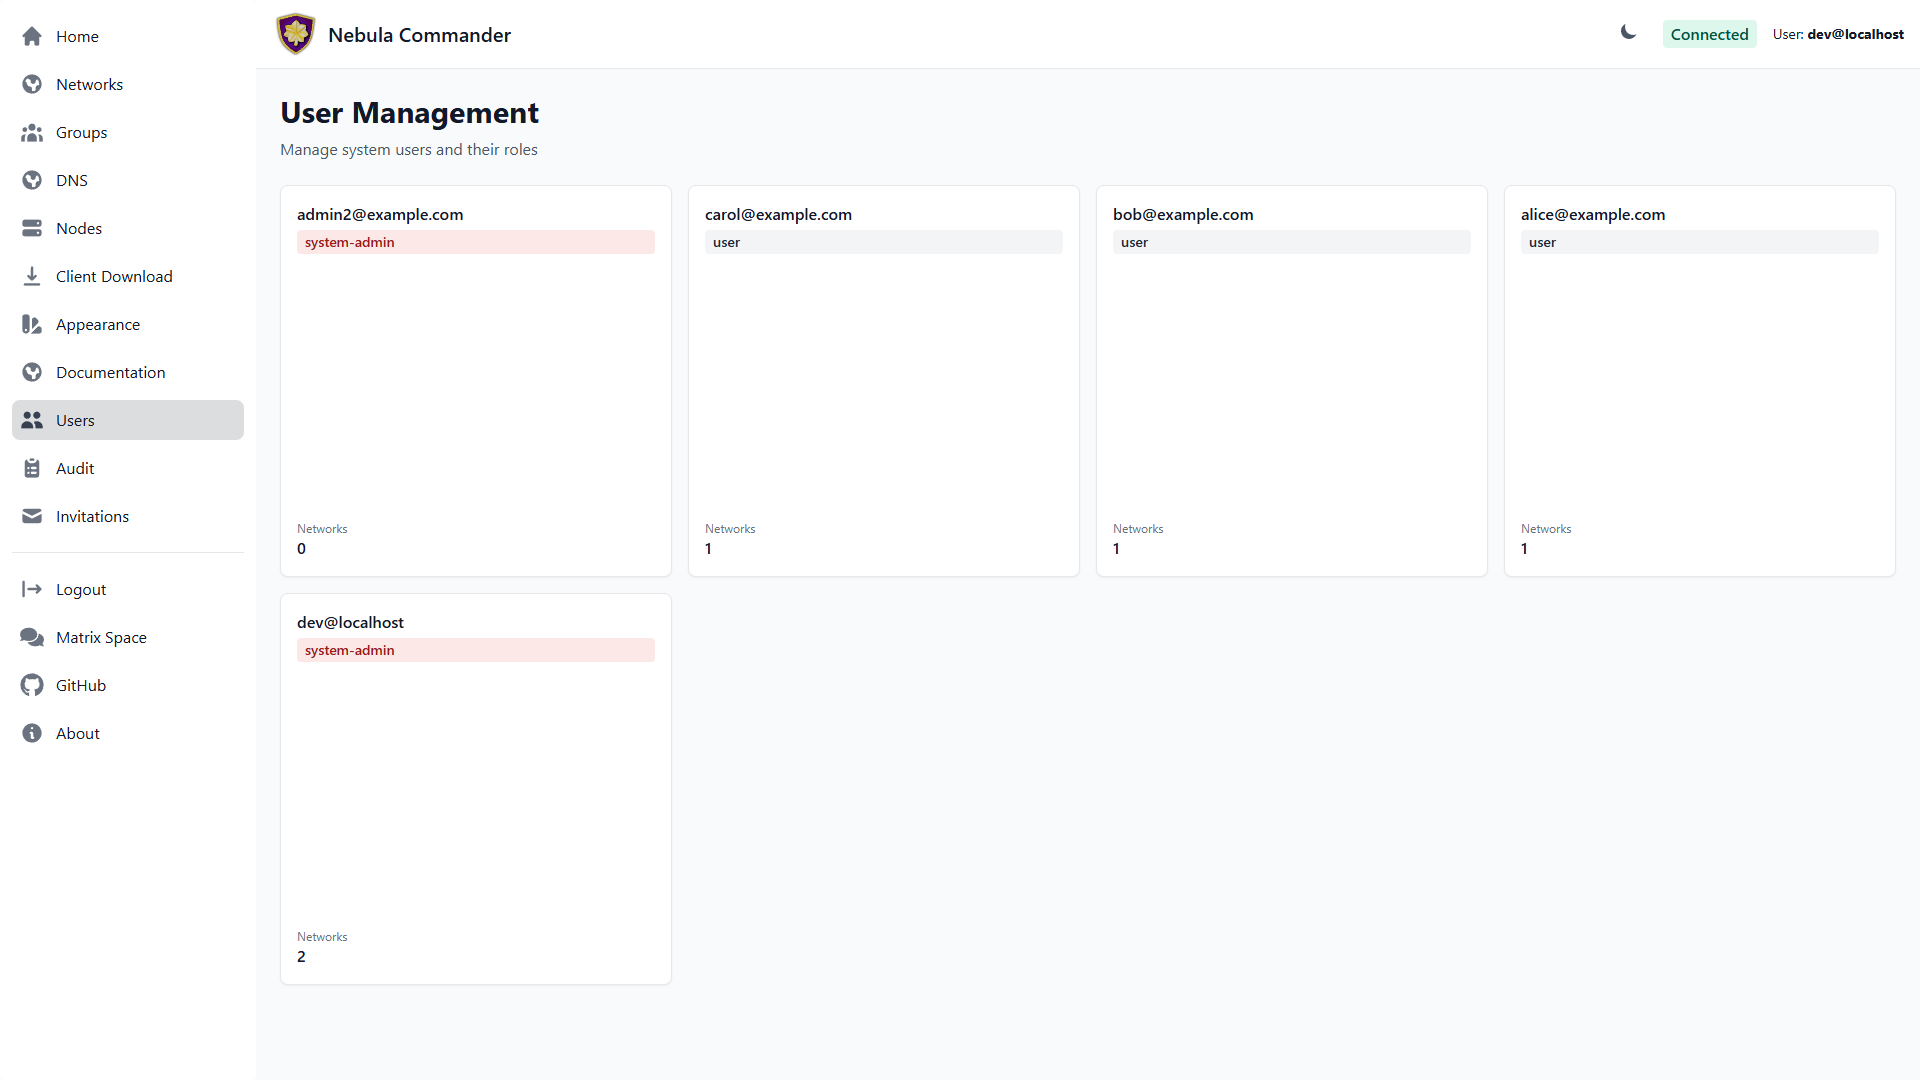 | 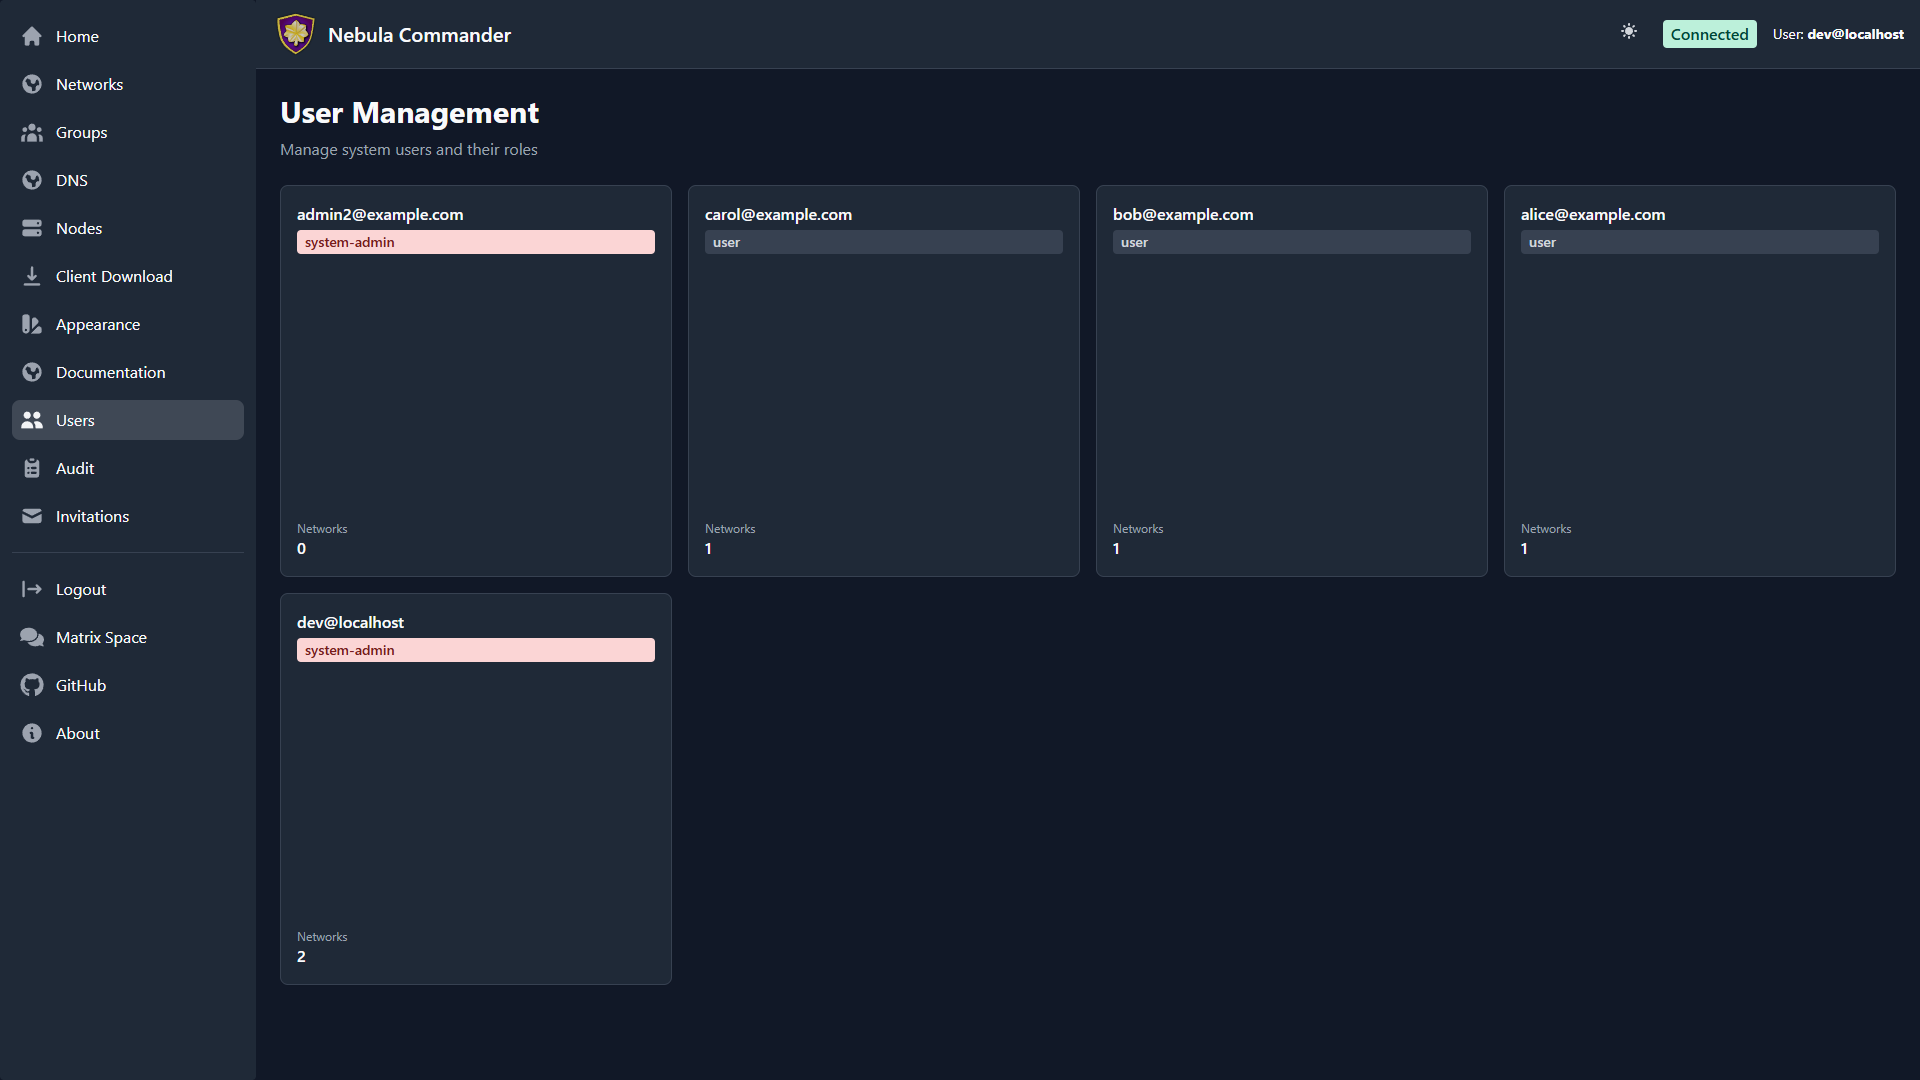 |
The user grid
Each card shows a user’s email, their system role badge (system-admin in red,
user in gray), and how many networks they belong to. Click a card to open its
details.
User details
The details modal shows the user’s email, system role, creation date, and their
per-network permissions — role (owner/member) and the specific capabilities
(manage nodes, invite users, manage firewall) granted on each network they’re part
of.
| Light | Dark |
|---|
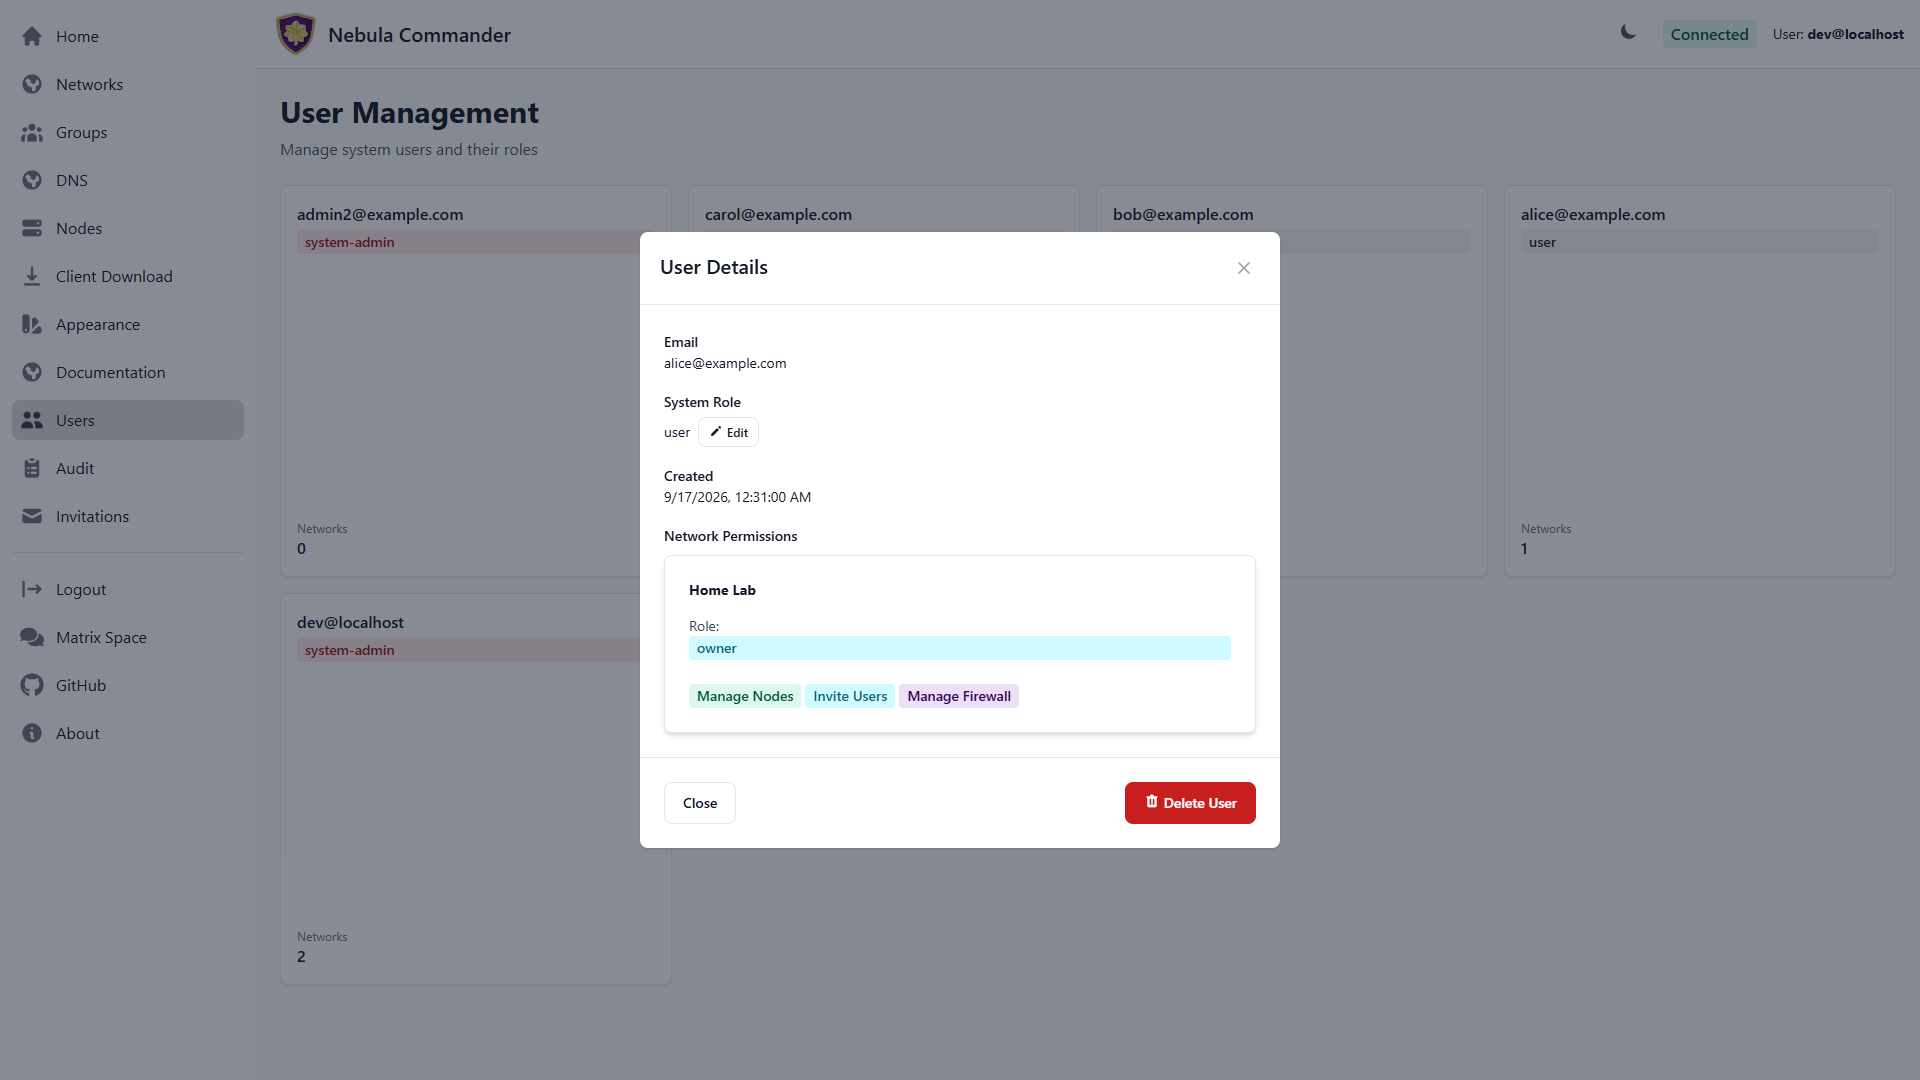 | 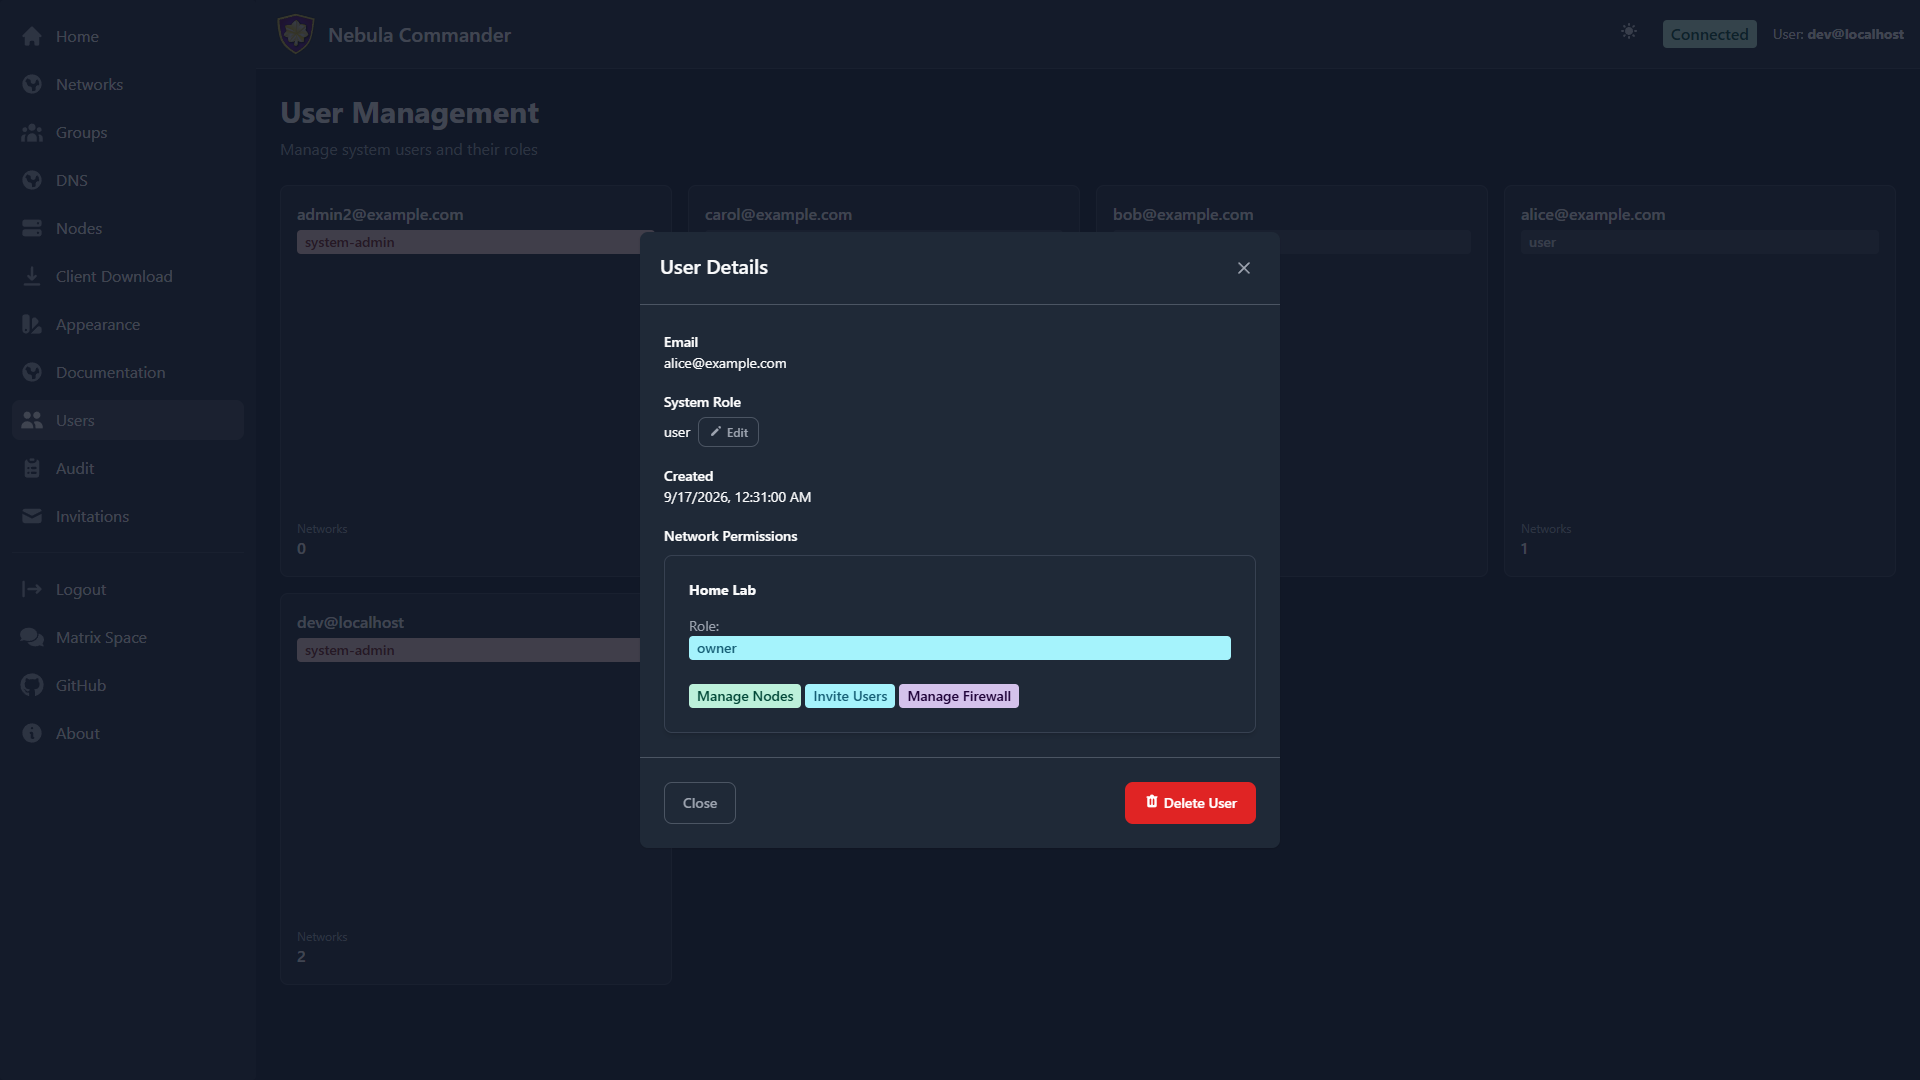 |
- Edit role — click Edit next to the system role to reveal a dropdown
(
User or System Admin) in place, without leaving the modal. Save applies
immediately and the modal updates to reflect it. - Delete User — opens a two-step, type-to-confirm delete flow (type the user’s
email to confirm) and requires reauthentication, the same as deleting a network
or a node. Deleting a user removes all their network permissions; it does not
delete nodes they created.
System role is separate from per-network permissions: a plain user can still be
a network owner with full control over their own networks — system-admin is
specifically for instance-wide administration (managing all users, viewing the
audit log across every network, and so on).
5.8 - Backup & export
Download an encrypted copy of your whole instance, and move it to another server with import.
The Backup & export page (sidebar → Backup & export) lets a system admin
download everything in a Nebula Commander instance as one encrypted file, and
import such a file into a new instance. Use it to:
- keep an offline backup,
- move from hosted Nebula Commander to your own server (or the other way round),
- move a self-hosted instance to new hardware.
Only system admins see this page, and both export and import ask you to
sign in again before they run.
What’s in an export
Everything needed to run the instance somewhere else:
- networks, their certificate authorities (including the CA private keys) and
host certificates
- nodes, groups, firewall rules, DNS settings and aliases, IP allocations
- users, their network and node permissions, pending invitations
- the audit log
- optionally, the key that signs device credentials (see
Keeping devices working)
Passwords aren’t included. Sign-in is handled by your identity provider
(for example Keycloak), not by Nebula Commander.
Encryption
When you export, you choose a passphrase (at least 12 characters). The file is
encrypted with it before it leaves the server, in the standard
age format:
- Without the passphrase the file can’t be opened, by you, by whoever runs the
server, or by anyone who gets hold of the file.
- The passphrase can’t be recovered or reset. After the download, Nebula
Commander shows it once more (hidden until you click Show) so you can save
it in a password manager.
- The passphrase is never stored or logged. The audit log records that an export
happened and by whom, not the passphrase.
An export protects your data wherever the file ends up. It can’t protect you
from someone who already controls the server running the live instance.
Opening an export without Nebula Commander
Because it’s a standard age file, you can always get at your data:
age -d -o export.zip nebula-commander-example.com-20260927-1200.ncexport.age
Or with the Nebula Commander backend installed:
python -m backend.scripts.ncexport inspect  export.ncexport.age   # show what's inside
python -m backend.scripts.ncexport decrypt  export.ncexport.age export.zip
The zip contains manifest.json, one JSON file per table under data/, the
certificate store under certs/ and a README.txt. It contains private
keys, so treat the decrypted zip like the keys themselves.
Creating an export
- Open Backup & export and click Create encrypted export.
- Sign in again when asked.
- Enter a passphrase twice and click Encrypt and download.
- Save the passphrase shown in the next dialog, then click I’ve saved it.
Importing into a new instance
Import only works on a fresh instance, one with no networks or nodes yet.
- Install Nebula Commander (Docker or
NixOS) and sign in as a system admin.
- Open Backup & export and click Import from a file.
- Sign in again, choose the export file and enter its passphrase.
- Check the summary, then point your devices at the new server (below).
Everything is re-encrypted with the new instance’s own encryption key. If
anything goes wrong, the import is rolled back and nothing is changed.
Users and sign-in
- Same identity provider (same issuer URL): users keep their accounts and
just sign in as before.
- Different identity provider: each person gets their access back the first
time they sign in to the new instance with the same email address, provided
the provider has verified that address. In Keycloak, turn on
Realm settings → Login → Verify email before inviting people in. This
check stops someone who registers with another person’s unverified email from
inheriting their access.
- The admin who runs the import is matched to their old account by email
straight away.
Keeping devices working
With Keep enrolled devices working after a move ticked (the default), the
export includes the key that signed your devices’ credentials. After importing,
each device only needs the new server address:
# /etc/default/ncclient (Linux service) or the ncclient environment
NEBULA_COMMANDER_SERVER=https://nebula.example.com
Restart ncclient. The device carries on with its existing certificate and keeps
receiving config updates, with no re-enrollment. The imported key is stored
encrypted and is only ever accepted for device credentials, never for signing
in. New credentials are always issued with the new instance’s own key.
Leave the box unticked for a plain backup you won’t import elsewhere. Devices
would then need a new enrollment code after an import.
5.9 - Appearance
Per-account color theming: customize buttons, status colors, badges, and backgrounds for both light and dark mode, and save your choices as reusable presets.
The Appearance page (sidebar → Appearance, or /settings/appearance) lets
each user customize the colors used across Nebula Commander — this is a personal
preference, saved to your own account, not a site-wide setting an admin controls.
| Light | Dark |
|---|
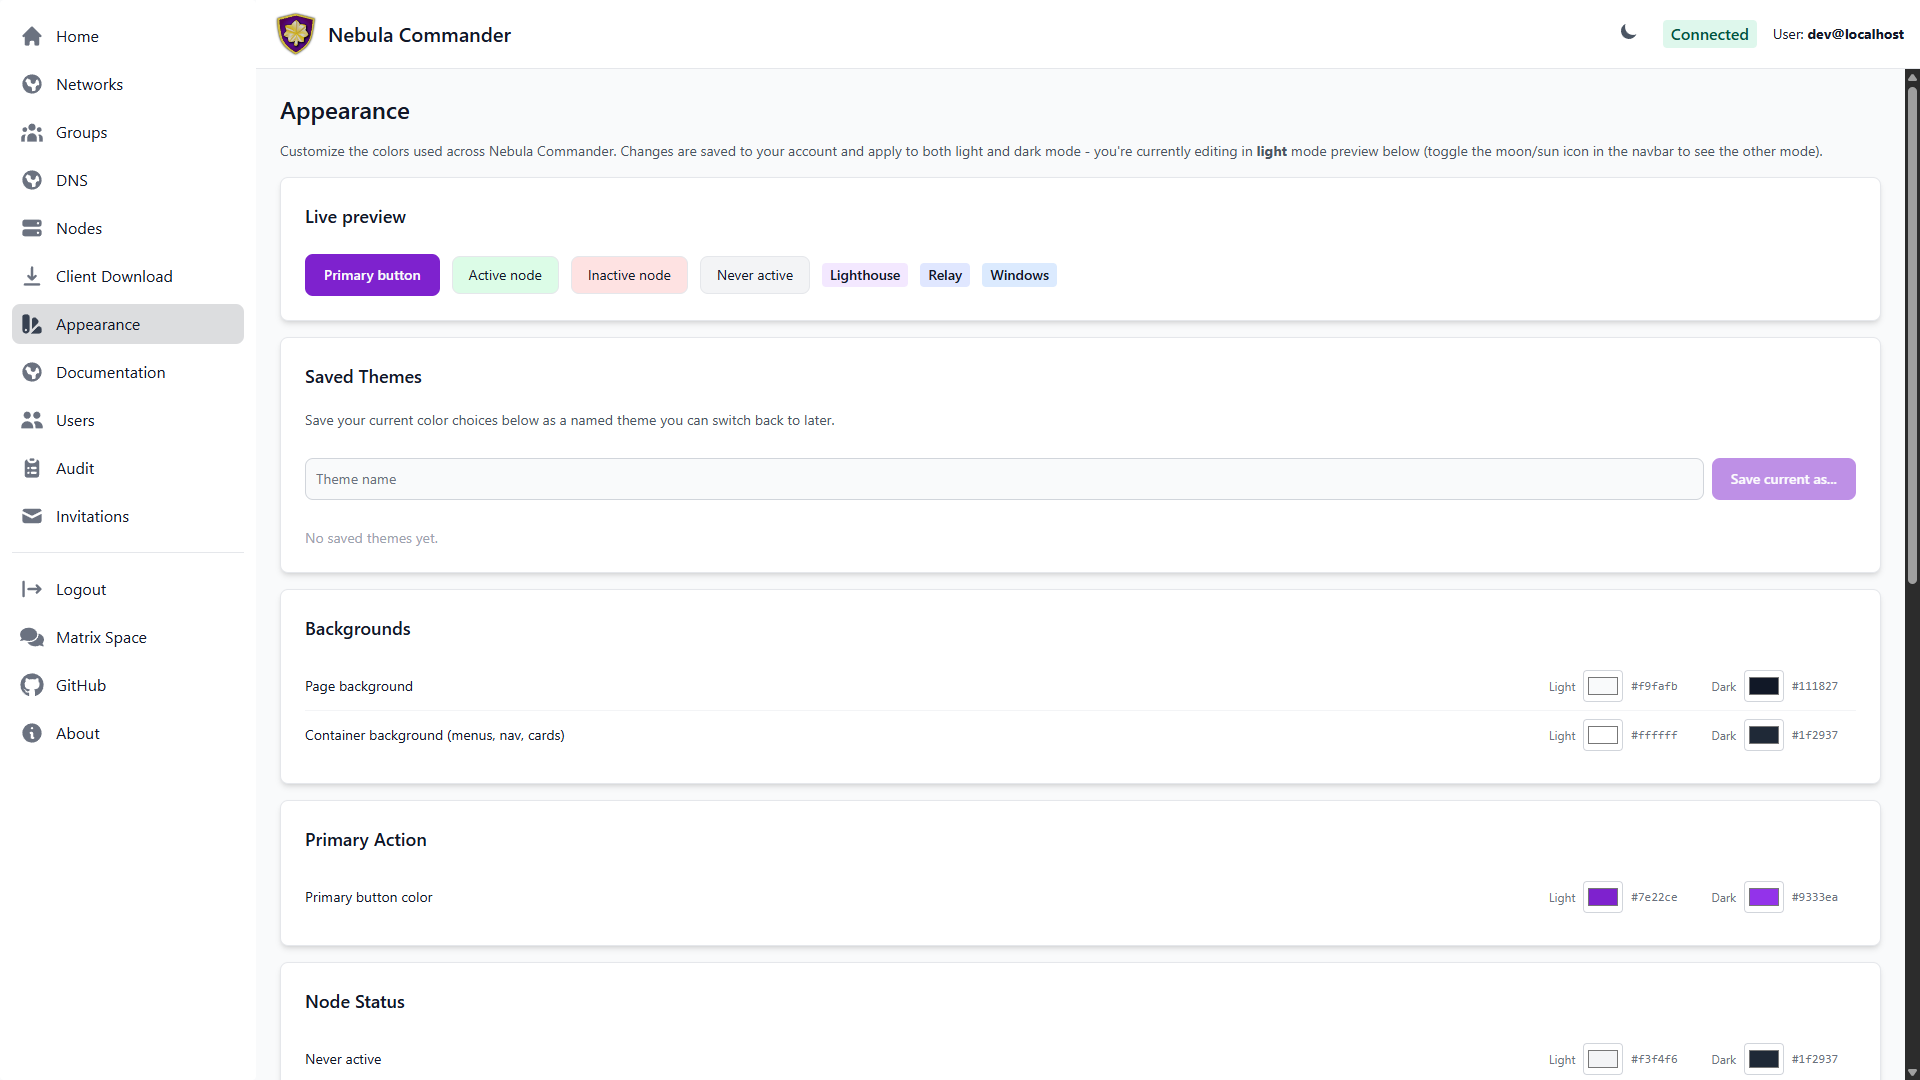 | 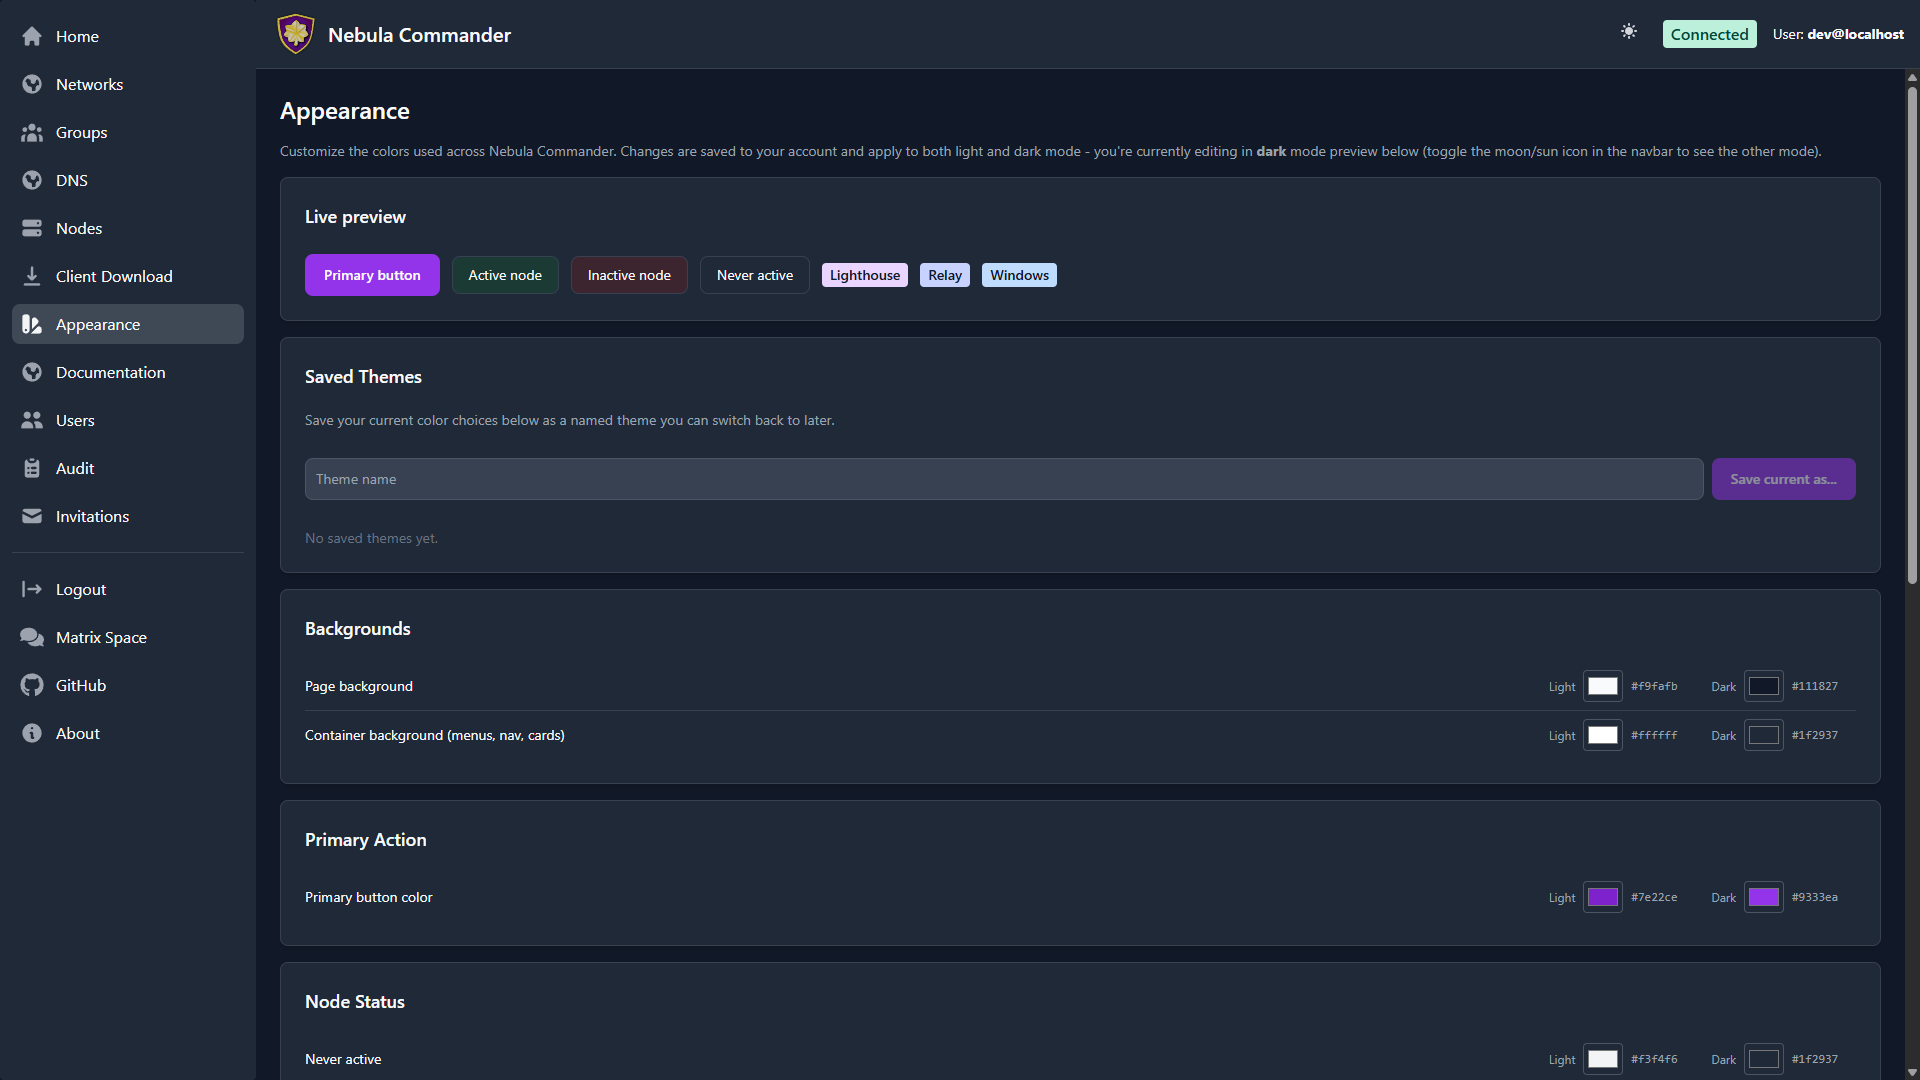 |
Every color you pick automatically gets a readable, contrast-checked
foreground: buttons, badges, status cards, and the page/container backgrounds
all compute their own text color (near-black or near-white) from whatever
background you choose, so an unusually light or dark pick never turns into
illegible same-on-same text.
Light and dark mode
The moon/sun toggle in the top navbar switches between light and dark mode; the
choice is remembered in your browser. Every color you customize on the Appearance
page has separate light and dark values — changing one never affects the other,
and the values shown on the page follow whichever mode you’re currently in (a
banner at the top of the page says which).
What’s themeable
Colors are grouped by where they show up:
- Backgrounds — the page background, and a separate “container” background
shared by the sidebar, the top navbar, and every card throughout the app.
- Primary Action — the color used for primary buttons everywhere in the app.
- Node Status — the three background colors used on Nodes
cards: never active, active, and inactive.
- Type / OS Badges — the background color of each badge shown on a node’s card
(Lighthouse, Relay, iOS, Android, Windows, Linux, macOS, and the generic Node
fallback). The badge’s text color is computed automatically for contrast against
whatever background you pick, so you never have to set it separately.
- Group Access Diagram — the restricted/open group colors and the edge color
used in the Network detail page’s
access diagram.
Every color picker shows the current hex code (e.g. #7e22ce) next to the swatch,
so you can match an exact brand color or copy a value elsewhere.
A live preview at the top of the page shows a sample button, status colors, and
badges updating as you edit, before you save anything.
Saving changes
Editing a color only updates the live preview — nothing is persisted until you
click Save changes. Reset to defaults reverts every color in the editor
back to Nebula Commander’s built-in defaults (also just a local edit, until you
save).
Saved themes
Beyond your one active set of colors, you can build a personal library of named
presets:
- Adjust colors to what you want.
- Type a name under Saved Themes and click Save current as…. This saves
whatever is currently in the editor, independent of whether you’ve clicked
Save changes yet.
- Later, click Apply on any saved theme to make it your active theme
immediately (this does persist right away — no separate save step). Delete
removes a saved theme; recreating one costs nothing, so there’s no confirmation
flow beyond a single prompt.
Saved themes are private to your account — other users don’t see them, and there’s
no site-wide/shared theme.
Exporting a theme
Click Export YAML (next to Save changes/Reset to defaults) to download the
colors currently in the editor as a .yaml file. Each saved theme also has its
own export button in the Saved Themes list, so you can back up or share a
specific preset. This is export only today - there’s no import button yet, so
re-applying an exported file means manually re-entering its colors.
6 - Clients
After server installation and server configuration, you can use the Web UI or run Nebula on devices:
- ncclient – Preferred method: device client for installation and usage (Docker, CLI, Linux desktop app, Windows app, NixOS). Enroll once, then ncclient polls for config and certs and can run Nebula.
- nebula – Manual alternative: create networks and nodes in the UI, then deploy config and certs yourself and run Nebula manually (e.g. when ncclient is not available, such as on mobile).
All of these assume the backend is running and reachable at the URL you configure.
6.1 - ncclient
ncclient is the preferred way to run Nebula Commander on devices: enroll once with a code from the UI, then ncclient polls for config and certificates and can run or restart Nebula when config changes. When you run the first lighthouse using the Docker client, you can use Magic DNS (split-horizon DNS) for the network.
- Installation – Docker (preferred for first lighthouse), binaries (Web UI or GitHub Releases), Linux desktop app (
.deb/.rpm/Flatpak), Windows Installer (MSI), NixOS module, or Pip (PyPI) as fallback. - Usage – One page per client (ncclient CLI, Docker, NixOS, Linux app, Windows app): enrolling, running, routes, DNS, and re-enrolling.
The CLI and both native GUI apps assume the Nebula Commander backend is running and reachable at the URL you configure.
6.1.1 - Installation
You can install ncclient in several ways:
| Method | Best for |
|---|
| Docker | The first lighthouse in a network, to also run Magic DNS |
| Binaries | Prebuilt CLI binaries from the Web UI or GitHub Releases |
| Linux Desktop App | Linux: GTK4 app + background service via .deb, .rpm, or Flatpak |
| Windows Installer | Windows: CLI, native app, and background service via one MSI |
| NixOS | NixOS hosts: a declarative services.ncclient module |
| Pip (PyPI) | Fallback when none of the above are suitable |
Choose one and follow the linked page. Then see the matching Usage page to enroll the device, run it, and re-enroll it later.
6.1.1.1 - Docker
The Docker client is the preferred method for the first lighthouse in a network so the container can run dnsmasq and you can use Magic DNS (split-horizon DNS) for the network. Other devices (CLI, a native GUI app, or additional Docker clients) can then resolve Nebula hostnames via the lighthouse.
Image: ghcr.io/nixrtr/nebula-commander-ncclient:latest, or build from the repo client/docker (Dockerfile in that directory).
Required environment:
NEBULA_COMMANDER_SERVER – Base URL of your Nebula Commander backend (e.g. https://nc.example.com), no trailing slash.
Optional environment:
ENROLL_CODE – One-time enrollment code from the Nebula Commander UI (Nodes → Enroll for the node). Only used when the token file does not exist; after enrollment the token is stored and this is ignored.SERVE_DNS – Set to "true" to run dnsmasq on this node when it is a lighthouse, so the network can use Magic DNS. Omit or set to false if this node is not a lighthouse or you do not need DNS.NEBULA_DNS_POLL_INTERVAL – Seconds between dnsmasq config polls when this node is a lighthouse (default: 60).NEBULA_OUTPUT_DIR – Directory where ncclient writes Nebula config and certs inside the container. Set it to /data/nebula (the image default is /etc/nebula, outside the volume).NEBULA_DEVICE_TOKEN_FILE – Path to the device token file. Set it to /data/nebula-commander/token (the image default is /etc/nebula-commander/token, outside the volume).
Use a persistent volume for /data, and point both paths above into it, so the token and Nebula config/certs survive the container being recreated. The compose file uses network_mode: host so Nebula and dnsmasq can bind to the host, and cap_add: NET_ADMIN so Nebula can create and configure its tun interface.
Example (docker-compose):
services:
  ncclient:
    image: ghcr.io/nixrtr/nebula-commander-ncclient:latest
    network_mode: host
    cap_add:
      - NET_ADMIN
    restart: unless-stopped
    environment:
      NEBULA_COMMANDER_SERVER: "https://nc.example.com"
      ENROLL_CODE: "XXXXXXXX"   # one-time, from UI
      SERVE_DNS: "true"         # for first lighthouse + Magic DNS
      NEBULA_OUTPUT_DIR: "/data/nebula"
      NEBULA_DEVICE_TOKEN_FILE: "/data/nebula-commander/token"
    volumes:
      - ncclient-data:/data

volumes:
  ncclient-data:
    driver: local
Steps:
- In Nebula Commander, create a network and add a node for this device. Mark it as a lighthouse if this will be the first lighthouse and you want Magic DNS.
- Create or sign a certificate for the node, then click Enroll and copy the one-time code.
- Set
NEBULA_COMMANDER_SERVER and ENROLL_CODE (and SERVE_DNS: "true" for the first lighthouse), then start the container. - After enrollment, the container fetches config and certs and runs Nebula (and dnsmasq if
SERVE_DNS is set and the node is a lighthouse).
See Docker usage for logs, routes, DNS, and re-enrolling.
6.1.1.2 - Binaries
If Docker is not an option, use binaries from the Web UI or GitHub Releases.
From Web UI
When your Nebula Commander instance is deployed with client binaries included (for example the frontend image built with DOWNLOAD_BINARIES=1), the Web UI can serve them.
- Open your Nebula Commander URL in a browser and log in.
- Go to the downloads or client section (or open
https://YOUR_SERVER/downloads/ if your instance serves that path). - Download the binary for your platform:
- Linux x86_64:
ncclient-linux-amd64 - Linux ARM64:
ncclient-linux-arm64 - Windows x86_64:
ncclient-windows-amd64.exe - macOS Intel:
ncclient-macos-amd64 - macOS Apple Silicon:
ncclient-macos-arm64
- Place the file in a directory on your PATH (or add that directory to PATH). On Linux and macOS, make it executable:
chmod +x ncclient-linux-amd64 (or the file you downloaded).
If your instance does not serve binaries, use From releases or Pip (PyPI) instead.
From releases
Pre-built binaries are attached to GitHub Releases for each version.
- Open the releases page and choose a version (e.g. the latest).
- Download the file for your platform (same names as in From Web UI).
- Optionally verify with
SHA256SUMS.txt in the same release. - Place the binary in a directory on your PATH (or add that directory to PATH). On Linux and macOS, make it executable:
chmod +x ncclient-linux-amd64 (or the file you downloaded).
Next, see ncclient CLI usage to enroll and run it.
6.1.1.3 - Linux Desktop App
On Linux, three packages give you a GTK4/libadwaita desktop app plus a background systemd service that does the actual work - no group membership or relogin needed, and no admin/root prompt for enrolling, starting/stopping, or accepting routes.
| Light | Dark |
|---|
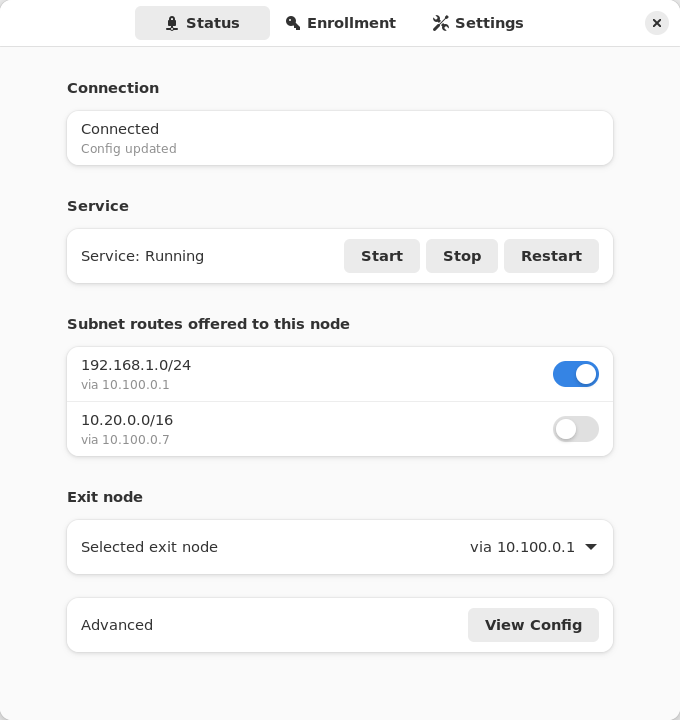 | 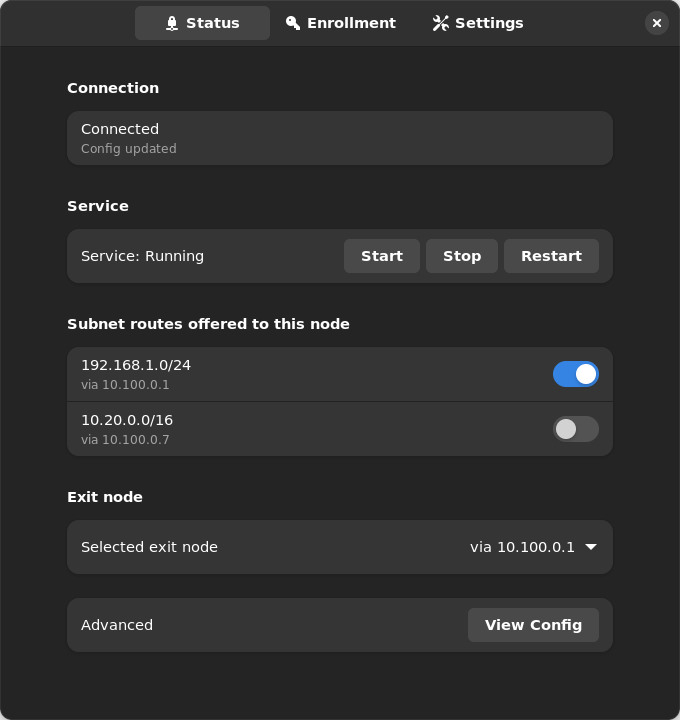 |
What’s included:
- nebula-commander-client – The
ncclient CLI (frozen binary, no Python runtime needed). - nebula-commander-service – Installs
ncclient.service (systemd), which polls for config/certs and runs Nebula as root. Exposes a system D-Bus API (org.beardedtek.NebulaCommander1) that the desktop app talks to, authorized per-call via polkit. - nebula-commander-desktop – The GTK4 app: enroll, view connection/service status, and accept or reject offered subnet routes and exit nodes.
Any user logged in at the machine can view status in the desktop app. Changes (enrolling, settings, routes, exit node, starting/stopping the service) need no password for members of the sudo or wheel group, which administrators normally already are, and an administrator’s password for everyone else.
Package repository (recommended)
Add the signed Nebula Commander repository once, and new releases arrive with your normal system updates (apt upgrade, dnf upgrade, zypper update). It carries the current and the previous few releases, for amd64 and arm64. Installing nebula-commander-desktop and nebula-commander-service pulls in nebula-commander-client.
Debian / Ubuntu:
sudo apt install -y curl
sudo install -d -m 0755 /etc/apt/keyrings
sudo curl -fsSL -o /etc/apt/keyrings/nebula-commander.asc https://pkgs.nebulacommander.com/gpg.key
sudo curl -fsSL -o /etc/apt/sources.list.d/nebula-commander.sources https://pkgs.nebulacommander.com/deb/nebula-commander.sources
sudo apt update
sudo apt install nebula-commander-desktop nebula-commander-service
Fedora / RHEL:
sudo curl -fsSL -o /etc/yum.repos.d/nebula-commander.repo https://pkgs.nebulacommander.com/rpm/nebula-commander.repo
sudo dnf install nebula-commander-desktop nebula-commander-service
openSUSE:
sudo zypper addrepo https://pkgs.nebulacommander.com/rpm/nebula-commander.repo
sudo zypper install nebula-commander-desktop nebula-commander-service
On a server without a desktop, install just nebula-commander-service. The repository metadata and the RPMs are signed with the key at pkgs.nebulacommander.com/gpg.key.
The packages below can also be installed directly, without adding the repository.
.deb (Debian, Ubuntu, and derivatives)
Download all three packages from the Client Download page or GitHub Releases, then install together so apt resolves the dependency order:
sudo apt install ./nebula-commander-client.deb ./nebula-commander-service.deb ./nebula-commander-desktop.deb
.rpm (Fedora, RHEL, and derivatives)
sudo dnf install ./nebula-commander-client.rpm ./nebula-commander-service.rpm ./nebula-commander-desktop.rpm
On openSUSE, use zypper instead:
sudo zypper install ./nebula-commander-*.rpm
Flatpak
The desktop app is also available as a Flatpak bundle. It is not yet published on Flathub, so install the bundle directly:
flatpak install --user ./org.beardedtek.NebulaCommander.flatpak
The Flatpak is the GUI only - it still needs nebula-commander-service (or an equivalent backend, such as the NixOS module) installed and running separately, since a sandboxed Flatpak cannot run Nebula or create a TUN device itself.
After install
- Open Nebula Commander from your application launcher.
- Go to the Enrollment tab and enter the server URL and the one-time code from Nebula Commander (Nodes → open the node → Enroll).
- The Status tab shows connection/service state and lets you start/stop/restart the service, view the generated
config.yaml, and accept or reject offered subnet routes and exit nodes.
See Linux App usage for day-to-day use, headless (service-only) setup, and re-enrolling, or Development: Manual builds to build these packages yourself.
6.1.1.4 - Windows Installer
On Windows the MSI installer sets up the ncclient CLI, a native windowed app, and a background Windows Service that does the actual work as LocalSystem. Any user can view status in the app; enrolling, changing settings or routes, and starting/stopping the service require running the app as administrator.
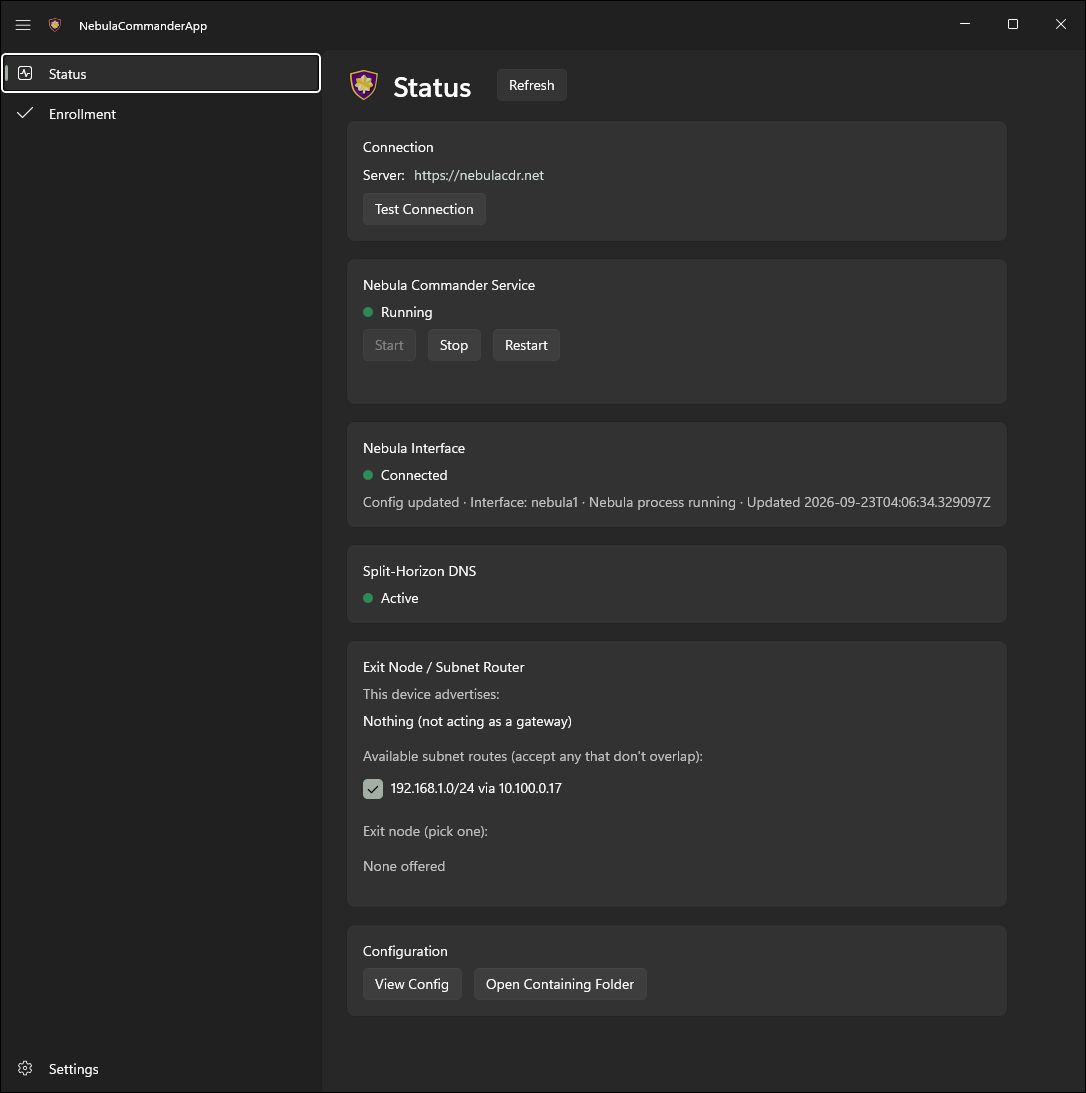
What the installer includes:
- ncclient – CLI for enrollment and daemon (poll for config/certs, run or restart Nebula).
- Nebula Commander (WinUI 3) – The windowed desktop app: side tabs for Status, Enrollment, and Settings, minimizes to the tray on close. Talks to the background service.
- ncclient-service – The
NebulaCommanderService Windows Service that polls for config/certs and runs Nebula as LocalSystem. Starts automatically at boot; the app talks to it over a local named pipe.
All three are installed to %ProgramFiles%\Nebula Commander\. The installer can add that directory to PATH, creates Start Menu shortcuts, and registers/starts the service.
Getting the installer:
- Download
NebulaCommander-windows-amd64.msi from the GitHub Releases page for the version you want. - Use
SHA256SUMS.txt in the same release to verify the file.
After install:
- Open Nebula Commander from the Start Menu, choose Relaunch as administrator, and use the Enrollment tab: paste the server URL and the one-time code from Nebula Commander (Nodes → open the node → Enroll). This is the recommended way to enroll after an MSI install - the service stores the token in its protected folder (
%ProgramData%\nebula-commander\) and fetches config immediately. (The CLI’s ncclient enroll writes to a separate per-user location the service does not read from, so avoid it for MSI installs unless you’ve explicitly redirected NEBULA_COMMANDER_CONFIG_DIR.) - The service starts polling automatically once enrolled - nothing else to run. On first start it also downloads and verifies Nebula itself. As administrator, use the app’s Start/Stop/Restart Service controls on the Status tab, and Settings to change server URL, poll interval, or enable split-horizon DNS. See Windows App usage for details, including re-enrolling.
For building the MSI yourself, see Development: Manual builds.
6.1.1.5 - NixOS
A services.ncclient module runs ncclient declaratively as a systemd service — an alternative to the Docker image, the Windows service, or a hand-written unit (see ncclient CLI: Run as a service). It’s exposed by the same flake.nix as the server module, as nixosModules.client.
{
  inputs.nebula-commander.url = "github:NixRTR/nebula-commander";

  outputs = { self, nixpkgs, nebula-commander, ... }: {
    nixosConfigurations.yourHost = nixpkgs.lib.nixosSystem {
      system = "x86_64-linux";
      modules = [
        ./configuration.nix
        nebula-commander.nixosModules.client
      ];
    };
  };
}
Or import nix/client-module.nix directly by path if you’re not using a flake, the same way the server module can be.
services.ncclient = {
  enable = true;
  server = "https://nebula.example.com";
  # One-time enrollment: a file holding the enrollment code, consumed once (the
  # unit only runs `ncclient enroll` when no token exists yet at stateDir/token).
  enrollCodeFile = "/run/secrets/ncclient-enroll-code";
  acceptDns = true;
};
Then rebuild: nixos-rebuild switch (path-based) or nixos-rebuild switch --flake .#yourHost. See NixOS usage for controlling the service, running ncclient commands, and re-enrolling.
| Option | Type | Default | Description |
|---|
enable | bool | — | Enable the ncclient service |
package | package | built from nix/client-package.nix | The ncclient package |
nebulaPackage | package | pkgs.nebula | Package providing the nebula/nebula-cert binaries ncclient orchestrates |
server | string | — (required) | Nebula Commander server URL |
enrollCodeFile | null or path | null | Path to a file containing a one-time enrollment code. When set and no token exists yet, a oneshot unit runs ncclient enroll before the main service starts. Leave null if you provision the token file out of band. |
interval | int | 60 | Poll interval in seconds |
outputDir | string | /var/lib/ncclient/nebula | Directory ncclient writes Nebula’s config/certs/binary to |
acceptDns | bool | false | Accept and apply DNS settings pushed by Nebula Commander |
adminGroups | null or list of strings | [ "wheel" "sudo" ] | Active local users in these groups may change the device (desktop app enrollment, settings, routes, exit node; start/stop/restart ncclient.service) without a password. Everyone else needs an administrator’s password. null lets any active local user do it (single-user machines only). |
stateDir | string | /var/lib/ncclient | Directory holding the device token and settings.json together on the same persistent path — both must live in the same place or the node’s identity is lost on restart even though the token survives |
The service runs as root, matching the Windows Service (LocalSystem) and Docker image (root-in-container) precedent above — Nebula needs to create a TUN device. --nebula/--restart-service are intentionally not exposed; nebula is resolved via PATH (from nebulaPackage), matching the Docker image’s approach.
Desktop app
On a NixOS desktop, you can add the Linux desktop app alongside the service with the nixosModules.client-desktop module (or nix/client-desktop-module.nix by path):
modules = [
  ./configuration.nix
  nebula-commander.nixosModules.client
  nebula-commander.nixosModules.client-desktop
];
services.ncclient.enable = true;          # the service the app controls
services.ncclient-desktop.enable = true;  # adds "Nebula Commander" to the app launcher
| Option | Type | Default | Description |
|---|
enable | bool | — | Install the Nebula Commander desktop app (GTK4/libadwaita) |
package | package | built from nix/client-desktop-package.nix | The desktop app package |
The desktop module installs the app and turns on security.polkit.enable (as a default you can override), since every request the app makes is authorized by polkit. services.ncclient registers the D-Bus policy and polkit rules the app needs. Any user in an active local session can view status; members of adminGroups (default wheel/sudo) can enroll, change settings, accept routes, and start/stop/restart ncclient.service without a password prompt, and everyone else needs an administrator’s password.
6.1.1.6 - Pip (PyPI)
Fallback method when Docker, binaries, or NixOS are not suitable (e.g. no Docker, or you need to run from source).
From PyPI:
pip install nebula-commander
Requires Python 3.10+. This installs the ncclient command.
From source (repo clone):
cd nebula-commander
pip install -r client/requirements.txt
Then run as python -m client --server URL enroll --code XXX, or install the client in development mode to get the ncclient command:
cd client
pip install -e .
Next, see ncclient CLI usage to enroll and run it.
6.1.2 - ncclient Usage
After installing ncclient, follow the page for the client you installed. Each one covers enrolling, day-to-day control, subnet routes and exit nodes, split-horizon DNS, re-enrolling, and troubleshooting.
Concepts shared by every client
Enrollment
A device joins Nebula Commander by enrolling with a one-time code:
- In Nebula Commander, open Nodes, select the node for this device, and click Enroll.
- Copy the code. It works once and expires if unused.
- Give the code to the client (how depends on the client, see its page).
Enrolling stores a device token and the node’s ID on the device. From then on the client uses the token to fetch the node’s Nebula config and certificates, and reports a heartbeat so the node shows as online.
Re-enrolling
Re-enroll when a device’s token was lost or revoked, when you want the device to become a different node, or when moving it to another Nebula Commander server. Generate a new code (the old one is already used up) and enroll again.
Enrolling a node again invalidates that node’s previous token on the server. A running client notices on its next poll (it gets a 401), then picks up the new token from disk without a restart. If you switched to a different server, restart the client so it polls the new URL. The per-client pages spell out the exact steps, and a couple of clients (Docker and the NixOS module) need the old token removed first.
Subnet routes, exit nodes, and DNS
- A subnet router or exit node assigned to a node is only offered to it. Each device has to accept it before using it.
- Split-horizon DNS is served by lighthouses (usually the Docker client with
SERVE_DNS). Other devices opt in to resolving through it.
Each client page shows how to do both.
6.1.2.1 - ncclient CLI
This page covers the plain ncclient command from the binaries or Pip, run by hand or under your own init system. If you installed the Linux packages, the Windows MSI, or the NixOS module, use the Linux App, Windows App, or NixOS page instead. Those set up a background service that keeps its state somewhere the plain CLI doesn’t look.
Where state lives
| What | Default location |
|---|
| Device token | The OS keyring if the Python keyring package is available. Otherwise ~/.nebula/device-token (the frozen binaries and a plain pip install use this). Set NEBULA_DEVICE_TOKEN_FILE to use a specific file. |
settings.json (server, node ID, accepted routes) | ~/.config/nebula-commander/ on Linux and macOS, %APPDATA%\nebula-commander\ on Windows. Set NEBULA_COMMANDER_CONFIG_DIR to change it. |
| Nebula config and certificates | /etc/nebula on Linux and macOS, %USERPROFILE%\.nebula on Windows. Set with --output-dir. |
~ is the home directory of whoever runs the command, so sudo ncclient … uses root’s (/root/.nebula/device-token). Run enroll, run, and routes as the same user (and with the same environment variables), or they won’t find each other’s files.
Enroll
- In Nebula Commander, open Nodes, select the node for this device, and click Enroll.
- Copy the enrollment code.
- On the device, as the user that will run the daemon (root on Linux):
sudo ncclient enroll --server https://YOUR_NEBULA_COMMANDER_URL --code XXXXXXXX
Run (daemon)
After enrollment, run ncclient so it periodically pulls config and certificates and runs or restarts Nebula:
sudo ncclient run --server https://YOUR_NEBULA_COMMANDER_URL
Defaults: poll every 60 seconds, write files to /etc/nebula (or ~/.nebula on Windows), and start or restart Nebula from PATH when config changes. --server can be left out once you’ve enrolled; ncclient uses the server saved in settings.json, or NEBULA_COMMANDER_SERVER.
Linux: creating the Nebula TUN device requires root, so run run with sudo.
Options
| Option | Description |
|---|
--output-dir DIR | Where to write config.yaml, ca.crt, host.crt (default: /etc/nebula on Linux/macOS, ~/.nebula on Windows) |
--interval N | Poll interval in seconds (default: 60) |
--nebula PATH | Path to the nebula binary if it is not on PATH |
--restart-service NAME | Instead of running nebula directly, restart this systemd service (e.g. nebula). Use only one of --nebula or --restart-service. |
--accept-dns | Apply split-horizon DNS. See Split-horizon DNS. |
Example with nebula in a non-standard location:
sudo ncclient run --server https://nc.example.com --nebula /usr/local/bin/nebula
Example using systemd to run Nebula (ncclient only restarts the service):
sudo ncclient run --server https://nc.example.com --restart-service nebula
Certificates: if the cert was created via the server (Create certificate in the UI), the bundle includes host.key. If it was signed (Sign flow), the server doesn’t have the key, so put your host.key in the output directory.
Run as a service
Linux (ncclient install)
This checks that root is enrolled (if not, it prints the ncclient enroll … command to run first). It then prompts for the server URL and options, writes /etc/default/ncclient and /etc/systemd/system/ncclient.service, and enables (and optionally starts) the service. The unit runs ncclient run as root.
- Use
--no-start to enable without starting. - Use
--non-interactive with NEBULA_COMMANDER_SERVER (and optional env vars) set for scripting.
Current limitation
Of the values ncclient install writes to /etc/default/ncclient, only NEBULA_COMMANDER_SERVER currently takes effect. The service runs with the default output directory (/etc/nebula), interval, and nebula from PATH. To change those, add the flags to ExecStart with sudo systemctl edit --full ncclient.
Day-to-day:
sudo systemctl status ncclient
sudo systemctl restart ncclient
journalctl -u ncclient -f
Run ncclient run under your init system (launchd on macOS, Task Scheduler or NSSM on Windows). Example configs are in the repo under client/examples/. See README-startup.md for step-by-step setup on macOS and Windows. On Windows, the MSI’s service is usually the easier option.
Subnet routes and exit nodes
A subnet router or exit node that an admin assigns to this node is only offered to it. It isn’t used until you accept it on the device. Use ncclient routes, as the same user as run and with the same --output-dir:
sudo ncclient routes list                              # offered routes, and which are accepted
sudo ncclient routes accept 192.168.1.0/24             # add --via <IP> if several gateways offer it
sudo ncclient routes reject 192.168.1.0/24
sudo ncclient routes accept-exit-node --via 10.100.0.1
sudo ncclient routes reject-exit-node
You can accept several subnet routes as long as they don’t overlap, and at most one exit node. The running daemon picks up changes on its next poll; no restart needed.
Split-horizon DNS
When the server has DNS enabled for the network, pass --accept-dns to run. ncclient then fetches the DNS config (domain and lighthouse IPs) and configures the host to resolve the Nebula domain via the network’s DNS. On Linux the client detects how the host manages DNS and configures it to match:
- systemd-resolved (on its own, or behind NetworkManager): per-link DNS on the Nebula interface, so only the Nebula domain goes to its servers.
- NetworkManager without systemd-resolved (e.g. Debian desktops): NetworkManager’s dnsmasq plugin with a rule for the Nebula domain. If NetworkManager is writing
/etc/resolv.conf itself, the client switches it to the plugin; that needs dnsmasq (Debian: dnsmasq-base) installed. - A standalone dnsmasq service: a rule in
/etc/dnsmasq.d/. - Plain
/etc/resolv.conf: last resort, not true split-horizon.
It also keeps NetworkManager from taking over the Nebula interface, re-checks the DNS on every poll (re-applying it if something undid it), and removes everything when it stops or DNS is turned off. If none of these can work, the client logs why and what to install. On Windows it uses NRPT. Applying DNS needs root (Linux) or Administrator (Windows). To remove the DNS override, stop ncclient normally (e.g. Ctrl+C or systemctl stop).
Re-enroll
Get a new code from Nodes → Enroll, then run enroll again as the same user, with the same environment variables as the daemon:
sudo ncclient enroll --server https://YOUR_NEBULA_COMMANDER_URL --code NEWCODE
This overwrites the old token and node ID. The running daemon switches to the new token on its next poll. If you changed servers, restart it too (sudo systemctl restart ncclient for an ncclient install service) and update NEBULA_COMMANDER_SERVER in /etc/default/ncclient.
If enroll succeeds but the daemon keeps logging Token invalid or expired, the two are using different token locations (usually one ran with sudo and the other didn’t). See Where state lives.
Troubleshooting
- No TUN device / cannot ping Nebula IP: on Linux, run with
sudo. For the Sign flow, make sure host.key is in the output directory. Check Nebula’s error output (e.g. “failed to get tun device”, “no such file”). - Nebula starts then exits: often a missing
host.key (Sign flow), a wrong config path, or on Linux not running as root. Check the Nebula lines ncclient prints. Token not found. Run 'ncclient enroll' first.: this user has no token. Enroll as the same user that runs the daemon.
macOS notes
Default output dir: /etc/nebula; for non-root use --output-dir ~/.nebula. Nebula: use PATH or --nebula /opt/homebrew/bin/nebula (Apple Silicon) or /usr/local/bin/nebula (Intel). Don’t use --restart-service; use launchd for background runs.
Windows notes
Default output dir: %USERPROFILE%\.nebula. Use --nebula if nebula.exe is not on PATH. Don’t use --restart-service. The plain CLI’s token and settings are separate from the shared %ProgramData%\nebula-commander\ location used by the MSI’s app and service. If you installed the MSI, use the Windows App to enroll instead.
6.1.2.2 - Docker
The Docker client runs ncclient, Nebula, and (on lighthouses) dnsmasq in one container. See Docker installation for the image and a full docker-compose.yml. The commands below assume that compose file, with the service named ncclient, run from the directory that holds it.
Where state lives
Everything that must survive a container recreate lives in the /data volume, as long as the compose file sets these two paths (the example does):
NEBULA_OUTPUT_DIR: "/data/nebula"
NEBULA_DEVICE_TOKEN_FILE: "/data/nebula-commander/token"
| Path in the container | What it is |
|---|
/data/nebula-commander/token | Device token |
/data/nebula-commander/settings.json | Server URL, node ID, accepted routes |
/data/nebula/ | Nebula config.yaml, certificates, status |
Without those two variables the image falls back to /etc/nebula and /etc/nebula-commander/token. Those paths are outside the volume, so the device loses its enrollment every time the container is recreated.
Enroll
In Nebula Commander, create or sign a certificate for the node, then click Enroll and copy the code.
Set ENROLL_CODE in the compose file and start the container:
docker compose up -d
docker compose logs -f ncclient
The container enrolls once, when no token exists yet. After that, ENROLL_CODE is ignored and you can remove it.
Run and control
The container starts ncclient on its own and restarts with Docker (restart: unless-stopped).
docker compose logs -f ncclient     # ncclient, Nebula, and dnsmasq output
docker compose restart ncclient     # restart everything in the container
docker compose down                 # stop (the volume and enrollment are kept)
docker compose up -d again after editing the compose file.
Subnet routes and exit nodes
Run ncclient routes inside the container. Pass NEBULA_COMMANDER_CONFIG_DIR so the command sees the same settings.json as the running client, and --output-dir so it sees the routes offered to the node:
docker compose exec -e NEBULA_COMMANDER_CONFIG_DIR=/data/nebula-commander ncclient \
  ncclient routes --output-dir /data/nebula list

docker compose exec -e NEBULA_COMMANDER_CONFIG_DIR=/data/nebula-commander ncclient \
  ncclient routes --output-dir /data/nebula accept 192.168.1.0/24
reject, accept-exit-node --via <IP>, and reject-exit-node work the same way (see the ncclient CLI page). The running client applies changes on its next poll.
Split-horizon DNS
The Docker client is how a lighthouse serves Magic DNS. Set SERVE_DNS: "true". When the node is a lighthouse and DNS is enabled for the network, the container polls for the dnsmasq config (every NEBULA_DNS_POLL_INTERVAL seconds, default 60) and runs dnsmasq on the node’s Nebula IP, port 53. On non-lighthouses dnsmasq stays off.
The container does not apply split-horizon DNS to the host it runs on (it doesn’t pass --accept-dns). To resolve Nebula names on that host too, point its resolver at the lighthouse IP yourself.
Re-enroll
The container only uses ENROLL_CODE when no token exists. There are two ways to re-enroll.
Enroll inside the running container. This needs no restart unless the server changed:
docker compose exec -e NEBULA_COMMANDER_CONFIG_DIR=/data/nebula-commander ncclient \
  ncclient enroll --code NEWCODE
The server URL comes from NEBULA_COMMANDER_SERVER. The old token is replaced, and the client switches to the new one on its next poll.
Or remove the token and let the container enroll on start:
docker compose exec ncclient rm /data/nebula-commander/token
# set ENROLL_CODE to the new code in docker-compose.yml, then:
docker compose up -d --force-recreate
docker compose logs -f ncclient
To move to a different server, change NEBULA_COMMANDER_SERVER, use either method above, then docker compose up -d --force-recreate.
Troubleshooting
Token file not found and ENROLL_CODE not set: the container has no token and nothing to enroll with. Set ENROLL_CODE, or check that the volume is mounted and the token path points into it.- The device keeps asking to enroll after every recreate: the token path isn’t in the volume. See Where state lives.
Revoked, deleted, or re-enrolled elsewhere - Nebula stopped. Enroll again to reconnect.: the device was revoked, deleted, or re-enrolled elsewhere; Nebula was stopped and its config and key removed. Re-enroll it with a new code.- Nebula can’t create its tun device: the container needs
network_mode: host and cap_add: NET_ADMIN. It also needs rootful Docker. Under rootless Docker or Podman, “host” networking is a private namespace owned by an unprivileged user, so Nebula can’t configure the real host’s network and inbound UDP never reaches it. - dnsmasq never starts: check
SERVE_DNS is set, the node is a lighthouse, and DNS is enabled for the network. The logs show Warning: listen-address … not assigned if Nebula’s interface never came up.
6.1.2.3 - NixOS
This page covers day-to-day use of the services.ncclient module. See NixOS installation for importing the module and its full option list. Paths below use the defaults (stateDir = "/var/lib/ncclient", outputDir = "/var/lib/ncclient/nebula"); adjust them if you changed those options.
What the module sets up
ncclient.service: runs ncclient run as root, with nebula from nebulaPackage, plus nftables and iproute2 (for subnet-router/exit-node forwarding and NAT), on its PATH. It restarts on failure.ncclient-enroll.service: only when enrollCodeFile is set. A oneshot that runs ncclient enroll before the main service, only if no token exists yet.- The D-Bus policy and polkit rules the Linux desktop app uses, if you also enable
services.ncclient-desktop. Only members of adminGroups (default wheel/sudo) can make changes without a password. - An
ncclient command on the system PATH, pre-pointed at the service’s state. See Running ncclient commands.
Where state lives
| Path | What it is |
|---|
/var/lib/ncclient/token | Device token |
/var/lib/ncclient/settings.json | Server URL, node ID, accepted routes |
/var/lib/ncclient/nebula/ | Nebula config.yaml, certificates, status |
Both directories are 0700 root:root.
Enroll
The declarative way is enrollCodeFile: a file holding a one-time code from Nodes → Enroll. For example, a sops-nix secret, or a root-only file you create by hand:
services.ncclient = {
  enable = true;
  server = "https://nebula.example.com";
  enrollCodeFile = "/etc/ncclient/enroll-code";   # or config.sops.secrets.ncclient-enroll.path
};
sudo install -D -m 0600 /dev/stdin /etc/ncclient/enroll-code <<< "XXXXXXXX"
sudo nixos-rebuild switch
journalctl -u ncclient-enroll -u ncclient -b
Once a token exists, the enroll unit does nothing and the code file isn’t read. If the token is ever lost, though, the unit tries the used-up code and fails. ncclient.service requires ncclient-enroll.service, so the main service won’t start either until you re-enroll.
Without enrollCodeFile, enroll with the CLI (below), or with the desktop app’s Enrollment tab.
Run and control
systemctl status ncclient
sudo systemctl restart ncclient
journalctl -u ncclient -f
Change server, interval, or acceptDns in your configuration and nixos-rebuild switch. The unit is restarted with the new values.
Running ncclient commands
The module puts an ncclient wrapper on the system PATH that already points at the service’s stateDir and outputDir. Commands that change the service’s state just need root:
Subnet routes and exit nodes
sudo ncclient routes list
sudo ncclient routes accept 192.168.1.0/24
reject, accept-exit-node --via <IP>, and reject-exit-node work the same way (see the CLI page). The service applies changes on its next poll. With services.ncclient-desktop enabled, you can use the app’s Status tab instead.
Split-horizon DNS
Set services.ncclient.acceptDns = true; and rebuild. The service then runs with --accept-dns and configures the host’s resolver (systemd-resolved is the usual case on NixOS). See Split-horizon DNS on the CLI page for details.
Re-enroll
With enrollCodeFile
The enroll unit only enrolls when there is no token, so remove the old one first:
Get a new code from Nodes → Enroll, and put it in the file enrollCodeFile points at. For a sops-managed secret, update the secret and nixos-rebuild switch. For a plain file, overwrite it.
Remove the old token:
sudo rm /var/lib/ncclient/token
Restart both units:
sudo systemctl restart ncclient-enroll ncclient
Check that it worked:
journalctl -u ncclient-enroll -u ncclient -b
Restarting only ncclient isn’t enough. ncclient-enroll is a oneshot with RemainAfterExit=true, so it stays “active” from boot and isn’t run again.
Keep the old token until you have the new code; once it’s removed the device is offline until enrollment succeeds. If you’re moving to a different server, change server and rebuild in step 1.
Without enrollCodeFile
Enroll with the CLI, pointed at the service’s state (see Running ncclient commands). It overwrites the old token, so there’s nothing to delete:
sudo ncclient --server https://nebula.example.com enroll --code NEWCODE
The service switches to the new token on its next poll. If you changed servers, update server and rebuild, which also restarts the service.
With the desktop app
If services.ncclient-desktop is enabled, the app’s Enrollment tab works as described on the Linux App page, with no password prompt for members of adminGroups.
Updates
The client can check daily for new releases and tell you when one is out (sudo ncclient auto-update enable). On NixOS it never installs anything itself; you update the flake input and rebuild. See Automatic updates.
Troubleshooting
ncclient.service won’t start and ncclient-enroll failed: there’s no token, and the code file is missing or its code was rejected (already used or expired). Put a fresh code in the file and restart both units.ncclient: command not found: expected; see Running ncclient commands.Revoked, deleted, or re-enrolled elsewhere - Nebula stopped. Enroll again to reconnect.: the device was revoked, deleted, or re-enrolled elsewhere; Nebula was stopped and its config and key removed. Re-enroll it with a new code.- Enrolled with the CLI but the service still waits for enrollment: the CLI ran without both environment variables, so the token went to root’s home directory. Run it again with them.
6.1.2.4 - Linux App
| Light | Dark |
|---|
| |
On Linux, Nebula Commander (GTK4/libadwaita) is an unelevated desktop app for the background ncclient systemd service. The service does the actual work (polling for config and certs, running Nebula) as root, and exposes a system D-Bus API (org.beardedtek.NebulaCommander1) that the app talks to, authorized per call via polkit.
Anyone can view; administrators change. Any user logged in at the machine can see status and offered routes. Enrolling, changing settings, accepting routes or exit nodes, and starting/stopping the service work without a password for members of the sudo (Debian/Ubuntu) or wheel (Fedora/openSUSE/Arch) group. Anyone else needs an administrator’s password, so other users of a shared machine can’t re-point or stop the tunnel. Remote (SSH) sessions get nothing through the app’s API; use sudo on the command line instead.
The app and service are installed together via .deb, .rpm, or Flatpak. The app isn’t designed to run without the service; if the service isn’t installed or running, the Status tab says so. On a server you can install just nebula-commander-service and manage it from the shell (see Headless use).
Where state lives
The service keeps its token, settings.json, generated Nebula config, and status under /var/lib/ncclient/ (root-only). The app never reads these files directly, only through the D-Bus API (View Config shows the node’s private key as <redacted>). The service uses the distribution’s packaged nebula binary.
Enroll
- Open Nebula Commander from your application launcher.
- Go to the Enrollment tab and enter the server URL and the one-time code from Nebula Commander (Nodes → open the node → Enroll).
The service picks up the token right away; it waits for enrollment instead of exiting when it has none.
Using the app
The app has three tabs in its header bar and follows the desktop’s light/dark preference.
- Status: connection state (e.g. Connected – Config updated), the systemd service state with Start/Stop/Restart buttons, a switch for each subnet route offered to this node, an Exit node picker, and View Config (under Advanced) to see the generated
config.yaml. Routes that overlap one you’ve already accepted are shown disabled with the reason. You also get a desktop notification when the connection state changes or a new route is offered. - Enrollment: shows whether the device is enrolled (and to which server), and lets you enroll with a server URL and code.
- Settings: server URL, poll interval, Accept split-horizon DNS, and Run on startup (an XDG autostart entry for the app itself). Saving restarts the service automatically so the new values take effect.
| Enrollment | Settings |
|---|
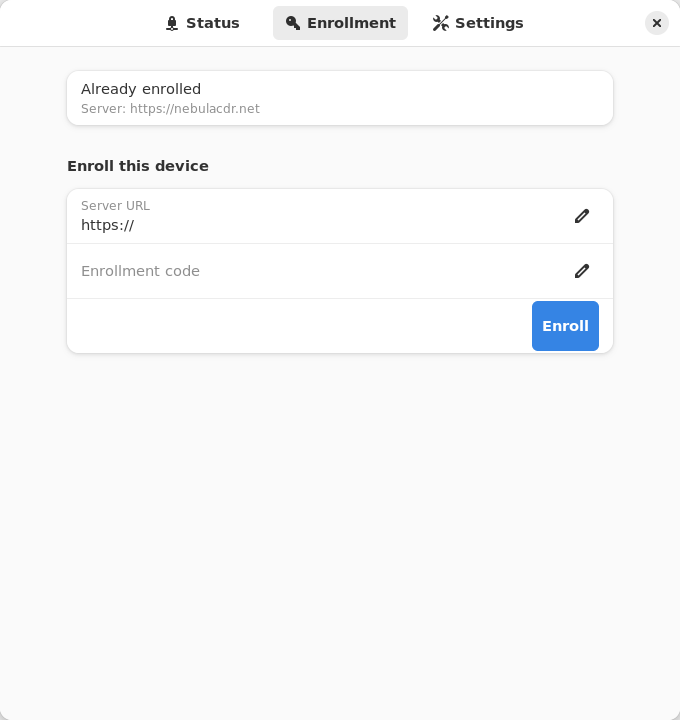 | 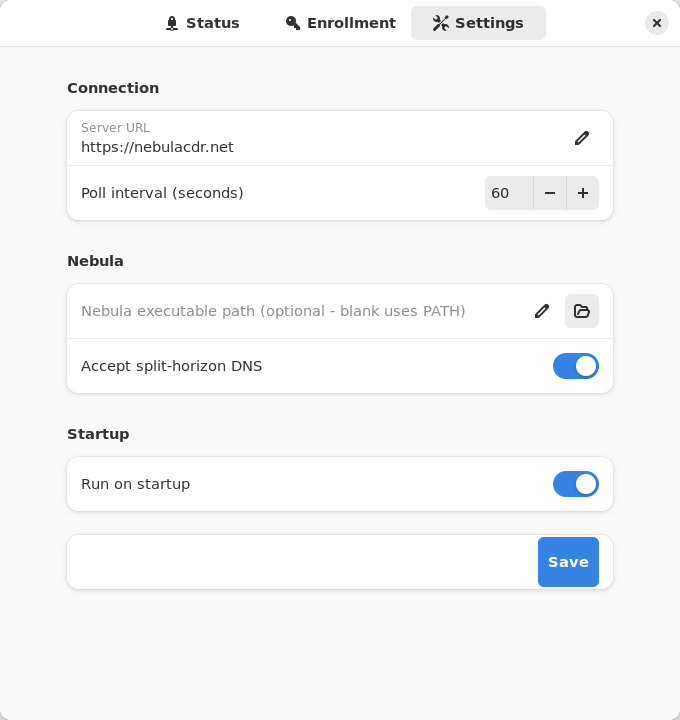 |
Subnet routes and exit nodes
Use the switches and the Exit node picker on the Status tab. Changes apply on the service’s next poll. See Subnet routers and exit nodes for how routes are offered.
Split-horizon DNS
Turn on Accept split-horizon DNS in Settings and save. The service restarts with --accept-dns and configures the host’s resolver to match how it manages DNS (systemd-resolved, NetworkManager, dnsmasq, or /etc/resolv.conf). See Split-horizon DNS on the CLI page for details.
Re-enroll
Open the Enrollment tab and enroll again with a new code (and a new server URL, if you’re moving servers). This replaces the device token. The service switches to the new token on its next poll. If you changed the server, click Restart on the Status tab so it polls the new URL.
Headless use (service only)
With only nebula-commander-service installed, manage the service from the shell:
sudo systemctl status ncclient
sudo systemctl restart ncclient
journalctl -u ncclient -f
Run as root, ncclient enroll and ncclient routes automatically use the service’s state in /var/lib/ncclient when the service package is installed.
Enroll or re-enroll:
sudo ncclient enroll --server https://YOUR_NEBULA_COMMANDER_URL --code XXXXXXXX
sudo systemctl enable --now ncclient
On re-enroll the service picks up the new token on its next poll; restart it if you changed servers.
Subnet routes and exit nodes:
sudo ncclient routes list
sudo ncclient routes accept 192.168.1.0/24
reject, accept-exit-node --via <IP>, and reject-exit-node work the same way (see the CLI page).
Split-horizon DNS: the service adds --accept-dns when /var/lib/ncclient/settings.json contains "accept_dns": true. Edit it as root, then sudo systemctl restart ncclient.
Updates
With the package repository configured, the client can upgrade itself during a daily window: Settings → Updates in the app, or sudo ncclient auto-update enable. See Automatic updates.
Troubleshooting
- Status says the service isn’t installed or is unreachable: install
nebula-commander-service and start it with sudo systemctl enable --now ncclient. The Flatpak app can’t do this for you. Revoked, deleted, or re-enrolled elsewhere - Nebula stopped. Enroll again to reconnect. in the journal: the device was revoked, deleted, or re-enrolled elsewhere; Nebula was stopped and its config and key removed. Re-enroll it with a new code.- “Administrator required” in the app: your account isn’t in the
sudo or wheel group. Ask an administrator to add you (sudo usermod -aG sudo USER on Debian/Ubuntu, wheel elsewhere, then log out and back in), or have them make the change. - Enrolled with
sudo ncclient enroll but the service still waits for enrollment (versions before 0.6.9): the token went to root’s home directory instead of /var/lib/ncclient. Upgrade, or prefix the command with NEBULA_COMMANDER_CONFIG_DIR=/var/lib/ncclient NEBULA_DEVICE_TOKEN_FILE=/var/lib/ncclient/token.
Run from source
From the nebula-commander repo root, with PyGObject, GTK 4, libadwaita, and jeepney installed (on Debian/Ubuntu: python3-gi gir1.2-gtk-4.0 gir1.2-adw-1 python3-jeepney):
python3 -m client.linux.desktop
It still needs a running ncclient.service that exposes the D-Bus API (from nebula-commander-service or the NixOS module). Without one, Status shows the service as not installed.
Build
See Linux Desktop App installation and Development: Manual builds for building the .deb/.rpm/Flatpak packages yourself.
6.1.2.5 - Windows App
On Windows, Nebula Commander (WinUI 3) is a native windowed app for a background Windows Service (NebulaCommanderService). The service does the actual work (polling for config and certs, running Nebula, applying split-horizon DNS) as LocalSystem.
Anyone can view; only administrators can change. Run normally, the app is view-only: status, routes and config are visible to every user. Enrolling, changing settings, accepting routes or exit nodes, installing/updating Nebula, and starting/stopping the service all require an elevated administrator. Use the Relaunch as administrator bar at the top of the app (or press Alt+R; one UAC prompt), or start it with Run as administrator. The service enforces this itself on every change, so other users on a shared PC can’t re-point or stop your tunnel.
The app and service are installed together by the MSI installer. The app isn’t designed to run without it: only the MSI registers the service (there’s no CLI install/remove subcommand for it), so a standalone app with no service shows Status as unreachable.
Where state lives
Everything lives in %ProgramData%\nebula-commander\, which only SYSTEM and Administrators can open. The app never touches it directly; it asks the service over a local named pipe.
| What | Where |
|---|
| Device token | token.bin (DPAPI-encrypted) |
| Settings | settings.json, written by the service |
| Nebula config, certs, and log | config.yaml (includes the node’s private key), certificates, nebula.log |
| Nebula itself | nebula\, installed and updated by the service |
The service’s own messages go to the Windows Application event log.
Enroll
- Open Nebula Commander from the Start Menu.
- On the Enrollment page, enter the server URL and the one-time code from Nebula Commander (Nodes → open the node → Enroll).
This needs the app running as administrator. The service makes the enrollment request itself, stores the token, and polls right away instead of waiting for the next interval.
Don’t enroll with ncclient enroll from a terminal on an MSI install. The plain CLI writes to a per-user location the service never reads.
Using the app
The app has three side tabs (Settings is pinned at the bottom of the side bar) and follows the Windows light/dark app theme.
Status: one card each for:
- Connection: the server URL and a Test Connection button.
- Nebula Commander Service: state and Start/Stop/Restart.
- Nebula Interface: connected/error, the interface name, whether the Nebula process is running, and when the service last updated.
- Split-Horizon DNS: active or inactive.
- Exit Node / Subnet Router: what this device advertises, plus checkboxes for offered subnet routes and a picker for offered exit nodes.
- Configuration: View Config (the node’s private key is shown as
<redacted>) and Open Containing Folder (administrator only).
Use Refresh to update the page right away.
Enrollment: enroll, or see which server the device is enrolled with.
Settings: server URL, poll interval, and Split-horizon DNS. Under Nebula you can see the installed Nebula version, Check for updates against Nebula’s GitHub releases, and Install / update Nebula: the service downloads the official release, verifies its SHA256 checksum, and installs the whole archive (nebula.exe, nebula-cert.exe, wintun) itself. The service installs Nebula automatically on first start, and there’s no custom Nebula path. Under Startup, Run on startup opens the app to the tray when you sign in.
| Enrollment | Settings |
|---|
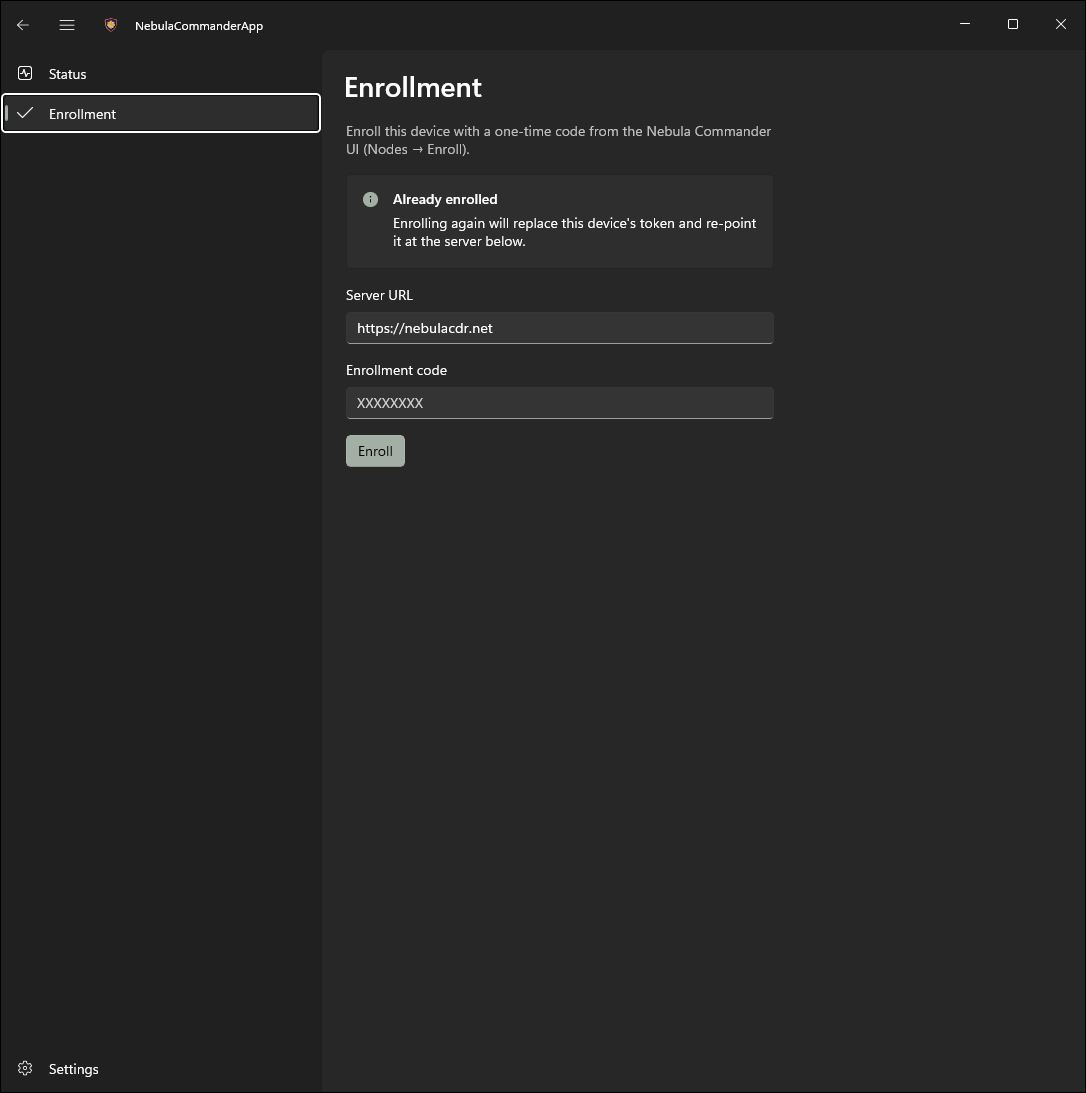 | 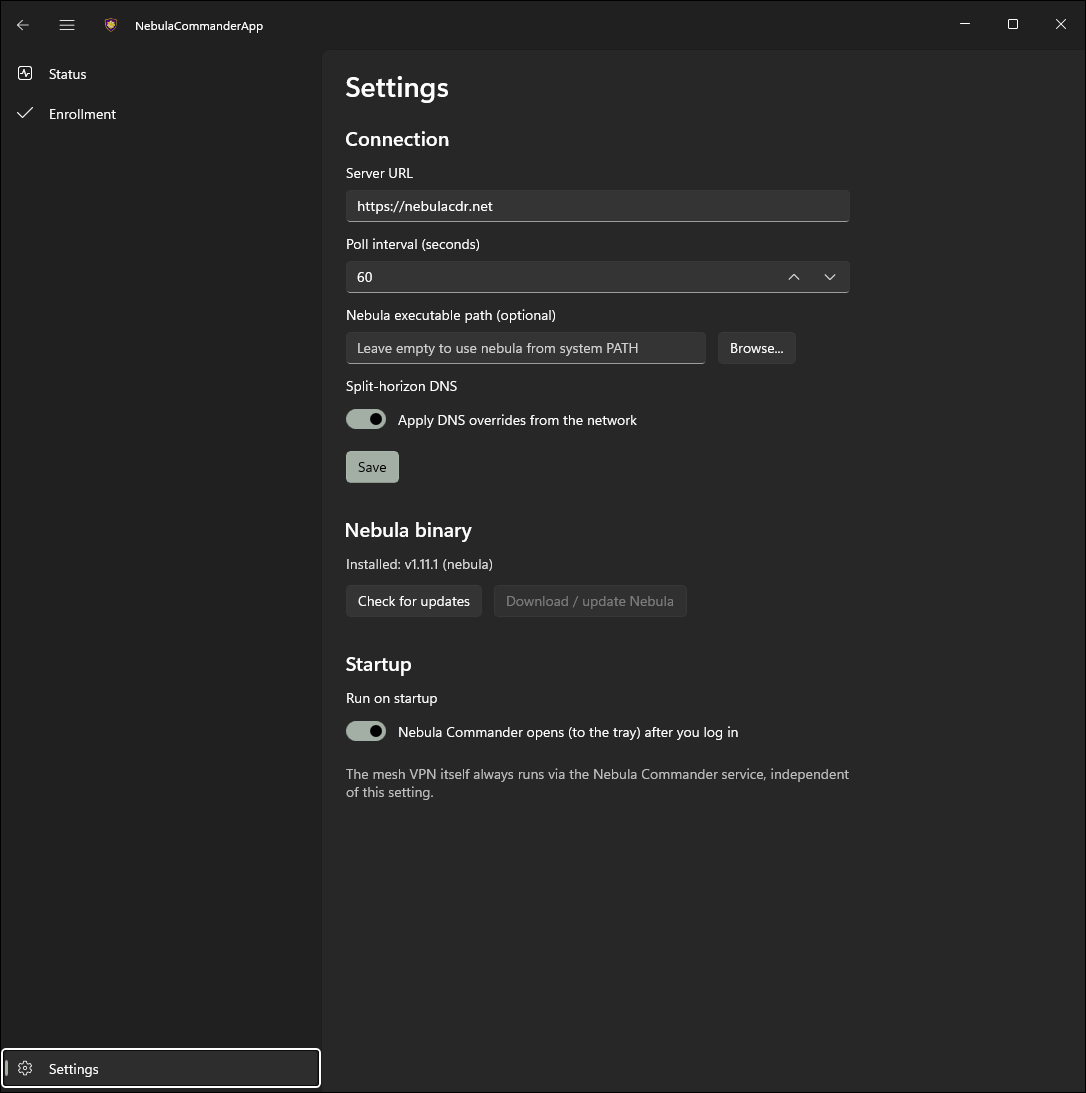 |
Closing the window minimizes it to the tray rather than exiting. Use the tray icon’s Open Nebula Commander item to bring it back, or Exit to quit the app. The service keeps running either way: it starts automatically at boot, whether or not the app is open or anyone is signed in.
To control the service without the app, use Services (services.msc) or an elevated prompt (non-administrators can only query it):
sc.exe query NebulaCommanderService
Restart-Service NebulaCommanderService
Subnet routes and exit nodes
Use the checkboxes and the exit-node picker on the Exit Node / Subnet Router card of the Status page. The service applies changes right away. See Subnet routers and exit nodes for how routes are offered.
Split-horizon DNS
Turn on Split-horizon DNS in Settings. The service applies it with NRPT rules for the network’s domain and removes them when turned off or when the service stops. The Split-Horizon DNS card on Status shows whether it’s active.
Re-enroll
Open the Enrollment page and enroll again with a new code, and a new server URL if you’re moving servers. This replaces the token, re-points the device at the server you entered, and makes the service poll immediately. Nothing needs restarting.
Updates
The service can install new releases by itself during a daily window: Settings → Updates (as administrator), or ncclient auto-update enable from an elevated prompt. See Automatic updates.
Troubleshooting
- Status shows the service as unreachable: the MSI’s service isn’t installed or isn’t running. Start it from the Status page or
services.msc, or reinstall the MSI. - “Administrator required” when changing something: relaunch the app as administrator (the bar at the top of the window).
- Nebula Interface shows an error: as administrator, check
%ProgramData%\nebula-commander\nebula.log (Open Containing Folder on Status gets you there). - Status says Nebula isn’t installed: the service’s first-run download failed (e.g. offline). Use Settings → Install / update Nebula as administrator.
- Enrolled from a terminal and the app still says not enrolled: the CLI wrote a per-user token. Enroll from the app instead.
Run from source
From client/windows-app/:
dotnet build # or: dotnet run
Running this way still expects a real installed-and-running NebulaCommanderService to control (the app checks that the control pipe really belongs to that service). If it isn’t installed or running, the Status page says so rather than failing.
Build (self-contained publish)
cd client/windows-app
dotnet publish -c Release -r win-x64
Output: bin\Release\net10.0-windows*\win-x64\publish\NebulaCommanderApp.exe, a single self-contained file (it bundles the .NET runtime and Windows App SDK, so the target machine needs no prerequisites). See client/windows-app/README.md for details.
For the background service, see client/windows/README.md and Development: Manual builds. The Windows MSI installer installs and registers all three: ncclient.exe, NebulaCommanderApp.exe, and ncclient-service.exe.
6.1.2.6 - Automatic updates
From v0.7.0, the client can keep itself up to date. It’s off by default, and only an administrator on the device itself can turn it on. The Nebula Commander server shows each node’s client version and whether automatic updates are on, but can’t change the setting.
| Install | What “on” does |
|---|
| Windows (MSI) | The service downloads and installs new releases during a daily window you choose. |
| Linux deb/rpm from the package repository | A systemd timer upgrades the Nebula Commander packages from that repository during the window. |
| NixOS module | Notify only. Checks daily and tells you when a release is out, with the commands to update. It never changes the system: your flake decides the version. |
| Docker, Flatpak, pip, a bare binary | Not available. Update these the way you installed them (pull a new image, Flathub, pip install -U). |
Turn it on
Windows: open the app as administrator (Relaunch as administrator), go to Settings → Updates, switch on Automatic updates, pick the window and click Save. Or, from an elevated prompt:
ncclient auto-update enable --window 02:00-05:00
Linux: in the desktop app, Settings → Updates, then Apply (you need to be in the sudo or wheel group). Or:
sudo ncclient auto-update enable --window 02:00-05:00
This is refused if the official package repository isn’t configured. Add it first. A .deb or .rpm installed by hand without the repository can’t update itself.
NixOS: sudo ncclient auto-update enable, or the desktop app. The window doesn’t apply.
Other commands:
ncclient auto-update status      # installed version, setting, last check and install
ncclient auto-update check-now   # check now, and install if automatic updates are on (admin)
ncclient auto-update disable     # admin
The window
Updates install once a day, at a random time inside the window (local time, HH:MM-HH:MM, default 02:00-05:00). Windows that cross midnight, like 23:00-01:00, work. A device that’s off during the window waits for the next one. The tunnel drops for a few seconds while the client restarts.
What it trusts
- Windows and NixOS read a release manifest from
https://pkgs.nebulacommander.com/updates/latest.json. The client uses it only if its signature checks out against a key built into the client. The Windows installer it names must come from the project’s GitHub releases and match the manifest’s SHA-256, or it’s discarded. - Linux packages come from the signed package repository, with the usual apt/dnf/zypper signature checks. If the repository can’t be verified, the update stops and says so.
- The client only ever moves to a newer stable release. It never downgrades or installs pre-releases. Development builds never update.
Where to look when something goes wrong
ncclient auto-update status shows the last check and the last install, with the error if there was one.- Windows: the installer log is in
C:\ProgramData\nebula-commander\updates\install-<version>.log (administrators only). If the app was open during an update, it shows Nebula Commander was updated → Restart now. - Linux:
journalctl -u ncclient-update. The timer is ncclient-update.timer; its window lives in /etc/systemd/system/ncclient-update.timer.d/window.conf, which ncclient writes. Don’t edit it by hand.
NixOS: updating when notified
When a release is out, ncclient auto-update status, the desktop app and a desktop notification tell you. To update:
nix flake update nebula-commander     # in your system flake
sudo nixos-rebuild switch
If your flake pins a release (github:NixRTR/nebula-commander/v0.7.0), change the tag instead. A NixOS build reports the commit it was built from (for example “built from commit f67bc81”) rather than a version number.
6.2 - Subnet Routers and Exit Nodes
Turn a node into a subnet router or an exit node, and pick which routes each other node actually uses — built on Nebula’s unsafe_routes.
Nebula Commander can turn a node into a subnet router (it advertises a LAN behind it
to the rest of the mesh, the way tailscale up --advertise-routes does) or an exit
node (it advertises 0.0.0.0/0/::/0 and routes all of another node’s traffic, the
way tailscale up --advertise-exit-node does). Both build on Nebula’s own
unsafe_routes feature.
This page covers how it’s configured from both sides — the gateway that advertises a
route, and the other nodes that actually use it — what happens automatically for
nodes running ncclient on Linux, and — the part that’s easy to miss — what you
have to do yourself for everything else (Windows, macOS, Docker-deployed ncclient,
or bare nebula).
Two sides of the same setting
Every route has a gateway (the node advertising it) and one or more
consumers (the nodes that actually route through it). Nebula Commander exposes
both sides in the Nodes page’s node-details panel:
- On the gateway node, under Advanced → Subnet Router & Exit Node Config
(and Advanced → Exit Node), you choose what this node advertises and, per
route, a “Used by” list of the groups and individual hosts allowed to consume it.
- On a consumer node, the visible (non-Advanced) Use Subnet Router and
Use Exit Node dropdowns let you pick a gateway directly, without opening the
gateway’s own settings.
Both mechanisms write to the same data: picking a gateway from a consumer’s
dropdown adds that consumer as a host in the gateway’s “Used by” list for every matching
route, and clears it from any other gateway’s routes of the same kind (a node uses
at most one subnet router and one exit node at a time). Either way, a route
reaches nobody until an admin explicitly says who it’s for — advertising a route
is never enough on its own.
Setting up a route (gateway side)
In a node’s details panel (Nodes → hostname → Edit), expand Advanced:
- Exit Node — a single checkbox, Exit node (route all traffic). Checking it
advertises both
0.0.0.0/0 and ::/0 from this node. - Subnet Router & Exit Node Config → Advertised subnets — a checklist of local
interfaces
ncclient discovered on this node (ethernet, Wi-Fi, Tailscale, or
another Nebula interface on the same host; Docker interfaces are never offered).
Only populated for nodes actively running ncclient on Linux. - Subnet Router & Exit Node Config → Other — type any CIDR by hand. Use this for
a subnet reachable through the node by some other means
ncclient can’t detect on
its own, or on a node not running ncclient at all.
Under each route is a “Used by” disclosure. Expand it to see who can use the
route, and while editing, add to it:
- Group — pick a group and click Add. Every node in that group gets the
route, including nodes added to the group later, without editing the gateway again.
- Host — pick a single node and click Add.
Each entry has a delete button to remove it. A node that’s both listed as a host and
in a listed group simply gets the route once.
Picking a route (consumer side)
On any other node’s details panel — visible without opening Advanced:
- Use Subnet Router — a dropdown listing every other node on the network that
advertises at least one subnet. Choosing one routes this node’s traffic for all of
that gateway’s advertised subnets through it; None stops using one.
- Use Exit Node — the same idea for full-tunnel routing: a dropdown of every
other node advertising an exit route.
This works for every platform, not just desktop/ncclient nodes - a mobile node can
pick a subnet router or exit node too, since consuming a route needs no host
automation, just the generated Nebula config.
Accepting a route locally (desktop ncclient nodes)
The picker above is server-side authorization - it controls what a node is allowed
to consume, the same way DNS being enabled for a network doesn’t by itself mean a
device applies it (accept_dns/--accept-dns is the separate, local opt-in for
that). Subnet routers and exit nodes work the same way on desktop ncclient nodes
(Linux and Windows): being picked as a consumer makes the route available, not
automatically active. ncclient writes everything it’s authorized to consume to
available-routes.json in its output directory, but only writes the locally
accepted subset into config.yaml for Nebula to actually use.
- CLI (
ncclient on Linux, ncclient.exe on Windows - same commands either
way): ncclient routes list shows what’s available and what’s currently
accepted; ncclient routes accept <CIDR> / routes reject <CIDR> manage subnet
routes, routes accept-exit-node --via <IP> / routes reject-exit-node manage
the exit node. Multiple subnet routes can be accepted at once as long as their
CIDRs don’t overlap - accept rejects an overlapping one with an explanation of
which already-accepted route it conflicts with. At most one exit node is ever
accepted at a time. - The Windows app: the Status page’s
“Exit Node / Subnet Router” card lists the same available/accepted state
interactively - checkboxes for subnet routes (disabled with a reason if accepting
one would overlap an already-accepted route) and a single-select list for the exit
node.
- The Linux desktop app: the Status tab
has a switch per offered subnet route (disabled with the conflict shown if it would
overlap an accepted one) and an Exit node picker. It also sends a desktop
notification when a new route is offered.
A locally accepted/rejected change is picked up within one poll cycle without
needing to re-enroll or restart anything by hand (or immediately, if something
nudges the service to poll now - the Windows app already does this after a
Settings change). This is entirely client-side: the “Used by” list above already
determines authorization; this is a separate device-level consent step on top
of it, and doesn’t exist for mobile (Mobile Nebula) nodes, which have no local
ncclient process to gate anything through - a mobile node’s only control is the
server-side picker.
What happens automatically (Linux nodes running ncclient)
For a gateway node whose ncclient has confirmed it’s Linux (shown by the absence
of the amber warning under Advanced → Subnet Router & Exit Node Config):
- Nebula Commander generates the correct
tun.unsafe_routes entry (with the
required via) in every consumer node’s config, and signs the gateway’s own
certificate with the -subnets claim Nebula requires before it will let that node
route the CIDR at all. ncclient on the gateway polls GET /api/device/advertised-routes and, when its
own advertised routes change, enables IP forwarding
(net.ipv4.ip_forward, and net.ipv6.conf.all.forwarding if any route is IPv6)
and installs a dedicated inet ncclient_routing nftables table: forwarding
accept rules scoped to each advertised subnet, and a masquerade rule for the
exit-node case.
None of this needs the admin to touch the host directly. nft (nftables) must be
installed on the gateway for step 2 to work - ncclient logs a warning and skips it
if nft isn’t found, leaving the route inert.
What you have to do yourself (hosts not running ncclient on Linux)
This includes Windows nodes, macOS, a Docker-deployed ncclient (it runs in its own
network namespace, so it can’t reach the host’s routing table at all), or any host
running the bare nebula binary directly. Nebula Commander still generates the
correct config for these nodes - ncclient’s automation is the only piece that’s
Linux-only. On such a gateway node you need to:
Get the config onto the host. Either let a non-Linux/bare ncclient write it
normally, or download it yourself from the node’s Config button (admin UI) or
GET /api/device/config (device token) and place it where nebula -config <path> expects it.
Enable IP forwarding.
- Linux (no
ncclient): sysctl -w net.ipv4.ip_forward=1 (and
net.ipv6.conf.all.forwarding=1 for IPv6 routes/exit-node), persisted via a file
under /etc/sysctl.d/. - Windows: enable IP forwarding on the network adapter bound to the Nebula tun
device, and configure routing/NAT (e.g. via
netsh interface ipv4 set interface "<adapter>" forwarding=enabled, plus RRAS if you need NAT for an exit node) -
consult Microsoft’s routing documentation for your Windows version. - macOS:
sysctl -w net.inet.ip.forwarding=1, plus pfctl for NAT.
Allow forwarding and (for an exit node) NAT between the Nebula tun interface and
your physical interface. On Linux with nftables, this is exactly what
client/linux_routing.py does for ncclient - use
it as a reference. For a subnet route to 192.168.1.0/24 via tun device nebula1:
table inet ncclient_routing {
    chain forward {
        type filter hook forward priority filter; policy accept;
        iifname "nebula1" ip daddr 192.168.1.0/24 accept
        ip saddr 192.168.1.0/24 oifname "nebula1" accept
    }
}
For an exit node, add a NAT table masquerading traffic from the tun device out
your uplink interface (eth0 below):
table inet ncclient_routing {
    chain postrouting {
        type nat hook postrouting priority srcnat; policy accept;
        iifname "nebula1" oifname "eth0" masquerade
    }
}
iptables-only systems need the equivalent iptables -A FORWARD ... /
iptables -t nat -A POSTROUTING ... -j MASQUERADE rules.
Troubleshooting
nebula fails to start with Could not parse tun.unsafe_routes: entry N.via ... is not present - you’re running a config from before Nebula Commander added the
via/-subnets fix, or a hand-edited config that omits via. Re-download the
config; every generated tun.unsafe_routes entry always includes via now. If this
is your own config (not Nebula Commander’s), every entry needs a via pointing at
the gateway node’s Nebula IP.
A consumer node has the route in its config, but traffic to the subnet doesn’t
arrive - most likely the gateway’s own firewall. Since Nebula 1.10, a firewall rule
only matches traffic to the node’s own Nebula IP unless it also sets local_cidr -
Nebula Commander generates a local_cidr-scoped accept rule for each advertised
subnet: one per host in that route’s “Used by” list, matched by that consumer’s own
certificate-verified Nebula IP (cidr: <ip>/32), and one per group, matched by the
group in the consumer’s certificate (group: <name>). If the consumer isn’t actually
covered by “Used by” - even if it somehow has the route in its own config, e.g. a
hand-edited config or a non-ncclient host - the gateway has no matching rule and
will drop the forwarded traffic; check the “Used by” list first. A manually-written
config for a non-ncclient gateway needs the equivalent cidr/local_cidr rules
added by hand. See Nebula’s firewall docs
for the exact rule shape.
The route works for one node but not another - check that node’s selection:
either its own Use Subnet Router/Use Exit Node dropdown, or the “Used by”
list on the gateway it should be using. A route only reaches nodes explicitly
selected on one side or the other, and - since the gateway’s firewall now enforces
this per node, not just config distribution - an unselected node can’t use the
route even if it has (or is given) a matching tun.unsafe_routes entry by some
other means.
6.3 - Public Endpoints and Reachable Addresses
Tell the mesh where to find a node on the underlay: one public endpoint every peer knows about, plus extra addresses the node reports to its lighthouses.
Nebula finds most nodes on its own: each node reports the addresses of its local
interfaces to the lighthouses, and the lighthouses also see the address a node
connects to them from. Two optional per-node settings cover what that misses. They
reach other nodes by different paths, so they’re separate fields.
| Public endpoint | Additional reachable addresses |
|---|
| Where to set it | Node details panel | Node details → Advanced |
| Values | One host:port (hostname, IPv4, or [IPv6]) | Up to 8 IP:port, added one at a time |
| Nebula setting | Every peer’s static_host_map | This node’s own lighthouse.advertise_addrs |
| How other nodes learn it | Written into their config | Reported to the lighthouses, which pass it on |
| Lighthouses and relays | Need one | Not shown (Nebula ignores it on lighthouses) |
| Changing it restarts Nebula on | Every node on the network | That node only |
Both can be used together: the public endpoint lets peers reach a node without
asking a lighthouse first, and the additional addresses fill in paths the
lighthouses can’t see.
When to add reachable addresses
Add the addresses Nebula can’t discover itself:
- A port forward on the router in front of the node, especially when the
external port isn’t
4242. Add the router’s public IP and the forwarded port. - A second uplink, or a LAN address that peers on the same site should try
first.
You don’t need to add the node’s own interface addresses or the address the
lighthouse already sees; Nebula reports those automatically.
Adding and removing addresses
- Open the node, click Edit, and expand Advanced.
- Under Additional reachable addresses, type one
IP:port, for example
203.0.113.7:4242 or [2001:db8::1]:4242, and click Add. Repeat for each
address. - Use the trash button next to an address to remove it.
- Click Save.
The node picks up the change on its next config poll and restarts Nebula. The
certificate isn’t re-signed, and no other node needs to restart.
Through the API, the field is advertise_addrs on PATCH /api/nodes/{id}: a list
with one address per item. Send [] to clear it. Leave the field out to keep the
current list.
Rules
- IP addresses only. Nebula resolves a hostname here once at startup and
doesn’t start if the lookup fails, so hostnames are rejected.
- Port
0 means the node’s own listen port (4242). - IPv6 goes in brackets:
[2001:db8::1]:4242. - Rejected: addresses inside the Nebula network itself, loopback, link-local,
multicast, reserved space (
240.0.0.0/4, including the broadcast address
255.255.255.255), IPv4-mapped IPv6 (use the plain IPv4 address instead), and
0.0.0.0 / ::. - At most 8 addresses per node. Duplicates are merged.
- Addresses ending in
.0 or .255 are accepted but flagged with a warning:
on a /24 LAN they’re the network or broadcast address and won’t work, but on a
larger LAN they can be ordinary hosts. Nebula Commander can’t see your LAN’s
subnet mask, so it’s up to you.
Additional reachable addresses were contributed by Austin Colt
(@YeeClaw).
6.4 - Running Nebula manually
This is the manual method: you use Nebula Commander to create networks, nodes, and certificates, then run Nebula on devices yourself without ncclient. Config and certs are copied or downloaded from the UI (or API) and you start Nebula manually. Use this when you prefer to deploy config and certs yourself or when ncclient is not available (e.g. on mobile).
When to use this
- You prefer to deploy config and certs yourself (copy to the device, run
nebula -config ...). - You do not want to enroll devices or run the ncclient daemon.
- You are fine updating config and certs manually when the network or node changes (re-download from the UI or API and replace files, then restart Nebula).
With ncclient, the device enrolls once and ncclient polls for config and certs and can run or restart Nebula automatically. With manual setup, you handle file deployment and restarts yourself.
Steps
1. Create network and node in Nebula Commander
In the Web UI: create a network, add a node for this device, and create or sign a certificate for the node.
- Create certificate – The server generates the key and cert; you can download a bundle that includes
host.key, host.crt, ca.crt, and config. - Sign certificate – You generate the key on the device; the server signs the cert. You will need to place your own
host.key next to the downloaded certs.
2. Get config and certs onto the device
Download or copy from the UI (or use the API) the node’s config and certificate files. You typically need:
config.yaml (Nebula config for this node)ca.crt (CA certificate)host.crt (host certificate for this node)host.key (only if you used Create certificate; with Sign, you already have this on the device)
Where to get them depends on your Nebula Commander version: use the node’s detail or download actions in the UI, or the device/config API. Place the files in a directory on the device (e.g. /etc/nebula or ~/.nebula).
3. Install and run Nebula on the device
Install Nebula from slackhq/nebula (packages, binary release, or build from source). Then run:
nebula -config /path/to/config.yaml
Use the path to the config.yaml you deployed. Nebula will read ca.crt, host.crt, and host.key from the paths specified in the config (often the same directory as the config).
4. Run Nebula at startup (optional)
Use your platform’s init system so Nebula keeps running: systemd on Linux, launchd on macOS, or a Windows service/task. When you change config or certs (after re-downloading from Nebula Commander), replace the files and restart Nebula.
Mobile devices
The official Nebula client from defined.net (Nebula app) is the only way to run Nebula on a mobile device — ncclient is not available on mobile. This is a first-class path, not a workaround: set a node’s platform to iOS or Android on the Nodes page, then use its download config.yaml action — the same config the API always generates (cert/key/CA already inline), which is exactly the format the app’s “Add Site → From file” import expects. See Nodes: Mobile nodes for split-horizon DNS behavior on each platform.
Summary
| ncclient | Manual (nebula) |
|---|
| Enrollment | One-time; device gets a token | None |
| Config/certs | Fetched automatically by ncclient | You copy or download and place them |
| Nebula process | ncclient can run or restart it | You run and restart Nebula yourself |
| Updates | ncclient polls and updates files | You re-download and replace files, then restart Nebula |
7 - Development
This section covers building Nebula Commander from source, using CI, and the backend API.
- Setup – Run the backend and frontend locally (venv, uvicorn, npm run dev).
- GitHub Actions – Workflows for ncclient binaries, releases, and Docker images.
- Manual Builds – Build ncclient, the Windows app/service and MSI, Linux packages, and Docker images locally.
- API – REST API base path, OpenAPI docs, and router summary.
7.1 - Development Setup
Run the backend and frontend locally for development.
Backend
From the nebula-commander repository root:
python -m venv .venv
source .venv/bin/activate   # or .venv\Scripts\activate on Windows
pip install -r backend/requirements.txt
export NEBULA_COMMANDER_DATABASE_URL="sqlite+aiosqlite:///./backend/db.sqlite"
export NEBULA_COMMANDER_CERT_STORE_PATH="./backend/certs"
# Required — the backend refuses to boot without it. Generate one:
# python -c "from cryptography.fernet import Fernet; print(Fernet.generate_key().decode())"
export NEBULA_COMMANDER_ENCRYPTION_KEY="your-fernet-key-here"
export NEBULA_COMMANDER_DEBUG=true
python -m uvicorn backend.main:app --reload --port 8081
Use a real JWT secret in production; for local dev, NEBULA_COMMANDER_DEBUG=true
enables the dev-token endpoint. Every backend setting uses the
NEBULA_COMMANDER_ prefix — a bare DEBUG=true without it is silently ignored.
Frontend
In another terminal:
cd frontend && npm install && npm run dev
Open http://localhost:5173. When the backend is in debug mode, you can log in via the dev token (no OIDC required).
Configuration
Set at least:
NEBULA_COMMANDER_DATABASE_URL – SQLite path (e.g. sqlite+aiosqlite:///./backend/db.sqlite)NEBULA_COMMANDER_CERT_STORE_PATH – Directory for CA and host certsNEBULA_COMMANDER_ENCRYPTION_KEY – Required; the backend won’t start without itNEBULA_COMMANDER_DEBUG=true – Enables dev token and hot reload
See Configuration: Environment for all options.
7.2 - GitHub Actions
Nebula Commander uses two GitHub Actions workflows: one to build ncclient binaries (and create releases), and one to build and push Docker images.
Build ncclient Binaries
Workflow file: .github/workflows/build-ncclient-binaries.yml
Triggers
- Version tags – Push a tag matching
v* (e.g. v0.1.5) to build all binaries and create a GitHub Release. This is the only trigger that produces a release; there is no trigger on push to main. - Pull requests – Runs when changes touch
client/binaries/**, client/windows/**, client/ncclient.py, installer/windows/**, or the workflow file itself. - Manual – Use “Run workflow” in the Actions tab (
workflow_dispatch).
| Platform | Artifact name |
|---|
| Linux x86_64 | ncclient-linux-amd64 |
| Linux ARM64 | ncclient-linux-arm64 |
| Windows x86_64 | ncclient-windows-amd64.exe |
| macOS Intel | ncclient-macos-amd64 |
| macOS ARM64 (Apple Silicon) | ncclient-macos-arm64 |
Windows ARM64 is not built (GitHub has no Windows ARM64 runners). Linux ARM64 is built in Docker with QEMU on the host runner.
Jobs and outputs
- build – Matrix job: builds the ncclient CLI for each platform. Uploads one artifact per platform.
- build-windows-service – Builds the
NebulaCommanderService background service with PyInstaller (client/windows/build.py). Uploads ncclient-service-windows-amd64.exe. - build-windows-app – Builds the WinUI 3 app with
dotnet publish -c Release -r win-x64 (.NET 10) as a self-contained single file. Uploads NebulaCommanderApp-windows-amd64.exe. - build-deb / build-rpm – Tag pushes only. Package the
build job’s ncclient-linux-amd64 binary plus the service and desktop app into three .deb and three .rpm packages (nebula-commander-client, -service, -desktop), plus an arm64 client package from ncclient-linux-arm64 (nebula-commander-client-arm64.deb, nebula-commander-client-aarch64.rpm). - build-flatpak – Tag pushes only. Builds the desktop app against the GNOME 51 runtime and uploads
org.beardedtek.NebulaCommander.flatpak. - build-msi – Tag pushes only. Downloads the Windows CLI, app, and service artifacts, copies all three into
installer/windows/redist/, builds the MSI with WiX 5 (Util + UI extensions), and uploads NebulaCommander-windows-amd64.msi. Any pre-release suffix is stripped from the MSI version, since MSI versions must be purely numeric. - upload-release – Tag pushes only. Downloads all artifacts (CLI, Windows app/service/MSI,
.deb, .rpm, Flatpak), flattens them, generates SHA256SUMS.txt, and uploads everything to the GitHub Release for that tag. Release is not draft; files can be overwritten. - checksums – Generates checksums for the Actions UI; release gets checksums from the upload-release job.
- summary – Prints build status and notes that release binaries were uploaded when the run was tag-triggered.
Creating a release
- Bump version (e.g. in
client/pyproject.toml or as appropriate). - Tag and push:
git tag v0.1.5
git push origin v0.1.5
- The workflow builds all platforms, the Windows app and service, the MSI, and the Linux packages, then creates the release and attaches all binaries and SHA256SUMS.
Manual run
In GitHub: Actions → “Build ncclient Binaries” → “Run workflow”. Choose branch and run. Artifacts appear in the run; no release is created unless you ran from a tag.
Build Docker Images
Workflow file: .github/workflows/build-docker-images.yml
Triggers
- After ncclient workflow – Runs when the “Build ncclient Binaries” workflow completes. It runs only if that workflow succeeded. Version is taken from the commit that triggered the binaries workflow: if that commit has a tag
v*, that tag (without the v) is used; otherwise version is latest. - Manual – “Run workflow” in the Actions tab. Version is
latest unless the run is triggered by the binaries workflow.
Images built and pushed
All images are pushed to GitHub Container Registry (ghcr.io):
| Image | Platforms |
|---|
ghcr.io/nixrtr/nebula-commander-backend | linux/amd64, linux/arm64 |
ghcr.io/nixrtr/nebula-commander-frontend | linux/amd64, linux/arm64 |
ghcr.io/nixrtr/nebula-commander-keycloak | linux/amd64, linux/arm64 |
Each image is tagged with the version (e.g. 1.2.3) and latest. Build uses Docker Buildx, layer caching (GitHub Actions cache), and the Dockerfiles under docker/. The frontend image is built with DOWNLOAD_BINARIES=1 so it can serve ncclient binaries from the release.
Summary job
A final job prints the version and the full image names with that tag.
Publish Package Repository
File: .github/workflows/publish-package-repo.yml
Rebuilds the signed apt and rpm repository at pkgs.nebulacommander.com (GitHub Pages) that Linux users add to install and update the client, service, and desktop app. See Linux Desktop App.
Triggers
- workflow_run – After “Build ncclient Binaries” completes successfully for a stable
v* tag. Pre-release tags (containing -, e.g. v0.7.0-rc1) are skipped. - workflow_dispatch – Rebuild the repository at any time, e.g. after rotating the signing key.
What it does
- Downloads the
.deb/.rpm assets of the newest 5 stable GitHub Releases that have Linux packages. - Runs
packaging/repo/build_repo.py: lays out an apt repository (deb/, one stable suite, amd64 and arm64) and an rpm repository (rpm/), signs InRelease/Release.gpg, signs each RPM and repomd.xml, and writes gpg.key, the .sources/.repo files, and an index page. - Verifies the signatures and deploys the site to GitHub Pages.
The repository has no state of its own; every run regenerates it from the Releases.
Secrets
PACKAGE_SIGNING_KEY – The armored private key used for signing.PACKAGE_SIGNING_KEY_PASSPHRASE – Its passphrase.
Testing workflows locally (act)
You can run the workflows locally with act. Only Linux jobs run in Docker; Windows and macOS jobs do not use real Windows/macOS runners in act. See the repository .github/README.md for setup, usage, and how to simulate a tag push. Release upload and secrets still require GitHub when running with act.
7.3 - Manual Builds
You can build all ncclient binaries, the Windows service and app, the Windows MSI, the Linux .deb/.rpm/Flatpak packages, and the Docker images locally without using GitHub Actions.
ncclient CLI (standalone binary)
The CLI is built with PyInstaller from client/binaries/. Python 3.11 is used in CI.
From the repository root:
pip install -r client/binaries/requirements.txt
pip install -r client/requirements.txt
cd client/binaries
python build.py
Output: client/binaries/dist/ncclient (or ncclient.exe on Windows). Use python build.py --clean to remove build artifacts; python build.py --test to build and run basic tests.
Linux ARM64
CI builds Linux ARM64 in a Docker container because the host runner is x86_64. Locally you can do the same:
docker run --rm --platform linux/arm64 \
  -v "$(pwd):/work" -w /work/client/binaries \
  python:3.11-slim \
  bash -c "
    apt-get update && apt-get install -y binutils &&
    pip install --upgrade pip &&
    pip install -r requirements.txt &&
    pip install -r ../requirements.txt &&
    python build.py
  "
The executable will be in client/binaries/dist/ncclient (arm64). Run this from the repo root so $(pwd) mounts the full tree.
Windows ARM64
On a Windows ARM64 machine (or with an ARM64 Python), install dependencies and run python build.py in client/binaries. To force PyInstaller to target ARM64 from an x64 host, set PYINSTALLER_TARGET_ARCH=arm64 in the environment when running build.py (CI does this for the Windows ARM64 matrix; GitHub does not provide Windows ARM64 runners, so this is for local use only).
Windows service
The service (NebulaCommanderService) is what actually polls for config/certs and runs Nebula, as LocalSystem. It is built with PyInstaller from client/windows/.
From the repository root:
pip install -r client/requirements.txt
pip install -r client/windows/requirements.txt
pip install pyinstaller
cd client/windows
python build.py
Output: client/windows/dist/ncclient-service.exe. The service does not bundle Nebula: it uses the copy the app downloads into %ProgramData%\nebula-commander\nebula\, the path set in Settings, or nebula.exe on PATH.
Note: ncclient-service.exe only does anything useful when registered as a real Windows Service (which the MSI does via WiX’s ServiceInstall/ServiceControl elements) - there is no standalone install/remove subcommand.
Windows app (WinUI 3)
The windowed app lives in client/windows-app/ and needs the .NET 10 SDK (CI uses 10.0.x). From that directory:
dotnet publish -c Release -r win-x64
Output: client/windows-app/bin/Release/net10.0-windows10.0.26100.0/win-x64/publish/NebulaCommanderApp.exe, a single self-contained file that bundles the .NET runtime and Windows App SDK. See client/windows-app/README.md for details.
Windows MSI
The MSI installs the ncclient CLI, the Windows app, and the service. You need all three executables and WiX 5.
Get the three executables – Build as above or download from a release. Copy them into installer/windows/redist/:
redist/ncclient.exe (from client/binaries/dist/ncclient.exe)redist/NebulaCommanderApp.exe (from the dotnet publish output above)redist/ncclient-service.exe (from client/windows/dist/ncclient-service.exe)
Install WiX 5 – e.g. dotnet tool install --global wix --version 5.0.2. Add the Util and UI extensions once:
wix extension add -g WixToolset.Util.wixext/5.0.0
wix extension add -g WixToolset.UI.wixext/5.0.2
Build the MSI – From installer/windows/:
wix build Product.wxs -ext WixToolset.Util.wixext -ext WixToolset.UI.wixext -o NebulaCommander-windows-amd64.msi -d Version=0.5.1 -arch x64
Replace 0.5.1 with the version you are building. It must be purely numeric (major.minor.patch): strip any pre-release suffix such as -rc1. installer/windows/build-msi.ps1 wraps this and checks that all three files are in redist/ first.
Output: NebulaCommander-windows-amd64.msi. Installing it registers NebulaCommanderService (auto-start, LocalSystem) and grants Authenticated Users start/stop/query rights on it, so the app’s Start/Stop/Restart buttons work without a UAC prompt.
Linux packages (.deb / .rpm)
Both builders produce three packages: nebula-commander-client (the frozen CLI, arch-specific), nebula-commander-service (systemd unit, D-Bus policy, polkit action/rule; depends on the distro’s nebula package), and nebula-commander-desktop (the GTK4 app as plain Python source; arch: all). From the repository root:
# .deb - needs dpkg-deb (a Debian/Ubuntu host, container, or WSL)
python3 packaging/deb/build.py --version 0.5.1

# .rpm - needs rpmbuild (Fedora, or the `rpm` package on Debian/Ubuntu)
python3 packaging/rpm/build.py --version 0.5.1
The client package uses client/binaries/dist/ncclient, building it first if it’s missing; pass --ncclient-binary PATH to use a binary you already have (CI passes the release’s ncclient-linux-amd64). --only desktop service builds a subset, and --version defaults to git describe. Output goes to packaging/deb/dist/ and packaging/rpm/dist/.
Linux Flatpak
The Flatpak contains the desktop app only (it still needs nebula-commander-service on the host). It builds against the GNOME 51 runtime:
flatpak remote-add --if-not-exists --user flathub https://dl.flathub.org/repo/flathub.flatpakrepo
flatpak install --user -y flathub org.gnome.Platform//51 org.gnome.Sdk//51
cd packaging/flatpak
python3 sync-sources.py   # vendor the client sources the manifest builds from
flatpak-builder --force-clean --user --repo=repo --install-deps-from=flathub \
  build-dir org.beardedtek.NebulaCommander.yaml
flatpak build-bundle repo org.beardedtek.NebulaCommander.flatpak org.beardedtek.NebulaCommander
Output: packaging/flatpak/org.beardedtek.NebulaCommander.flatpak.
Docker
Backend and frontend (compose)
From the repository root:
cd docker
docker compose build
This builds the backend and frontend images with default build-args. No Keycloak image is built by default; use the Keycloak Dockerfile separately if needed.
Backend image (docker build)
From the repository root:
docker build -f docker/backend/Dockerfile -t nebula-commander-backend:local .
Optional build-args: VERSION (default latest), NEBULA_VERSION (default 1.8.2).
Frontend image (docker build)
From the repository root:
docker build -f docker/frontend/Dockerfile -t nebula-commander-frontend:local .
Build-args:
- VERSION – Version tag used when downloading ncclient binaries (default
latest). - DOWNLOAD_BINARIES – Set to
1 to download ncclient binaries from GitHub releases (by version) into the image; set to 0 (default) for local builds that do not need bundled binaries.
Example with version and binaries:
docker build -f docker/frontend/Dockerfile \
  --build-arg VERSION=0.1.12 \
  --build-arg DOWNLOAD_BINARIES=1 \
  -t nebula-commander-frontend:0.1.12 .
Keycloak image
From the repository root:
docker build -f docker/keycloak/Dockerfile -t nebula-commander-keycloak:local .
No required build-args. For the nebula login background, ensure nebula-bg.webp exists under docker/keycloak-theme/nebula/login/resources/img/ (or copy from frontend/public/nebula-bg.webp) before building.
Multi-architecture (Buildx)
To build for linux/amd64 and linux/arm64 and push (e.g. to GHCR):
docker buildx build --platform linux/amd64,linux/arm64 \
  -f docker/backend/Dockerfile \
  -t ghcr.io/nixrtr/nebula-commander-backend:latest \
  --build-arg VERSION=latest \
  --push .
Use the same pattern for the frontend (with VERSION and DOWNLOAD_BINARIES as needed) and keycloak Dockerfiles.
7.4 - API
The Nebula Commander backend exposes a REST API under the base path /api. All routes are prefixed with /api. Most endpoints require a valid JWT in the Authorization: Bearer <token> header unless noted otherwise.
OpenAPI docs
When the backend is running in debug mode, interactive documentation is available at:
- Swagger UI – /api/docs
- ReDoc – /api/redoc
For full request/response schemas and parameters, use the interactive docs.
Health and root
| Method | Path | Auth | Description |
|---|
GET | /api | No | Root response: name, version, status. |
GET | /api/health | No | Health check. Returns {"status": "healthy"}. |
Auth (/api/auth)
Authentication and session management. OIDC (e.g. Keycloak) is used when configured; otherwise a dev token is available in debug mode.
| Method | Path | Auth | Description |
|---|
GET | /api/auth/dev-token | No | Development only. Returns a JWT (token, expires_in) granting full admin access. Requires DEBUG=true (loopback requests only) or NEBULA_COMMANDER_STANDALONE_ADMIN_BOOTSTRAP=true when no OIDC provider is configured — it no longer falls back to enabled-by-default for standalone deployments. Returns 404 when OIDC is configured. |
POST | /api/auth/exchange | No | Trade a one-time exchange code (from the /auth/callback or reauth redirect) for the real JWT. Single-use, 60-second-lived. Response: {"token": "..."}. 400 if invalid, already used, or expired. |
GET | /api/auth/me | Optional | Current user info. Returns {"authenticated": false} or {"authenticated": true, "sub", "email", "role", "system_role"}. |
GET | /api/auth/login | No | Redirects to the OIDC provider for login. Returns 501 if OIDC is not configured. |
GET | /api/auth/oidc-status | No | OIDC provider readiness. Returns {"status": "ok"}, {"status": "disabled"}, or 503 if provider is unavailable. |
GET | /api/auth/callback | No | OAuth callback. Exchanges the authorization code for tokens, then redirects to the frontend with a one-time exchange code, not the JWT itself (/auth/callback?code=...) — this keeps the token out of the URL, browser history, referrer headers, and access logs. The frontend immediately calls POST /api/auth/exchange to trade it for the real token. |
GET | /api/auth/logout | No | Logs out and redirects to OIDC logout (or frontend if OIDC not configured). |
POST | /api/auth/reauth/challenge | Yes | Creates a reauthentication challenge for critical operations. Body: none. Response: challenge, reauth_url. Used before destructive actions (e.g. delete network/node, revoke certificate, delete user). |
GET | /api/auth/reauth/callback | No | Reauth OAuth callback. Validates state (challenge) and redirects to the frontend with a one-time exchange code for the reauth token (same exchange pattern as login). |
Heartbeat (/api/nodes)
Used by ncclient (or other clients) to report node liveness.
| Method | Path | Auth | Description |
|---|
POST | /api/nodes/{node_id}/heartbeat | Device token | Updates last_seen and sets node status to active. Call periodically from enrolled nodes using Authorization: Bearer <device_token> — not a human JWT. Body (all optional): interval_seconds (the client’s actual poll interval, clamped 10–3600s, used by the dashboard to detect an offline node relative to its real cadence), peer_reachability ({node_id: reachable} — only honored when the reporting node is itself a lighthouse, checked server-side and scoped to its own network, so a node can’t report on or spoof nodes it has no relationship to; see Device: lighthouse-peers below). Response: {"ok": true, "last_seen": "<iso>"}. |
Networks (/api/networks)
Create and manage Nebula networks. Permissions are enforced per network (owner, member, and capability flags).
| Method | Path | Auth | Description |
|---|
GET | /api/networks | Yes | List networks the user can access. Includes role, can_manage_nodes, can_invite_users, can_manage_firewall per network. System admins see all networks (with limited data). |
POST | /api/networks | Yes | Create a network. Body: name, subnet_cidr. Creator becomes owner. Returns full network object. 409 if name exists. |
GET | /api/networks/{network_id} | Yes | Get a single network. System admins need an access grant to see CA path. |
PATCH | /api/networks/{network_id} | Yes | Update network (owner only). Body: optional fields (currently no network-level firewall; use group firewall). |
DELETE | /api/networks/{network_id} | Yes | Delete network (owner only; system admins can delete any). Body: reauth_token, confirmation (must match network name). 204 on success. |
GET | /api/networks/{network_id}/group-firewall | Yes | List per-group firewall configs. Requires can_manage_firewall. Response: list of {group_name, inbound_rules}. |
PUT | /api/networks/{network_id}/group-firewall/{group_name} | Yes | Create or update inbound firewall rules for a group. Body: inbound_rules (each: allowed_group, protocol (any/tcp/udp/icmp), port_range, optional description). |
DELETE | /api/networks/{network_id}/group-firewall/{group_name} | Yes | Remove group firewall config for that group. 204 on success. |
GET | /api/networks/{network_id}/check-ip | Yes | Check if an IP is available in the network. Query: ip. Response: {"available": true or false}. 400 if IP not in subnet. |
Nodes (/api/nodes)
Manage Nebula nodes (hosts) within networks. Used by the Web UI and for manual cert/config workflows.
| Method | Path | Auth | Description |
|---|
GET | /api/nodes | Yes | List nodes. Query: optional network_id. Returns only nodes the user can access (networks they have permission for, or node-level access grants). Response: list of node objects (id, network_id, hostname, ip_address, groups, is_lighthouse, is_relay, platform, status, etc.). |
GET | /api/nodes/{node_id} | Yes | Get a single node by ID. |
PATCH | /api/nodes/{node_id} | Yes | Update node. Body (all optional): group, is_lighthouse, is_relay, public_endpoint, lighthouse_options, logging_options, punchy_options, platform (desktop/ios/android — 400 if setting a non-desktop platform while the node is a lighthouse or relay). 409 if removing the only lighthouse. A group change automatically re-signs the node’s certificate in place (same IP and keypair — a Nebula cert bakes its group in at signing time) when the node already has one. Response: {"ok": true, "cert_resigned": true or false}. |
DELETE | /api/nodes/{node_id} | Yes | Delete node: release IP, remove host cert/key files, delete related records. Body: reauth_token, confirmation (must match node hostname). 204 on success. 409 if node is the only lighthouse. |
GET | /api/nodes/{node_id}/config | Yes | Generate and return Nebula YAML config for the node (with inline PKI when key is stored). Response: application/yaml attachment. |
GET | /api/nodes/{node_id}/certs | Yes | Return a ZIP with ca.crt, host.crt, optional host.key, and README.txt. |
POST | /api/nodes/{node_id}/revoke-certificate | Yes | Revoke the node’s certificate and take it offline; node record is kept and can re-enroll later. Body: reauth_token, confirmation (must match node hostname). Releases IP and removes cert/key files. Response: {"ok": true}. |
POST | /api/nodes/{node_id}/re-enroll | Yes | Revoke existing cert (if any) and issue a new one for this node. Frontend typically creates an enrollment code afterward. Response: {"ok": true, "node_id": id}. |
PUT | /api/nodes/{node_id}/subnet-router | Yes | Consumer-side pick of which other node’s advertised subnets this node should route through. Body: router_node_id (int or null to clear). Atomically adds this node to every matching route’s consumers on the chosen gateway and removes it from every other gateway’s matching routes — a node uses at most one subnet router at a time. 400 if the target routes through itself, isn’t on the same network, or doesn’t advertise a subnet. See Subnet Routers and Exit Nodes. |
PUT | /api/nodes/{node_id}/exit-node | Yes | Same as above, for the exit-route pair (0.0.0.0/0 + ::/0) instead of subnet routes. Body: exit_node_id. |
Certificates (/api/certificates)
Create or sign host certificates. Used when creating nodes from the Web UI or when using client-generated keys (e.g. betterkeys).
| Method | Path | Auth | Description |
|---|
POST | /api/certificates/sign | Yes | Sign a host certificate (client sends public key). Body: network_id, name, public_key, optional group, suggested_ip, duration_days. Response: ip_address, certificate (PEM), optional ca_certificate. Creates or updates node record. |
POST | /api/certificates/create | Yes | Create a host certificate (server generates keypair). Body: network_id, name, optional group, suggested_ip, duration_days, is_lighthouse, is_relay, public_endpoint, lighthouse_options, punchy_options. Response: node_id, hostname, ip_address, certificate, private_key, optional ca_certificate. First node in network must be lighthouse. 409 if node name exists or suggested IP is taken. |
GET | /api/certificates | Yes | List issued certificates. Query: optional network_id. Response: list of {id, node_id, node_name, network_id, network_name, ip_address, issued_at, expires_at, revoked_at}. |
Device (/api/device)
Used by ncclient for enrollment and for fetching config/certs with a device token. Flow: create enrollment code (admin) → device redeems code at POST /enroll → device uses returned token for GET /config and GET /certs.
| Method | Path | Auth | Description |
|---|
POST | /api/device/enrollment-codes | Yes (JWT) | Create a one-time enrollment code for a node. Body: node_id, expires_in_hours (default 24). Response: code, expires_at, node_id, hostname. Node must already have a certificate. |
POST | /api/device/enroll | No | Public. Redeem a one-time code. Body: code. Response: device_token, node_id, hostname. Rate limited (e.g. 5 attempts per 15 min per IP). 404 if code invalid/expired, 400 if already used or expired. |
GET | /api/device/config | Device token | Return Nebula YAML config for the device (inline PKI). Header: Authorization: Bearer <device_token>. Optional If-None-Match: <etag> for 304 when unchanged. |
GET | /api/device/certs | Device token | Return ZIP with ca.crt, host.crt, optional host.key, README.txt for the device. |
GET | /api/device/dns-client-config | Device token | Split-horizon DNS config for the device: domain and dns_servers (lighthouse Nebula IPs). 404 if DNS is not enabled for the network. Used by ncclient with --accept-dns. |
GET | /api/device/lighthouse-peers | Device token | Return the other nodes on this device’s network (node_id, ip_address, hostname), for a lighthouse to ping and report reachability on via its heartbeat’s peer_reachability. Non-lighthouse devices always get an empty list — keeps client logic trivial and avoids leaking network topology to devices that don’t need it. |
GET | /api/device/dnsmasq.conf | Device token | dnsmasq zone config for this device’s network (for lighthouse/container clients), derived from the token. Returns text/plain. Optional If-None-Match: <etag> for 304. Rate limited per device. |
Networks DNS (/api/networks/{network_id}/dns)
Per-network DNS configuration for split-horizon DNS (domain and aliases). Network owners only.
| Method | Path | Auth | Description |
|---|
GET | /api/networks/{network_id}/dns | Yes | Get DNS config: domain, enabled, upstream_servers. Default domain is network name when not set. |
PUT | /api/networks/{network_id}/dns | Yes | Update DNS config. Body: optional domain, enabled, upstream_servers. |
GET | /api/networks/{network_id}/dns/aliases | Yes | List DNS aliases (hostname → node). Response: list of {id, alias, node_id, node_hostname}. |
POST | /api/networks/{network_id}/dns/aliases | Yes | Create alias. Body: alias (hostname label), node_id. 409 if alias exists. |
DELETE | /api/networks/{network_id}/dns/aliases/{alias_id} | Yes | Delete alias. 204. |
GET | /api/networks/{network_id}/dns/dnsmasq.conf | Device token | Device-facing dnsmasq zone config, network given explicitly in the path rather than derived from the token. 403 if the token’s node isn’t a member of network_id. Otherwise identical to /api/device/dnsmasq.conf above (same ETag/304 behavior). |
Users: self-service (/api/users/me)
Per-account preferences, available to any authenticated user (not just admins). See Appearance.
| Method | Path | Auth | Description |
|---|
GET | /api/users/me/theme | Yes | Get the current user’s active color theme: their saved overrides merged over the built-in defaults, so the response is always a complete token set. |
PUT | /api/users/me/theme | Yes | Merge the given tokens into the current user’s active theme (partial update — omitted keys are left as-is). Body: theme (map of token key → {light, dark} hex pair). Each key must be a known token; each color must match ^#[0-9a-fA-F]{6}$. 400 on an unknown key or invalid color. |
GET | /api/users/me/themes | Yes | List the current user’s saved theme presets. Response: list of {id, name, tokens, created_at} — full token sets included, not just names. |
POST | /api/users/me/themes | Yes | Save a named preset. Body: name, tokens (same shape as PUT /me/theme’s theme). 400 if the name is empty, over 100 characters, or already used by one of this user’s other saved themes. There’s no separate “apply” endpoint — applying a saved theme is just PUT /me/theme with its tokens. |
DELETE | /api/users/me/themes/{theme_id} | Yes | Delete a saved theme. Scoped to the requesting user — 404 (not 403) if the theme belongs to someone else. 204 on success. |
Users (/api/users)
System admin user management. All endpoints below require system-admin role (self-service /me endpoints above do not).
| Method | Path | Auth | Description |
|---|
GET | /api/users | System admin | List all users. Response: list of {id, oidc_sub, email, system_role, created_at, network_count}. |
GET | /api/users/{user_id} | System admin | Get user details including networks (list of network id, name, role, permission flags). |
PATCH | /api/users/{user_id} | System admin | Update user. Body: optional system_role (system-admin or user). |
DELETE | /api/users/{user_id} | System admin | Delete user; removes all their network permissions. 204. |
Access grants (/api/access-grants)
Temporary access for system admins to a specific network or node (e.g. for support). Only network owners can create grants.
| Method | Path | Auth | Description |
|---|
POST | /api/access-grants | Yes | Create an access grant. Body: admin_user_id, resource_type (network or node), resource_id, duration_hours, reason. Target user must be system-admin. |
GET | /api/access-grants | Yes | List grants. Query: active_only (default true). Network owners see grants they created; system admins see grants for them. |
DELETE | /api/access-grants/{grant_id} | Yes | Revoke a grant. Only the user who created the grant can revoke. 204. |
Invitations (/api/invitations)
Invite users to join a network by email. Requires can_invite_users (or owner) on the network.
| Method | Path | Auth | Description |
|---|
POST | /api/invitations | Yes | Create invitation. Body: email, network_id, role (owner/member), can_manage_nodes, can_invite_users, can_manage_firewall, expires_in_days (default 7). Sends email if SMTP configured. 400 if user already member or pending invitation exists. |
GET | /api/invitations | Yes | List invitations. Query: optional network_id, status_filter. Owners see invitations for their networks; system admins see all. |
GET | /api/invitations/public/{token} | No | Public. Get invitation details by token (no auth). Returns network name, inviter, role, permissions, status, expires_at. 410 if expired. |
POST | /api/invitations/{token}/accept | Yes | Accept invitation; creates NetworkPermission for current user. Must be logged in. Email should match invitation (optional check). |
POST | /api/invitations/{invitation_id}/resend | Yes | Resend invitation email. Pending only. |
DELETE | /api/invitations/{invitation_id} | Yes | Revoke invitation (inviter or network owner). Sets status to revoked. 204. |
Network permissions (/api/networks)
Manage which users have access to a network and their roles/permissions. Owner-only for list/update/remove; can_invite_users for add.
| Method | Path | Auth | Description |
|---|
GET | /api/networks/{network_id}/users | Yes | List users with access to the network. Owner or system admin. Response: list of user_id, email, role, can_manage_, invited_by_, created_at. |
POST | /api/networks/{network_id}/users | Yes | Add user to network. Body: user_id, role (owner/member), can_manage_nodes, can_invite_users, can_manage_firewall. Requires can_invite_users. 400 if already member. |
PATCH | /api/networks/{network_id}/users/{target_user_id} | Yes | Update user’s permissions. Body: optional role, can_manage_nodes, can_invite_users, can_manage_firewall. Owner only. Cannot demote the last owner. |
DELETE | /api/networks/{network_id}/users/{target_user_id} | Yes | Remove user from network. Owner only. Cannot remove the last owner. 204. |
Audit (/api/audit)
Read-only audit log. System admins only.
| Method | Path | Auth | Description |
|---|
GET | /api/audit | System admin | List audit log entries. Query: limit (default 50, max 200), offset, optional action, resource_type, from_date, to_date. Ordered by occurred_at descending. Response: list of id, occurred_at, action, actor_*, resource_type, resource_id, result, details, client_ip. |
Summary
/api — Root, health/api/auth — Login, callback, exchange, dev-token, logout, reauth/api/nodes — Heartbeat (device token, carries peer_reachability), full node CRUD + config/certs/revoke/re-enroll, and subnet-router/exit-node consumer selection/api/networks — Networks CRUD, group firewall, check-ip, network users (permissions), and per-network DNS (config, aliases, device-facing dnsmasq.conf)/api/certificates — Sign host cert (client key), create host cert (server key), list certs/api/device — Enrollment codes, enroll (public), config and certs (device token), lighthouse-peers, dns-client-config and dnsmasq.conf for split-horizon DNS/api/users/me — Self-service: active color theme (get/set) and saved theme presets (list/create/delete), any authenticated user/api/users — User list/detail/update/delete (system admin)/api/access-grants — Create/list/revoke temporary admin access/api/invitations — Create/list/accept/resend/revoke invitations/api/audit — List audit log (system admin)