Clients
After server installation and server configuration, you can use the Web UI or run Nebula on devices:
- ncclient – Preferred method: device client for installation and usage (Docker, CLI, Linux desktop app, Windows app, NixOS). Enroll once, then ncclient polls for config and certs and can run Nebula.
- nebula – Manual alternative: create networks and nodes in the UI, then deploy config and certs yourself and run Nebula manually (e.g. when ncclient is not available, such as on mobile).
All of these assume the backend is running and reachable at the URL you configure.
1 - ncclient
ncclient is the preferred way to run Nebula Commander on devices: enroll once with a code from the UI, then ncclient polls for config and certificates and can run or restart Nebula when config changes. When you run the first lighthouse using the Docker client, you can use Magic DNS (split-horizon DNS) for the network.
- Installation – Docker (preferred for first lighthouse), binaries (Web UI or GitHub Releases), Linux desktop app (
.deb/.rpm/Flatpak), Windows Installer (MSI), NixOS module, or Pip (PyPI) as fallback. - Usage – One page per client (ncclient CLI, Docker, NixOS, Linux app, Windows app): enrolling, running, routes, DNS, and re-enrolling.
The CLI and both native GUI apps assume the Nebula Commander backend is running and reachable at the URL you configure.
1.1 - Installation
You can install ncclient in several ways:
| Method | Best for |
|---|
| Docker | The first lighthouse in a network, to also run Magic DNS |
| Binaries | Prebuilt CLI binaries from the Web UI or GitHub Releases |
| Linux Desktop App | Linux: GTK4 app + background service via .deb, .rpm, or Flatpak |
| Windows Installer | Windows: CLI, native app, and background service via one MSI |
| NixOS | NixOS hosts: a declarative services.ncclient module |
| Pip (PyPI) | Fallback when none of the above are suitable |
Choose one and follow the linked page. Then see the matching Usage page to enroll the device, run it, and re-enroll it later.
1.1.1 - Docker
The Docker client is the preferred method for the first lighthouse in a network so the container can run dnsmasq and you can use Magic DNS (split-horizon DNS) for the network. Other devices (CLI, a native GUI app, or additional Docker clients) can then resolve Nebula hostnames via the lighthouse.
Image: ghcr.io/nixrtr/nebula-commander-ncclient:latest, or build from the repo client/docker (Dockerfile in that directory).
Required environment:
NEBULA_COMMANDER_SERVER – Base URL of your Nebula Commander backend (e.g. https://nc.example.com), no trailing slash.
Optional environment:
ENROLL_CODE – One-time enrollment code from the Nebula Commander UI (Nodes → Enroll for the node). Only used when the token file does not exist; after enrollment the token is stored and this is ignored.SERVE_DNS – Set to "true" to run dnsmasq on this node when it is a lighthouse, so the network can use Magic DNS. Omit or set to false if this node is not a lighthouse or you do not need DNS.NEBULA_DNS_POLL_INTERVAL – Seconds between dnsmasq config polls when this node is a lighthouse (default: 60).NEBULA_OUTPUT_DIR – Directory where ncclient writes Nebula config and certs inside the container. Set it to /data/nebula (the image default is /etc/nebula, outside the volume).NEBULA_DEVICE_TOKEN_FILE – Path to the device token file. Set it to /data/nebula-commander/token (the image default is /etc/nebula-commander/token, outside the volume).
Use a persistent volume for /data, and point both paths above into it, so the token and Nebula config/certs survive the container being recreated. The compose file uses network_mode: host so Nebula and dnsmasq can bind to the host, and cap_add: NET_ADMIN so Nebula can create and configure its tun interface.
Example (docker-compose):
services:
  ncclient:
    image: ghcr.io/nixrtr/nebula-commander-ncclient:latest
    network_mode: host
    cap_add:
      - NET_ADMIN
    restart: unless-stopped
    environment:
      NEBULA_COMMANDER_SERVER: "https://nc.example.com"
      ENROLL_CODE: "XXXXXXXX"   # one-time, from UI
      SERVE_DNS: "true"         # for first lighthouse + Magic DNS
      NEBULA_OUTPUT_DIR: "/data/nebula"
      NEBULA_DEVICE_TOKEN_FILE: "/data/nebula-commander/token"
    volumes:
      - ncclient-data:/data

volumes:
  ncclient-data:
    driver: local
Steps:
- In Nebula Commander, create a network and add a node for this device. Mark it as a lighthouse if this will be the first lighthouse and you want Magic DNS.
- Create or sign a certificate for the node, then click Enroll and copy the one-time code.
- Set
NEBULA_COMMANDER_SERVER and ENROLL_CODE (and SERVE_DNS: "true" for the first lighthouse), then start the container. - After enrollment, the container fetches config and certs and runs Nebula (and dnsmasq if
SERVE_DNS is set and the node is a lighthouse).
See Docker usage for logs, routes, DNS, and re-enrolling.
1.1.2 - Binaries
If Docker is not an option, use binaries from the Web UI or GitHub Releases.
From Web UI
When your Nebula Commander instance is deployed with client binaries included (for example the frontend image built with DOWNLOAD_BINARIES=1), the Web UI can serve them.
- Open your Nebula Commander URL in a browser and log in.
- Go to the downloads or client section (or open
https://YOUR_SERVER/downloads/ if your instance serves that path). - Download the binary for your platform:
- Linux x86_64:
ncclient-linux-amd64 - Linux ARM64:
ncclient-linux-arm64 - Windows x86_64:
ncclient-windows-amd64.exe - macOS Intel:
ncclient-macos-amd64 - macOS Apple Silicon:
ncclient-macos-arm64
- Place the file in a directory on your PATH (or add that directory to PATH). On Linux and macOS, make it executable:
chmod +x ncclient-linux-amd64 (or the file you downloaded).
If your instance does not serve binaries, use From releases or Pip (PyPI) instead.
From releases
Pre-built binaries are attached to GitHub Releases for each version.
- Open the releases page and choose a version (e.g. the latest).
- Download the file for your platform (same names as in From Web UI).
- Optionally verify with
SHA256SUMS.txt in the same release. - Place the binary in a directory on your PATH (or add that directory to PATH). On Linux and macOS, make it executable:
chmod +x ncclient-linux-amd64 (or the file you downloaded).
Next, see ncclient CLI usage to enroll and run it.
1.1.3 - Linux Desktop App
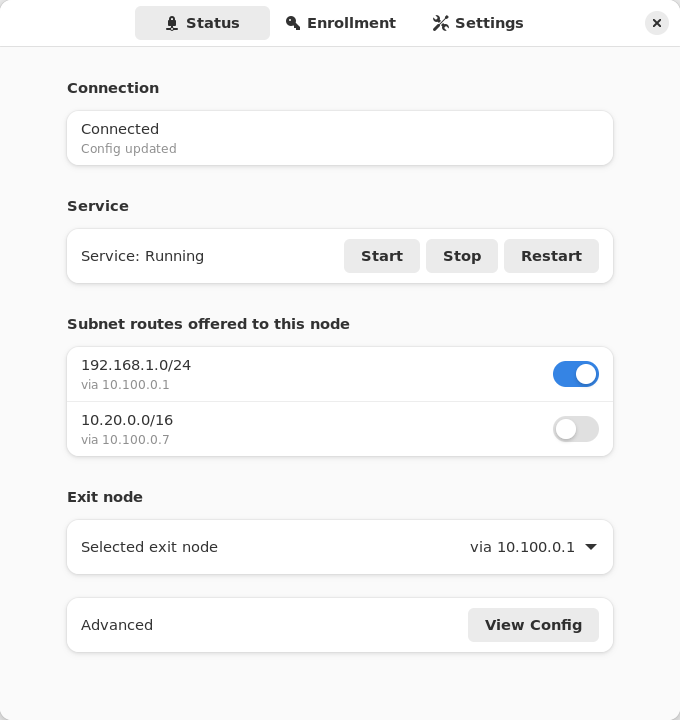
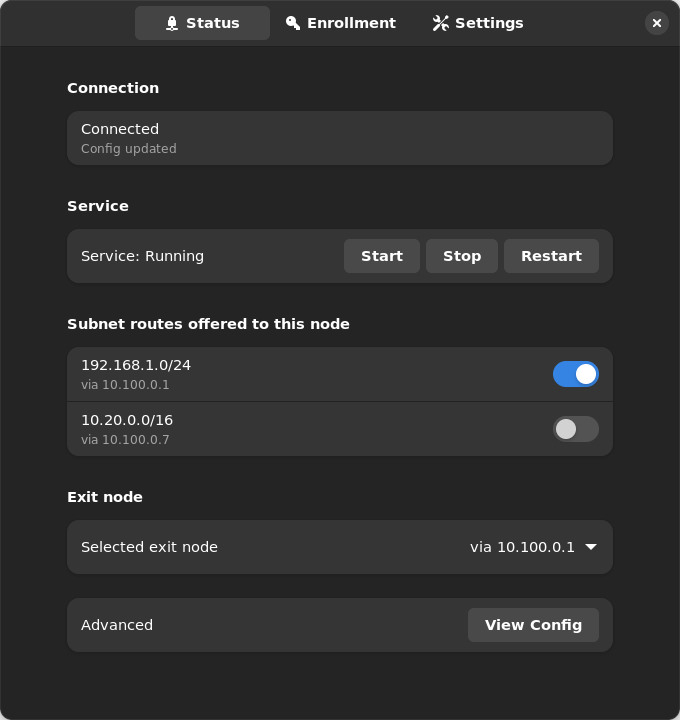
On Linux, three packages give you a GTK4/libadwaita desktop app plus a background systemd service that does the actual work - no group membership or relogin needed, and no admin/root prompt for enrolling, starting/stopping, or accepting routes.
| Light | Dark |
|---|
 |  |
What’s included:
- nebula-commander-client – The
ncclient CLI (frozen binary, no Python runtime needed). - nebula-commander-service – Installs
ncclient.service (systemd), which polls for config/certs and runs Nebula as root. Exposes a system D-Bus API (org.beardedtek.NebulaCommander1) that the desktop app talks to, authorized per-call via polkit. - nebula-commander-desktop – The GTK4 app: enroll, view connection/service status, and accept or reject offered subnet routes and exit nodes.
Any user logged in at the machine can view status in the desktop app. Changes (enrolling, settings, routes, exit node, starting/stopping the service) need no password for members of the sudo or wheel group, which administrators normally already are, and an administrator’s password for everyone else.
Package repository (recommended)
Add the signed Nebula Commander repository once, and new releases arrive with your normal system updates (apt upgrade, dnf upgrade, zypper update). It carries the current and the previous few releases, for amd64 and arm64. Installing nebula-commander-desktop and nebula-commander-service pulls in nebula-commander-client.
Debian / Ubuntu:
sudo apt install -y curl
sudo install -d -m 0755 /etc/apt/keyrings
sudo curl -fsSL -o /etc/apt/keyrings/nebula-commander.asc https://pkgs.nebulacommander.com/gpg.key
sudo curl -fsSL -o /etc/apt/sources.list.d/nebula-commander.sources https://pkgs.nebulacommander.com/deb/nebula-commander.sources
sudo apt update
sudo apt install nebula-commander-desktop nebula-commander-service
Fedora / RHEL:
sudo curl -fsSL -o /etc/yum.repos.d/nebula-commander.repo https://pkgs.nebulacommander.com/rpm/nebula-commander.repo
sudo dnf install nebula-commander-desktop nebula-commander-service
openSUSE:
sudo zypper addrepo https://pkgs.nebulacommander.com/rpm/nebula-commander.repo
sudo zypper install nebula-commander-desktop nebula-commander-service
On a server without a desktop, install just nebula-commander-service. The repository metadata and the RPMs are signed with the key at pkgs.nebulacommander.com/gpg.key.
The packages below can also be installed directly, without adding the repository.
.deb (Debian, Ubuntu, and derivatives)
Download all three packages from the Client Download page or GitHub Releases, then install together so apt resolves the dependency order:
sudo apt install ./nebula-commander-client.deb ./nebula-commander-service.deb ./nebula-commander-desktop.deb
.rpm (Fedora, RHEL, and derivatives)
sudo dnf install ./nebula-commander-client.rpm ./nebula-commander-service.rpm ./nebula-commander-desktop.rpm
On openSUSE, use zypper instead:
sudo zypper install ./nebula-commander-*.rpm
Flatpak
The desktop app is also available as a Flatpak bundle. It is not yet published on Flathub, so install the bundle directly:
flatpak install --user ./org.beardedtek.NebulaCommander.flatpak
The Flatpak is the GUI only - it still needs nebula-commander-service (or an equivalent backend, such as the NixOS module) installed and running separately, since a sandboxed Flatpak cannot run Nebula or create a TUN device itself.
After install
- Open Nebula Commander from your application launcher.
- Go to the Enrollment tab and enter the server URL and the one-time code from Nebula Commander (Nodes → open the node → Enroll).
- The Status tab shows connection/service state and lets you start/stop/restart the service, view the generated
config.yaml, and accept or reject offered subnet routes and exit nodes.
See Linux App usage for day-to-day use, headless (service-only) setup, and re-enrolling, or Development: Manual builds to build these packages yourself.
1.1.4 - Windows Installer
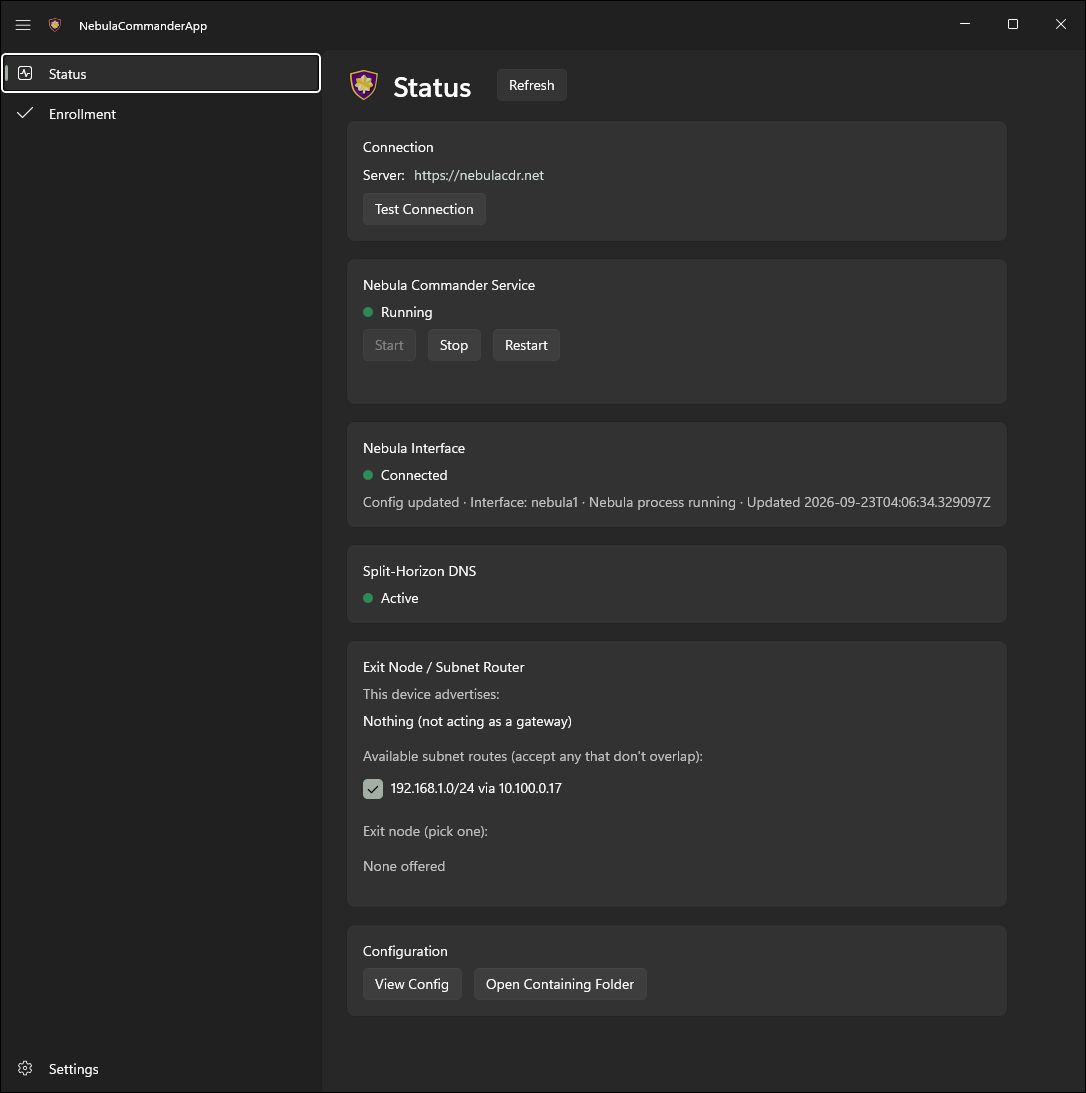
On Windows the MSI installer sets up the ncclient CLI, a native windowed app, and a background Windows Service that does the actual work as LocalSystem. Any user can view status in the app; enrolling, changing settings or routes, and starting/stopping the service require running the app as administrator.
What the installer includes:
- ncclient – CLI for enrollment and daemon (poll for config/certs, run or restart Nebula).
- Nebula Commander (WinUI 3) – The windowed desktop app: side tabs for Status, Enrollment, and Settings, minimizes to the tray on close. Talks to the background service.
- ncclient-service – The
NebulaCommanderService Windows Service that polls for config/certs and runs Nebula as LocalSystem. Starts automatically at boot; the app talks to it over a local named pipe.
All three are installed to %ProgramFiles%\Nebula Commander\. The installer can add that directory to PATH, creates Start Menu shortcuts, and registers/starts the service.
Getting the installer:
- Download
NebulaCommander-windows-amd64.msi from the GitHub Releases page for the version you want. - Use
SHA256SUMS.txt in the same release to verify the file.
After install:
- Open Nebula Commander from the Start Menu, choose Relaunch as administrator, and use the Enrollment tab: paste the server URL and the one-time code from Nebula Commander (Nodes → open the node → Enroll). This is the recommended way to enroll after an MSI install - the service stores the token in its protected folder (
%ProgramData%\nebula-commander\) and fetches config immediately. (The CLI’s ncclient enroll writes to a separate per-user location the service does not read from, so avoid it for MSI installs unless you’ve explicitly redirected NEBULA_COMMANDER_CONFIG_DIR.) - The service starts polling automatically once enrolled - nothing else to run. On first start it also downloads and verifies Nebula itself. As administrator, use the app’s Start/Stop/Restart Service controls on the Status tab, and Settings to change server URL, poll interval, or enable split-horizon DNS. See Windows App usage for details, including re-enrolling.
For building the MSI yourself, see Development: Manual builds.
1.1.5 - NixOS
A services.ncclient module runs ncclient declaratively as a systemd service — an alternative to the Docker image, the Windows service, or a hand-written unit (see ncclient CLI: Run as a service). It’s exposed by the same flake.nix as the server module, as nixosModules.client.
{
  inputs.nebula-commander.url = "github:NixRTR/nebula-commander";

  outputs = { self, nixpkgs, nebula-commander, ... }: {
    nixosConfigurations.yourHost = nixpkgs.lib.nixosSystem {
      system = "x86_64-linux";
      modules = [
        ./configuration.nix
        nebula-commander.nixosModules.client
      ];
    };
  };
}
Or import nix/client-module.nix directly by path if you’re not using a flake, the same way the server module can be.
services.ncclient = {
  enable = true;
  server = "https://nebula.example.com";
  # One-time enrollment: a file holding the enrollment code, consumed once (the
  # unit only runs `ncclient enroll` when no token exists yet at stateDir/token).
  enrollCodeFile = "/run/secrets/ncclient-enroll-code";
  acceptDns = true;
};
Then rebuild: nixos-rebuild switch (path-based) or nixos-rebuild switch --flake .#yourHost. See NixOS usage for controlling the service, running ncclient commands, and re-enrolling.
| Option | Type | Default | Description |
|---|
enable | bool | — | Enable the ncclient service |
package | package | built from nix/client-package.nix | The ncclient package |
nebulaPackage | package | pkgs.nebula | Package providing the nebula/nebula-cert binaries ncclient orchestrates |
server | string | — (required) | Nebula Commander server URL |
enrollCodeFile | null or path | null | Path to a file containing a one-time enrollment code. When set and no token exists yet, a oneshot unit runs ncclient enroll before the main service starts. Leave null if you provision the token file out of band. |
interval | int | 60 | Poll interval in seconds |
outputDir | string | /var/lib/ncclient/nebula | Directory ncclient writes Nebula’s config/certs/binary to |
acceptDns | bool | false | Accept and apply DNS settings pushed by Nebula Commander |
adminGroups | null or list of strings | [ "wheel" "sudo" ] | Active local users in these groups may change the device (desktop app enrollment, settings, routes, exit node; start/stop/restart ncclient.service) without a password. Everyone else needs an administrator’s password. null lets any active local user do it (single-user machines only). |
stateDir | string | /var/lib/ncclient | Directory holding the device token and settings.json together on the same persistent path — both must live in the same place or the node’s identity is lost on restart even though the token survives |
The service runs as root, matching the Windows Service (LocalSystem) and Docker image (root-in-container) precedent above — Nebula needs to create a TUN device. --nebula/--restart-service are intentionally not exposed; nebula is resolved via PATH (from nebulaPackage), matching the Docker image’s approach.
Desktop app
On a NixOS desktop, you can add the Linux desktop app alongside the service with the nixosModules.client-desktop module (or nix/client-desktop-module.nix by path):
modules = [
  ./configuration.nix
  nebula-commander.nixosModules.client
  nebula-commander.nixosModules.client-desktop
];
services.ncclient.enable = true;          # the service the app controls
services.ncclient-desktop.enable = true;  # adds "Nebula Commander" to the app launcher
| Option | Type | Default | Description |
|---|
enable | bool | — | Install the Nebula Commander desktop app (GTK4/libadwaita) |
package | package | built from nix/client-desktop-package.nix | The desktop app package |
The desktop module installs the app and turns on security.polkit.enable (as a default you can override), since every request the app makes is authorized by polkit. services.ncclient registers the D-Bus policy and polkit rules the app needs. Any user in an active local session can view status; members of adminGroups (default wheel/sudo) can enroll, change settings, accept routes, and start/stop/restart ncclient.service without a password prompt, and everyone else needs an administrator’s password.
1.1.6 - Pip (PyPI)
Fallback method when Docker, binaries, or NixOS are not suitable (e.g. no Docker, or you need to run from source).
From PyPI:
pip install nebula-commander
Requires Python 3.10+. This installs the ncclient command.
From source (repo clone):
cd nebula-commander
pip install -r client/requirements.txt
Then run as python -m client --server URL enroll --code XXX, or install the client in development mode to get the ncclient command:
cd client
pip install -e .
Next, see ncclient CLI usage to enroll and run it.
1.2 - ncclient Usage
After installing ncclient, follow the page for the client you installed. Each one covers enrolling, day-to-day control, subnet routes and exit nodes, split-horizon DNS, re-enrolling, and troubleshooting.
Concepts shared by every client
Enrollment
A device joins Nebula Commander by enrolling with a one-time code:
- In Nebula Commander, open Nodes, select the node for this device, and click Enroll.
- Copy the code. It works once and expires if unused.
- Give the code to the client (how depends on the client, see its page).
Enrolling stores a device token and the node’s ID on the device. From then on the client uses the token to fetch the node’s Nebula config and certificates, and reports a heartbeat so the node shows as online.
Re-enrolling
Re-enroll when a device’s token was lost or revoked, when you want the device to become a different node, or when moving it to another Nebula Commander server. Generate a new code (the old one is already used up) and enroll again.
Enrolling a node again invalidates that node’s previous token on the server. A running client notices on its next poll (it gets a 401), then picks up the new token from disk without a restart. If you switched to a different server, restart the client so it polls the new URL. The per-client pages spell out the exact steps, and a couple of clients (Docker and the NixOS module) need the old token removed first.
Subnet routes, exit nodes, and DNS
- A subnet router or exit node assigned to a node is only offered to it. Each device has to accept it before using it.
- Split-horizon DNS is served by lighthouses (usually the Docker client with
SERVE_DNS). Other devices opt in to resolving through it.
Each client page shows how to do both.
1.2.1 - ncclient CLI
This page covers the plain ncclient command from the binaries or Pip, run by hand or under your own init system. If you installed the Linux packages, the Windows MSI, or the NixOS module, use the Linux App, Windows App, or NixOS page instead. Those set up a background service that keeps its state somewhere the plain CLI doesn’t look.
Where state lives
| What | Default location |
|---|
| Device token | The OS keyring if the Python keyring package is available. Otherwise ~/.nebula/device-token (the frozen binaries and a plain pip install use this). Set NEBULA_DEVICE_TOKEN_FILE to use a specific file. |
settings.json (server, node ID, accepted routes) | ~/.config/nebula-commander/ on Linux and macOS, %APPDATA%\nebula-commander\ on Windows. Set NEBULA_COMMANDER_CONFIG_DIR to change it. |
| Nebula config and certificates | /etc/nebula on Linux and macOS, %USERPROFILE%\.nebula on Windows. Set with --output-dir. |
~ is the home directory of whoever runs the command, so sudo ncclient … uses root’s (/root/.nebula/device-token). Run enroll, run, and routes as the same user (and with the same environment variables), or they won’t find each other’s files.
Enroll
- In Nebula Commander, open Nodes, select the node for this device, and click Enroll.
- Copy the enrollment code.
- On the device, as the user that will run the daemon (root on Linux):
sudo ncclient enroll --server https://YOUR_NEBULA_COMMANDER_URL --code XXXXXXXX
Run (daemon)
After enrollment, run ncclient so it periodically pulls config and certificates and runs or restarts Nebula:
sudo ncclient run --server https://YOUR_NEBULA_COMMANDER_URL
Defaults: poll every 60 seconds, write files to /etc/nebula (or ~/.nebula on Windows), and start or restart Nebula from PATH when config changes. --server can be left out once you’ve enrolled; ncclient uses the server saved in settings.json, or NEBULA_COMMANDER_SERVER.
Linux: creating the Nebula TUN device requires root, so run run with sudo.
Options
| Option | Description |
|---|
--output-dir DIR | Where to write config.yaml, ca.crt, host.crt (default: /etc/nebula on Linux/macOS, ~/.nebula on Windows) |
--interval N | Poll interval in seconds (default: 60) |
--nebula PATH | Path to the nebula binary if it is not on PATH |
--restart-service NAME | Instead of running nebula directly, restart this systemd service (e.g. nebula). Use only one of --nebula or --restart-service. |
--accept-dns | Apply split-horizon DNS. See Split-horizon DNS. |
Example with nebula in a non-standard location:
sudo ncclient run --server https://nc.example.com --nebula /usr/local/bin/nebula
Example using systemd to run Nebula (ncclient only restarts the service):
sudo ncclient run --server https://nc.example.com --restart-service nebula
Certificates: if the cert was created via the server (Create certificate in the UI), the bundle includes host.key. If it was signed (Sign flow), the server doesn’t have the key, so put your host.key in the output directory.
Run as a service
Linux (ncclient install)
This checks that root is enrolled (if not, it prints the ncclient enroll … command to run first). It then prompts for the server URL and options, writes /etc/default/ncclient and /etc/systemd/system/ncclient.service, and enables (and optionally starts) the service. The unit runs ncclient run as root.
- Use
--no-start to enable without starting. - Use
--non-interactive with NEBULA_COMMANDER_SERVER (and optional env vars) set for scripting.
Current limitation
Of the values ncclient install writes to /etc/default/ncclient, only NEBULA_COMMANDER_SERVER currently takes effect. The service runs with the default output directory (/etc/nebula), interval, and nebula from PATH. To change those, add the flags to ExecStart with sudo systemctl edit --full ncclient.
Day-to-day:
sudo systemctl status ncclient
sudo systemctl restart ncclient
journalctl -u ncclient -f
Run ncclient run under your init system (launchd on macOS, Task Scheduler or NSSM on Windows). Example configs are in the repo under client/examples/. See README-startup.md for step-by-step setup on macOS and Windows. On Windows, the MSI’s service is usually the easier option.
Subnet routes and exit nodes
A subnet router or exit node that an admin assigns to this node is only offered to it. It isn’t used until you accept it on the device. Use ncclient routes, as the same user as run and with the same --output-dir:
sudo ncclient routes list                              # offered routes, and which are accepted
sudo ncclient routes accept 192.168.1.0/24             # add --via <IP> if several gateways offer it
sudo ncclient routes reject 192.168.1.0/24
sudo ncclient routes accept-exit-node --via 10.100.0.1
sudo ncclient routes reject-exit-node
You can accept several subnet routes as long as they don’t overlap, and at most one exit node. The running daemon picks up changes on its next poll; no restart needed.
Split-horizon DNS
When the server has DNS enabled for the network, pass --accept-dns to run. ncclient then fetches the DNS config (domain and lighthouse IPs) and configures the host to resolve the Nebula domain via the network’s DNS. On Linux the client detects how the host manages DNS and configures it to match:
- systemd-resolved (on its own, or behind NetworkManager): per-link DNS on the Nebula interface, so only the Nebula domain goes to its servers.
- NetworkManager without systemd-resolved (e.g. Debian desktops): NetworkManager’s dnsmasq plugin with a rule for the Nebula domain. If NetworkManager is writing
/etc/resolv.conf itself, the client switches it to the plugin; that needs dnsmasq (Debian: dnsmasq-base) installed. - A standalone dnsmasq service: a rule in
/etc/dnsmasq.d/. - Plain
/etc/resolv.conf: last resort, not true split-horizon.
It also keeps NetworkManager from taking over the Nebula interface, re-checks the DNS on every poll (re-applying it if something undid it), and removes everything when it stops or DNS is turned off. If none of these can work, the client logs why and what to install. On Windows it uses NRPT. Applying DNS needs root (Linux) or Administrator (Windows). To remove the DNS override, stop ncclient normally (e.g. Ctrl+C or systemctl stop).
Re-enroll
Get a new code from Nodes → Enroll, then run enroll again as the same user, with the same environment variables as the daemon:
sudo ncclient enroll --server https://YOUR_NEBULA_COMMANDER_URL --code NEWCODE
This overwrites the old token and node ID. The running daemon switches to the new token on its next poll. If you changed servers, restart it too (sudo systemctl restart ncclient for an ncclient install service) and update NEBULA_COMMANDER_SERVER in /etc/default/ncclient.
If enroll succeeds but the daemon keeps logging Token invalid or expired, the two are using different token locations (usually one ran with sudo and the other didn’t). See Where state lives.
Troubleshooting
- No TUN device / cannot ping Nebula IP: on Linux, run with
sudo. For the Sign flow, make sure host.key is in the output directory. Check Nebula’s error output (e.g. “failed to get tun device”, “no such file”). - Nebula starts then exits: often a missing
host.key (Sign flow), a wrong config path, or on Linux not running as root. Check the Nebula lines ncclient prints. Token not found. Run 'ncclient enroll' first.: this user has no token. Enroll as the same user that runs the daemon.
macOS notes
Default output dir: /etc/nebula; for non-root use --output-dir ~/.nebula. Nebula: use PATH or --nebula /opt/homebrew/bin/nebula (Apple Silicon) or /usr/local/bin/nebula (Intel). Don’t use --restart-service; use launchd for background runs.
Windows notes
Default output dir: %USERPROFILE%\.nebula. Use --nebula if nebula.exe is not on PATH. Don’t use --restart-service. The plain CLI’s token and settings are separate from the shared %ProgramData%\nebula-commander\ location used by the MSI’s app and service. If you installed the MSI, use the Windows App to enroll instead.
1.2.2 - Docker
The Docker client runs ncclient, Nebula, and (on lighthouses) dnsmasq in one container. See Docker installation for the image and a full docker-compose.yml. The commands below assume that compose file, with the service named ncclient, run from the directory that holds it.
Where state lives
Everything that must survive a container recreate lives in the /data volume, as long as the compose file sets these two paths (the example does):
NEBULA_OUTPUT_DIR: "/data/nebula"
NEBULA_DEVICE_TOKEN_FILE: "/data/nebula-commander/token"
| Path in the container | What it is |
|---|
/data/nebula-commander/token | Device token |
/data/nebula-commander/settings.json | Server URL, node ID, accepted routes |
/data/nebula/ | Nebula config.yaml, certificates, status |
Without those two variables the image falls back to /etc/nebula and /etc/nebula-commander/token. Those paths are outside the volume, so the device loses its enrollment every time the container is recreated.
Enroll
In Nebula Commander, create or sign a certificate for the node, then click Enroll and copy the code.
Set ENROLL_CODE in the compose file and start the container:
docker compose up -d
docker compose logs -f ncclient
The container enrolls once, when no token exists yet. After that, ENROLL_CODE is ignored and you can remove it.
Run and control
The container starts ncclient on its own and restarts with Docker (restart: unless-stopped).
docker compose logs -f ncclient     # ncclient, Nebula, and dnsmasq output
docker compose restart ncclient     # restart everything in the container
docker compose down                 # stop (the volume and enrollment are kept)
docker compose up -d again after editing the compose file.
Subnet routes and exit nodes
Run ncclient routes inside the container. Pass NEBULA_COMMANDER_CONFIG_DIR so the command sees the same settings.json as the running client, and --output-dir so it sees the routes offered to the node:
docker compose exec -e NEBULA_COMMANDER_CONFIG_DIR=/data/nebula-commander ncclient \
  ncclient routes --output-dir /data/nebula list

docker compose exec -e NEBULA_COMMANDER_CONFIG_DIR=/data/nebula-commander ncclient \
  ncclient routes --output-dir /data/nebula accept 192.168.1.0/24
reject, accept-exit-node --via <IP>, and reject-exit-node work the same way (see the ncclient CLI page). The running client applies changes on its next poll.
Split-horizon DNS
The Docker client is how a lighthouse serves Magic DNS. Set SERVE_DNS: "true". When the node is a lighthouse and DNS is enabled for the network, the container polls for the dnsmasq config (every NEBULA_DNS_POLL_INTERVAL seconds, default 60) and runs dnsmasq on the node’s Nebula IP, port 53. On non-lighthouses dnsmasq stays off.
The container does not apply split-horizon DNS to the host it runs on (it doesn’t pass --accept-dns). To resolve Nebula names on that host too, point its resolver at the lighthouse IP yourself.
Re-enroll
The container only uses ENROLL_CODE when no token exists. There are two ways to re-enroll.
Enroll inside the running container. This needs no restart unless the server changed:
docker compose exec -e NEBULA_COMMANDER_CONFIG_DIR=/data/nebula-commander ncclient \
  ncclient enroll --code NEWCODE
The server URL comes from NEBULA_COMMANDER_SERVER. The old token is replaced, and the client switches to the new one on its next poll.
Or remove the token and let the container enroll on start:
docker compose exec ncclient rm /data/nebula-commander/token
# set ENROLL_CODE to the new code in docker-compose.yml, then:
docker compose up -d --force-recreate
docker compose logs -f ncclient
To move to a different server, change NEBULA_COMMANDER_SERVER, use either method above, then docker compose up -d --force-recreate.
Troubleshooting
Token file not found and ENROLL_CODE not set: the container has no token and nothing to enroll with. Set ENROLL_CODE, or check that the volume is mounted and the token path points into it.- The device keeps asking to enroll after every recreate: the token path isn’t in the volume. See Where state lives.
Revoked, deleted, or re-enrolled elsewhere - Nebula stopped. Enroll again to reconnect.: the device was revoked, deleted, or re-enrolled elsewhere; Nebula was stopped and its config and key removed. Re-enroll it with a new code.- Nebula can’t create its tun device: the container needs
network_mode: host and cap_add: NET_ADMIN. It also needs rootful Docker. Under rootless Docker or Podman, “host” networking is a private namespace owned by an unprivileged user, so Nebula can’t configure the real host’s network and inbound UDP never reaches it. - dnsmasq never starts: check
SERVE_DNS is set, the node is a lighthouse, and DNS is enabled for the network. The logs show Warning: listen-address … not assigned if Nebula’s interface never came up.
1.2.3 - NixOS
This page covers day-to-day use of the services.ncclient module. See NixOS installation for importing the module and its full option list. Paths below use the defaults (stateDir = "/var/lib/ncclient", outputDir = "/var/lib/ncclient/nebula"); adjust them if you changed those options.
What the module sets up
ncclient.service: runs ncclient run as root, with nebula from nebulaPackage, plus nftables and iproute2 (for subnet-router/exit-node forwarding and NAT), on its PATH. It restarts on failure.ncclient-enroll.service: only when enrollCodeFile is set. A oneshot that runs ncclient enroll before the main service, only if no token exists yet.- The D-Bus policy and polkit rules the Linux desktop app uses, if you also enable
services.ncclient-desktop. Only members of adminGroups (default wheel/sudo) can make changes without a password. - An
ncclient command on the system PATH, pre-pointed at the service’s state. See Running ncclient commands.
Where state lives
| Path | What it is |
|---|
/var/lib/ncclient/token | Device token |
/var/lib/ncclient/settings.json | Server URL, node ID, accepted routes |
/var/lib/ncclient/nebula/ | Nebula config.yaml, certificates, status |
Both directories are 0700 root:root.
Enroll
The declarative way is enrollCodeFile: a file holding a one-time code from Nodes → Enroll. For example, a sops-nix secret, or a root-only file you create by hand:
services.ncclient = {
  enable = true;
  server = "https://nebula.example.com";
  enrollCodeFile = "/etc/ncclient/enroll-code";   # or config.sops.secrets.ncclient-enroll.path
};
sudo install -D -m 0600 /dev/stdin /etc/ncclient/enroll-code <<< "XXXXXXXX"
sudo nixos-rebuild switch
journalctl -u ncclient-enroll -u ncclient -b
Once a token exists, the enroll unit does nothing and the code file isn’t read. If the token is ever lost, though, the unit tries the used-up code and fails. ncclient.service requires ncclient-enroll.service, so the main service won’t start either until you re-enroll.
Without enrollCodeFile, enroll with the CLI (below), or with the desktop app’s Enrollment tab.
Run and control
systemctl status ncclient
sudo systemctl restart ncclient
journalctl -u ncclient -f
Change server, interval, or acceptDns in your configuration and nixos-rebuild switch. The unit is restarted with the new values.
Running ncclient commands
The module puts an ncclient wrapper on the system PATH that already points at the service’s stateDir and outputDir. Commands that change the service’s state just need root:
Subnet routes and exit nodes
sudo ncclient routes list
sudo ncclient routes accept 192.168.1.0/24
reject, accept-exit-node --via <IP>, and reject-exit-node work the same way (see the CLI page). The service applies changes on its next poll. With services.ncclient-desktop enabled, you can use the app’s Status tab instead.
Split-horizon DNS
Set services.ncclient.acceptDns = true; and rebuild. The service then runs with --accept-dns and configures the host’s resolver (systemd-resolved is the usual case on NixOS). See Split-horizon DNS on the CLI page for details.
Re-enroll
With enrollCodeFile
The enroll unit only enrolls when there is no token, so remove the old one first:
Get a new code from Nodes → Enroll, and put it in the file enrollCodeFile points at. For a sops-managed secret, update the secret and nixos-rebuild switch. For a plain file, overwrite it.
Remove the old token:
sudo rm /var/lib/ncclient/token
Restart both units:
sudo systemctl restart ncclient-enroll ncclient
Check that it worked:
journalctl -u ncclient-enroll -u ncclient -b
Restarting only ncclient isn’t enough. ncclient-enroll is a oneshot with RemainAfterExit=true, so it stays “active” from boot and isn’t run again.
Keep the old token until you have the new code; once it’s removed the device is offline until enrollment succeeds. If you’re moving to a different server, change server and rebuild in step 1.
Without enrollCodeFile
Enroll with the CLI, pointed at the service’s state (see Running ncclient commands). It overwrites the old token, so there’s nothing to delete:
sudo ncclient --server https://nebula.example.com enroll --code NEWCODE
The service switches to the new token on its next poll. If you changed servers, update server and rebuild, which also restarts the service.
With the desktop app
If services.ncclient-desktop is enabled, the app’s Enrollment tab works as described on the Linux App page, with no password prompt for members of adminGroups.
Updates
The client can check daily for new releases and tell you when one is out (sudo ncclient auto-update enable). On NixOS it never installs anything itself; you update the flake input and rebuild. See Automatic updates.
Troubleshooting
ncclient.service won’t start and ncclient-enroll failed: there’s no token, and the code file is missing or its code was rejected (already used or expired). Put a fresh code in the file and restart both units.ncclient: command not found: expected; see Running ncclient commands.Revoked, deleted, or re-enrolled elsewhere - Nebula stopped. Enroll again to reconnect.: the device was revoked, deleted, or re-enrolled elsewhere; Nebula was stopped and its config and key removed. Re-enroll it with a new code.- Enrolled with the CLI but the service still waits for enrollment: the CLI ran without both environment variables, so the token went to root’s home directory. Run it again with them.
1.2.4 - Linux App
| Light | Dark |
|---|
| |
On Linux, Nebula Commander (GTK4/libadwaita) is an unelevated desktop app for the background ncclient systemd service. The service does the actual work (polling for config and certs, running Nebula) as root, and exposes a system D-Bus API (org.beardedtek.NebulaCommander1) that the app talks to, authorized per call via polkit.
Anyone can view; administrators change. Any user logged in at the machine can see status and offered routes. Enrolling, changing settings, accepting routes or exit nodes, and starting/stopping the service work without a password for members of the sudo (Debian/Ubuntu) or wheel (Fedora/openSUSE/Arch) group. Anyone else needs an administrator’s password, so other users of a shared machine can’t re-point or stop the tunnel. Remote (SSH) sessions get nothing through the app’s API; use sudo on the command line instead.
The app and service are installed together via .deb, .rpm, or Flatpak. The app isn’t designed to run without the service; if the service isn’t installed or running, the Status tab says so. On a server you can install just nebula-commander-service and manage it from the shell (see Headless use).
Where state lives
The service keeps its token, settings.json, generated Nebula config, and status under /var/lib/ncclient/ (root-only). The app never reads these files directly, only through the D-Bus API (View Config shows the node’s private key as <redacted>). The service uses the distribution’s packaged nebula binary.
Enroll
- Open Nebula Commander from your application launcher.
- Go to the Enrollment tab and enter the server URL and the one-time code from Nebula Commander (Nodes → open the node → Enroll).
The service picks up the token right away; it waits for enrollment instead of exiting when it has none.
Using the app
The app has three tabs in its header bar and follows the desktop’s light/dark preference.
- Status: connection state (e.g. Connected – Config updated), the systemd service state with Start/Stop/Restart buttons, a switch for each subnet route offered to this node, an Exit node picker, and View Config (under Advanced) to see the generated
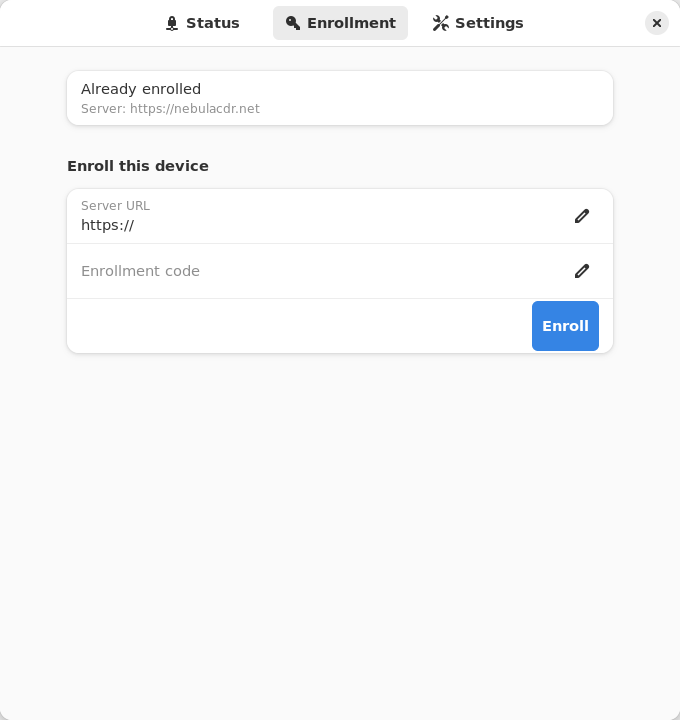
config.yaml. Routes that overlap one you’ve already accepted are shown disabled with the reason. You also get a desktop notification when the connection state changes or a new route is offered. - Enrollment: shows whether the device is enrolled (and to which server), and lets you enroll with a server URL and code.
- Settings: server URL, poll interval, Accept split-horizon DNS, and Run on startup (an XDG autostart entry for the app itself). Saving restarts the service automatically so the new values take effect.
| Enrollment | Settings |
|---|
 | 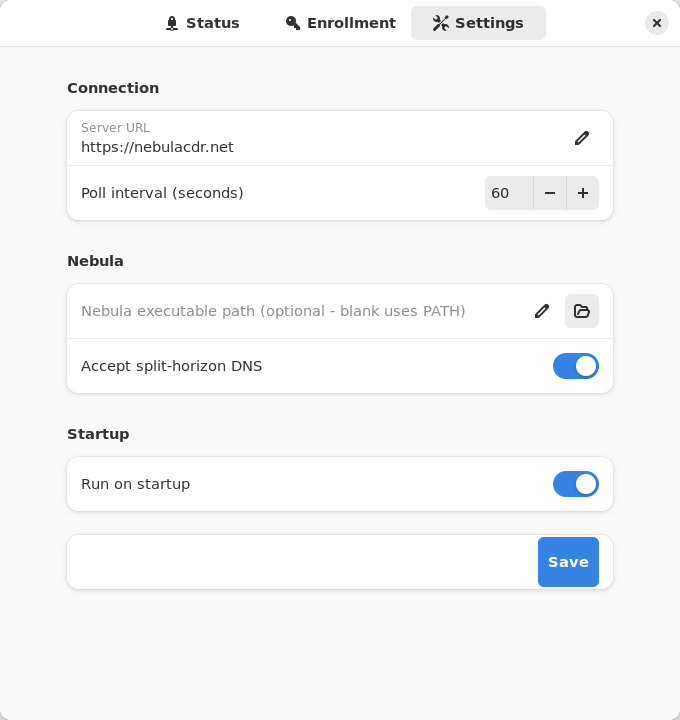 |
Subnet routes and exit nodes
Use the switches and the Exit node picker on the Status tab. Changes apply on the service’s next poll. See Subnet routers and exit nodes for how routes are offered.
Split-horizon DNS
Turn on Accept split-horizon DNS in Settings and save. The service restarts with --accept-dns and configures the host’s resolver to match how it manages DNS (systemd-resolved, NetworkManager, dnsmasq, or /etc/resolv.conf). See Split-horizon DNS on the CLI page for details.
Re-enroll
Open the Enrollment tab and enroll again with a new code (and a new server URL, if you’re moving servers). This replaces the device token. The service switches to the new token on its next poll. If you changed the server, click Restart on the Status tab so it polls the new URL.
Headless use (service only)
With only nebula-commander-service installed, manage the service from the shell:
sudo systemctl status ncclient
sudo systemctl restart ncclient
journalctl -u ncclient -f
Run as root, ncclient enroll and ncclient routes automatically use the service’s state in /var/lib/ncclient when the service package is installed.
Enroll or re-enroll:
sudo ncclient enroll --server https://YOUR_NEBULA_COMMANDER_URL --code XXXXXXXX
sudo systemctl enable --now ncclient
On re-enroll the service picks up the new token on its next poll; restart it if you changed servers.
Subnet routes and exit nodes:
sudo ncclient routes list
sudo ncclient routes accept 192.168.1.0/24
reject, accept-exit-node --via <IP>, and reject-exit-node work the same way (see the CLI page).
Split-horizon DNS: the service adds --accept-dns when /var/lib/ncclient/settings.json contains "accept_dns": true. Edit it as root, then sudo systemctl restart ncclient.
Updates
With the package repository configured, the client can upgrade itself during a daily window: Settings → Updates in the app, or sudo ncclient auto-update enable. See Automatic updates.
Troubleshooting
- Status says the service isn’t installed or is unreachable: install
nebula-commander-service and start it with sudo systemctl enable --now ncclient. The Flatpak app can’t do this for you. Revoked, deleted, or re-enrolled elsewhere - Nebula stopped. Enroll again to reconnect. in the journal: the device was revoked, deleted, or re-enrolled elsewhere; Nebula was stopped and its config and key removed. Re-enroll it with a new code.- “Administrator required” in the app: your account isn’t in the
sudo or wheel group. Ask an administrator to add you (sudo usermod -aG sudo USER on Debian/Ubuntu, wheel elsewhere, then log out and back in), or have them make the change. - Enrolled with
sudo ncclient enroll but the service still waits for enrollment (versions before 0.6.9): the token went to root’s home directory instead of /var/lib/ncclient. Upgrade, or prefix the command with NEBULA_COMMANDER_CONFIG_DIR=/var/lib/ncclient NEBULA_DEVICE_TOKEN_FILE=/var/lib/ncclient/token.
Run from source
From the nebula-commander repo root, with PyGObject, GTK 4, libadwaita, and jeepney installed (on Debian/Ubuntu: python3-gi gir1.2-gtk-4.0 gir1.2-adw-1 python3-jeepney):
python3 -m client.linux.desktop
It still needs a running ncclient.service that exposes the D-Bus API (from nebula-commander-service or the NixOS module). Without one, Status shows the service as not installed.
Build
See Linux Desktop App installation and Development: Manual builds for building the .deb/.rpm/Flatpak packages yourself.
1.2.5 - Windows App
On Windows, Nebula Commander (WinUI 3) is a native windowed app for a background Windows Service (NebulaCommanderService). The service does the actual work (polling for config and certs, running Nebula, applying split-horizon DNS) as LocalSystem.
Anyone can view; only administrators can change. Run normally, the app is view-only: status, routes and config are visible to every user. Enrolling, changing settings, accepting routes or exit nodes, installing/updating Nebula, and starting/stopping the service all require an elevated administrator. Use the Relaunch as administrator bar at the top of the app (or press Alt+R; one UAC prompt), or start it with Run as administrator. The service enforces this itself on every change, so other users on a shared PC can’t re-point or stop your tunnel.
The app and service are installed together by the MSI installer. The app isn’t designed to run without it: only the MSI registers the service (there’s no CLI install/remove subcommand for it), so a standalone app with no service shows Status as unreachable.
Where state lives
Everything lives in %ProgramData%\nebula-commander\, which only SYSTEM and Administrators can open. The app never touches it directly; it asks the service over a local named pipe.
| What | Where |
|---|
| Device token | token.bin (DPAPI-encrypted) |
| Settings | settings.json, written by the service |
| Nebula config, certs, and log | config.yaml (includes the node’s private key), certificates, nebula.log |
| Nebula itself | nebula\, installed and updated by the service |
The service’s own messages go to the Windows Application event log.
Enroll
- Open Nebula Commander from the Start Menu.
- On the Enrollment page, enter the server URL and the one-time code from Nebula Commander (Nodes → open the node → Enroll).
This needs the app running as administrator. The service makes the enrollment request itself, stores the token, and polls right away instead of waiting for the next interval.
Don’t enroll with ncclient enroll from a terminal on an MSI install. The plain CLI writes to a per-user location the service never reads.
Using the app
The app has three side tabs (Settings is pinned at the bottom of the side bar) and follows the Windows light/dark app theme.
Status: one card each for:
- Connection: the server URL and a Test Connection button.
- Nebula Commander Service: state and Start/Stop/Restart.
- Nebula Interface: connected/error, the interface name, whether the Nebula process is running, and when the service last updated.
- Split-Horizon DNS: active or inactive.
- Exit Node / Subnet Router: what this device advertises, plus checkboxes for offered subnet routes and a picker for offered exit nodes.
- Configuration: View Config (the node’s private key is shown as
<redacted>) and Open Containing Folder (administrator only).
Use Refresh to update the page right away.
Enrollment: enroll, or see which server the device is enrolled with.
Settings: server URL, poll interval, and Split-horizon DNS. Under Nebula you can see the installed Nebula version, Check for updates against Nebula’s GitHub releases, and Install / update Nebula: the service downloads the official release, verifies its SHA256 checksum, and installs the whole archive (nebula.exe, nebula-cert.exe, wintun) itself. The service installs Nebula automatically on first start, and there’s no custom Nebula path. Under Startup, Run on startup opens the app to the tray when you sign in.
| Enrollment | Settings |
|---|
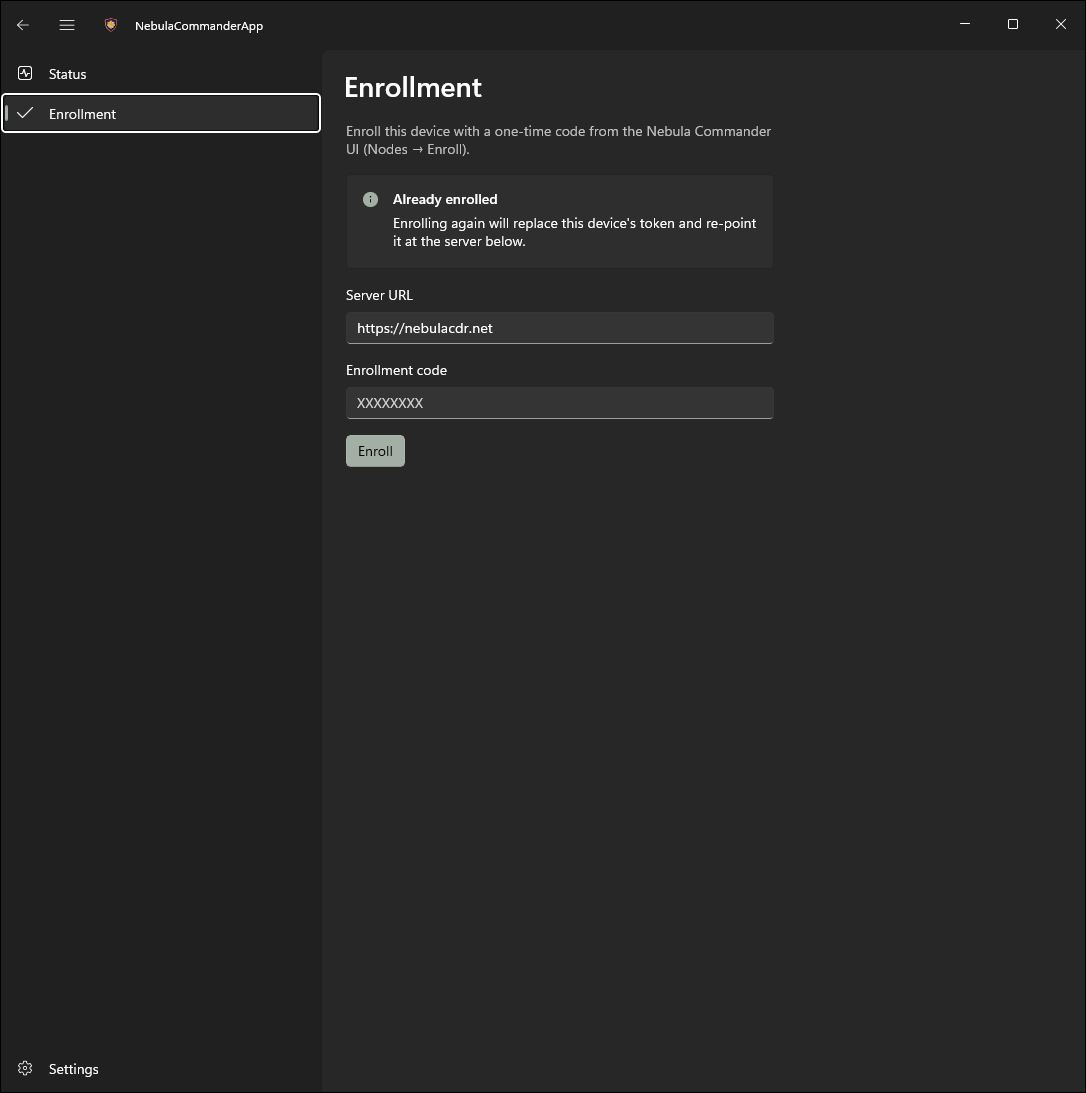 | 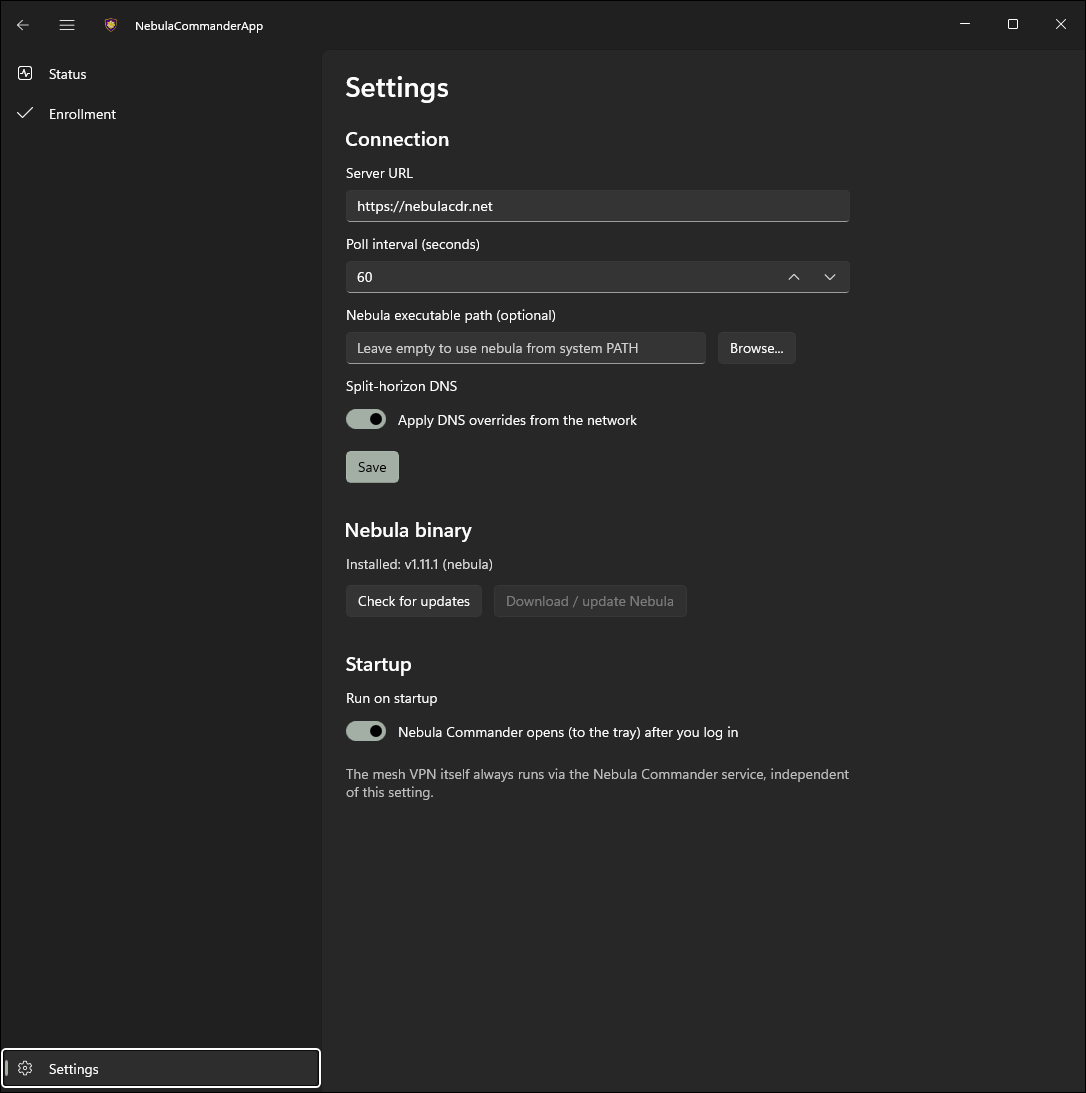 |
Closing the window minimizes it to the tray rather than exiting. Use the tray icon’s Open Nebula Commander item to bring it back, or Exit to quit the app. The service keeps running either way: it starts automatically at boot, whether or not the app is open or anyone is signed in.
To control the service without the app, use Services (services.msc) or an elevated prompt (non-administrators can only query it):
sc.exe query NebulaCommanderService
Restart-Service NebulaCommanderService
Subnet routes and exit nodes
Use the checkboxes and the exit-node picker on the Exit Node / Subnet Router card of the Status page. The service applies changes right away. See Subnet routers and exit nodes for how routes are offered.
Split-horizon DNS
Turn on Split-horizon DNS in Settings. The service applies it with NRPT rules for the network’s domain and removes them when turned off or when the service stops. The Split-Horizon DNS card on Status shows whether it’s active.
Re-enroll
Open the Enrollment page and enroll again with a new code, and a new server URL if you’re moving servers. This replaces the token, re-points the device at the server you entered, and makes the service poll immediately. Nothing needs restarting.
Updates
The service can install new releases by itself during a daily window: Settings → Updates (as administrator), or ncclient auto-update enable from an elevated prompt. See Automatic updates.
Troubleshooting
- Status shows the service as unreachable: the MSI’s service isn’t installed or isn’t running. Start it from the Status page or
services.msc, or reinstall the MSI. - “Administrator required” when changing something: relaunch the app as administrator (the bar at the top of the window).
- Nebula Interface shows an error: as administrator, check
%ProgramData%\nebula-commander\nebula.log (Open Containing Folder on Status gets you there). - Status says Nebula isn’t installed: the service’s first-run download failed (e.g. offline). Use Settings → Install / update Nebula as administrator.
- Enrolled from a terminal and the app still says not enrolled: the CLI wrote a per-user token. Enroll from the app instead.
Run from source
From client/windows-app/:
dotnet build # or: dotnet run
Running this way still expects a real installed-and-running NebulaCommanderService to control (the app checks that the control pipe really belongs to that service). If it isn’t installed or running, the Status page says so rather than failing.
Build (self-contained publish)
cd client/windows-app
dotnet publish -c Release -r win-x64
Output: bin\Release\net10.0-windows*\win-x64\publish\NebulaCommanderApp.exe, a single self-contained file (it bundles the .NET runtime and Windows App SDK, so the target machine needs no prerequisites). See client/windows-app/README.md for details.
For the background service, see client/windows/README.md and Development: Manual builds. The Windows MSI installer installs and registers all three: ncclient.exe, NebulaCommanderApp.exe, and ncclient-service.exe.
1.2.6 - Automatic updates
From v0.7.0, the client can keep itself up to date. It’s off by default, and only an administrator on the device itself can turn it on. The Nebula Commander server shows each node’s client version and whether automatic updates are on, but can’t change the setting.
| Install | What “on” does |
|---|
| Windows (MSI) | The service downloads and installs new releases during a daily window you choose. |
| Linux deb/rpm from the package repository | A systemd timer upgrades the Nebula Commander packages from that repository during the window. |
| NixOS module | Notify only. Checks daily and tells you when a release is out, with the commands to update. It never changes the system: your flake decides the version. |
| Docker, Flatpak, pip, a bare binary | Not available. Update these the way you installed them (pull a new image, Flathub, pip install -U). |
Turn it on
Windows: open the app as administrator (Relaunch as administrator), go to Settings → Updates, switch on Automatic updates, pick the window and click Save. Or, from an elevated prompt:
ncclient auto-update enable --window 02:00-05:00
Linux: in the desktop app, Settings → Updates, then Apply (you need to be in the sudo or wheel group). Or:
sudo ncclient auto-update enable --window 02:00-05:00
This is refused if the official package repository isn’t configured. Add it first. A .deb or .rpm installed by hand without the repository can’t update itself.
NixOS: sudo ncclient auto-update enable, or the desktop app. The window doesn’t apply.
Other commands:
ncclient auto-update status      # installed version, setting, last check and install
ncclient auto-update check-now   # check now, and install if automatic updates are on (admin)
ncclient auto-update disable     # admin
The window
Updates install once a day, at a random time inside the window (local time, HH:MM-HH:MM, default 02:00-05:00). Windows that cross midnight, like 23:00-01:00, work. A device that’s off during the window waits for the next one. The tunnel drops for a few seconds while the client restarts.
What it trusts
- Windows and NixOS read a release manifest from
https://pkgs.nebulacommander.com/updates/latest.json. The client uses it only if its signature checks out against a key built into the client. The Windows installer it names must come from the project’s GitHub releases and match the manifest’s SHA-256, or it’s discarded. - Linux packages come from the signed package repository, with the usual apt/dnf/zypper signature checks. If the repository can’t be verified, the update stops and says so.
- The client only ever moves to a newer stable release. It never downgrades or installs pre-releases. Development builds never update.
Where to look when something goes wrong
ncclient auto-update status shows the last check and the last install, with the error if there was one.- Windows: the installer log is in
C:\ProgramData\nebula-commander\updates\install-<version>.log (administrators only). If the app was open during an update, it shows Nebula Commander was updated → Restart now. - Linux:
journalctl -u ncclient-update. The timer is ncclient-update.timer; its window lives in /etc/systemd/system/ncclient-update.timer.d/window.conf, which ncclient writes. Don’t edit it by hand.
NixOS: updating when notified
When a release is out, ncclient auto-update status, the desktop app and a desktop notification tell you. To update:
nix flake update nebula-commander     # in your system flake
sudo nixos-rebuild switch
If your flake pins a release (github:NixRTR/nebula-commander/v0.7.0), change the tag instead. A NixOS build reports the commit it was built from (for example “built from commit f67bc81”) rather than a version number.
2 - Subnet Routers and Exit Nodes
Turn a node into a subnet router or an exit node, and pick which routes each other node actually uses — built on Nebula’s unsafe_routes.
Nebula Commander can turn a node into a subnet router (it advertises a LAN behind it
to the rest of the mesh, the way tailscale up --advertise-routes does) or an exit
node (it advertises 0.0.0.0/0/::/0 and routes all of another node’s traffic, the
way tailscale up --advertise-exit-node does). Both build on Nebula’s own
unsafe_routes feature.
This page covers how it’s configured from both sides — the gateway that advertises a
route, and the other nodes that actually use it — what happens automatically for
nodes running ncclient on Linux, and — the part that’s easy to miss — what you
have to do yourself for everything else (Windows, macOS, Docker-deployed ncclient,
or bare nebula).
Two sides of the same setting
Every route has a gateway (the node advertising it) and one or more
consumers (the nodes that actually route through it). Nebula Commander exposes
both sides in the Nodes page’s node-details panel:
- On the gateway node, under Advanced → Subnet Router & Exit Node Config
(and Advanced → Exit Node), you choose what this node advertises and, per
route, a “Used by” list of the groups and individual hosts allowed to consume it.
- On a consumer node, the visible (non-Advanced) Use Subnet Router and
Use Exit Node dropdowns let you pick a gateway directly, without opening the
gateway’s own settings.
Both mechanisms write to the same data: picking a gateway from a consumer’s
dropdown adds that consumer as a host in the gateway’s “Used by” list for every matching
route, and clears it from any other gateway’s routes of the same kind (a node uses
at most one subnet router and one exit node at a time). Either way, a route
reaches nobody until an admin explicitly says who it’s for — advertising a route
is never enough on its own.
Setting up a route (gateway side)
In a node’s details panel (Nodes → hostname → Edit), expand Advanced:
- Exit Node — a single checkbox, Exit node (route all traffic). Checking it
advertises both
0.0.0.0/0 and ::/0 from this node. - Subnet Router & Exit Node Config → Advertised subnets — a checklist of local
interfaces
ncclient discovered on this node (ethernet, Wi-Fi, Tailscale, or
another Nebula interface on the same host; Docker interfaces are never offered).
Only populated for nodes actively running ncclient on Linux. - Subnet Router & Exit Node Config → Other — type any CIDR by hand. Use this for
a subnet reachable through the node by some other means
ncclient can’t detect on
its own, or on a node not running ncclient at all.
Under each route is a “Used by” disclosure. Expand it to see who can use the
route, and while editing, add to it:
- Group — pick a group and click Add. Every node in that group gets the
route, including nodes added to the group later, without editing the gateway again.
- Host — pick a single node and click Add.
Each entry has a delete button to remove it. A node that’s both listed as a host and
in a listed group simply gets the route once.
Picking a route (consumer side)
On any other node’s details panel — visible without opening Advanced:
- Use Subnet Router — a dropdown listing every other node on the network that
advertises at least one subnet. Choosing one routes this node’s traffic for all of
that gateway’s advertised subnets through it; None stops using one.
- Use Exit Node — the same idea for full-tunnel routing: a dropdown of every
other node advertising an exit route.
This works for every platform, not just desktop/ncclient nodes - a mobile node can
pick a subnet router or exit node too, since consuming a route needs no host
automation, just the generated Nebula config.
Accepting a route locally (desktop ncclient nodes)
The picker above is server-side authorization - it controls what a node is allowed
to consume, the same way DNS being enabled for a network doesn’t by itself mean a
device applies it (accept_dns/--accept-dns is the separate, local opt-in for
that). Subnet routers and exit nodes work the same way on desktop ncclient nodes
(Linux and Windows): being picked as a consumer makes the route available, not
automatically active. ncclient writes everything it’s authorized to consume to
available-routes.json in its output directory, but only writes the locally
accepted subset into config.yaml for Nebula to actually use.
- CLI (
ncclient on Linux, ncclient.exe on Windows - same commands either
way): ncclient routes list shows what’s available and what’s currently
accepted; ncclient routes accept <CIDR> / routes reject <CIDR> manage subnet
routes, routes accept-exit-node --via <IP> / routes reject-exit-node manage
the exit node. Multiple subnet routes can be accepted at once as long as their
CIDRs don’t overlap - accept rejects an overlapping one with an explanation of
which already-accepted route it conflicts with. At most one exit node is ever
accepted at a time. - The Windows app: the Status page’s
“Exit Node / Subnet Router” card lists the same available/accepted state
interactively - checkboxes for subnet routes (disabled with a reason if accepting
one would overlap an already-accepted route) and a single-select list for the exit
node.
- The Linux desktop app: the Status tab
has a switch per offered subnet route (disabled with the conflict shown if it would
overlap an accepted one) and an Exit node picker. It also sends a desktop
notification when a new route is offered.
A locally accepted/rejected change is picked up within one poll cycle without
needing to re-enroll or restart anything by hand (or immediately, if something
nudges the service to poll now - the Windows app already does this after a
Settings change). This is entirely client-side: the “Used by” list above already
determines authorization; this is a separate device-level consent step on top
of it, and doesn’t exist for mobile (Mobile Nebula) nodes, which have no local
ncclient process to gate anything through - a mobile node’s only control is the
server-side picker.
What happens automatically (Linux nodes running ncclient)
For a gateway node whose ncclient has confirmed it’s Linux (shown by the absence
of the amber warning under Advanced → Subnet Router & Exit Node Config):
- Nebula Commander generates the correct
tun.unsafe_routes entry (with the
required via) in every consumer node’s config, and signs the gateway’s own
certificate with the -subnets claim Nebula requires before it will let that node
route the CIDR at all. ncclient on the gateway polls GET /api/device/advertised-routes and, when its
own advertised routes change, enables IP forwarding
(net.ipv4.ip_forward, and net.ipv6.conf.all.forwarding if any route is IPv6)
and installs a dedicated inet ncclient_routing nftables table: forwarding
accept rules scoped to each advertised subnet, and a masquerade rule for the
exit-node case.
None of this needs the admin to touch the host directly. nft (nftables) must be
installed on the gateway for step 2 to work - ncclient logs a warning and skips it
if nft isn’t found, leaving the route inert.
What you have to do yourself (hosts not running ncclient on Linux)
This includes Windows nodes, macOS, a Docker-deployed ncclient (it runs in its own
network namespace, so it can’t reach the host’s routing table at all), or any host
running the bare nebula binary directly. Nebula Commander still generates the
correct config for these nodes - ncclient’s automation is the only piece that’s
Linux-only. On such a gateway node you need to:
Get the config onto the host. Either let a non-Linux/bare ncclient write it
normally, or download it yourself from the node’s Config button (admin UI) or
GET /api/device/config (device token) and place it where nebula -config <path> expects it.
Enable IP forwarding.
- Linux (no
ncclient): sysctl -w net.ipv4.ip_forward=1 (and
net.ipv6.conf.all.forwarding=1 for IPv6 routes/exit-node), persisted via a file
under /etc/sysctl.d/. - Windows: enable IP forwarding on the network adapter bound to the Nebula tun
device, and configure routing/NAT (e.g. via
netsh interface ipv4 set interface "<adapter>" forwarding=enabled, plus RRAS if you need NAT for an exit node) -
consult Microsoft’s routing documentation for your Windows version. - macOS:
sysctl -w net.inet.ip.forwarding=1, plus pfctl for NAT.
Allow forwarding and (for an exit node) NAT between the Nebula tun interface and
your physical interface. On Linux with nftables, this is exactly what
client/linux_routing.py does for ncclient - use
it as a reference. For a subnet route to 192.168.1.0/24 via tun device nebula1:
table inet ncclient_routing {
    chain forward {
        type filter hook forward priority filter; policy accept;
        iifname "nebula1" ip daddr 192.168.1.0/24 accept
        ip saddr 192.168.1.0/24 oifname "nebula1" accept
    }
}
For an exit node, add a NAT table masquerading traffic from the tun device out
your uplink interface (eth0 below):
table inet ncclient_routing {
    chain postrouting {
        type nat hook postrouting priority srcnat; policy accept;
        iifname "nebula1" oifname "eth0" masquerade
    }
}
iptables-only systems need the equivalent iptables -A FORWARD ... /
iptables -t nat -A POSTROUTING ... -j MASQUERADE rules.
Troubleshooting
nebula fails to start with Could not parse tun.unsafe_routes: entry N.via ... is not present - you’re running a config from before Nebula Commander added the
via/-subnets fix, or a hand-edited config that omits via. Re-download the
config; every generated tun.unsafe_routes entry always includes via now. If this
is your own config (not Nebula Commander’s), every entry needs a via pointing at
the gateway node’s Nebula IP.
A consumer node has the route in its config, but traffic to the subnet doesn’t
arrive - most likely the gateway’s own firewall. Since Nebula 1.10, a firewall rule
only matches traffic to the node’s own Nebula IP unless it also sets local_cidr -
Nebula Commander generates a local_cidr-scoped accept rule for each advertised
subnet: one per host in that route’s “Used by” list, matched by that consumer’s own
certificate-verified Nebula IP (cidr: <ip>/32), and one per group, matched by the
group in the consumer’s certificate (group: <name>). If the consumer isn’t actually
covered by “Used by” - even if it somehow has the route in its own config, e.g. a
hand-edited config or a non-ncclient host - the gateway has no matching rule and
will drop the forwarded traffic; check the “Used by” list first. A manually-written
config for a non-ncclient gateway needs the equivalent cidr/local_cidr rules
added by hand. See Nebula’s firewall docs
for the exact rule shape.
The route works for one node but not another - check that node’s selection:
either its own Use Subnet Router/Use Exit Node dropdown, or the “Used by”
list on the gateway it should be using. A route only reaches nodes explicitly
selected on one side or the other, and - since the gateway’s firewall now enforces
this per node, not just config distribution - an unselected node can’t use the
route even if it has (or is given) a matching tun.unsafe_routes entry by some
other means.
3 - Public Endpoints and Reachable Addresses
Tell the mesh where to find a node on the underlay: one public endpoint every peer knows about, plus extra addresses the node reports to its lighthouses.
Nebula finds most nodes on its own: each node reports the addresses of its local
interfaces to the lighthouses, and the lighthouses also see the address a node
connects to them from. Two optional per-node settings cover what that misses. They
reach other nodes by different paths, so they’re separate fields.
| Public endpoint | Additional reachable addresses |
|---|
| Where to set it | Node details panel | Node details → Advanced |
| Values | One host:port (hostname, IPv4, or [IPv6]) | Up to 8 IP:port, added one at a time |
| Nebula setting | Every peer’s static_host_map | This node’s own lighthouse.advertise_addrs |
| How other nodes learn it | Written into their config | Reported to the lighthouses, which pass it on |
| Lighthouses and relays | Need one | Not shown (Nebula ignores it on lighthouses) |
| Changing it restarts Nebula on | Every node on the network | That node only |
Both can be used together: the public endpoint lets peers reach a node without
asking a lighthouse first, and the additional addresses fill in paths the
lighthouses can’t see.
When to add reachable addresses
Add the addresses Nebula can’t discover itself:
- A port forward on the router in front of the node, especially when the
external port isn’t
4242. Add the router’s public IP and the forwarded port. - A second uplink, or a LAN address that peers on the same site should try
first.
You don’t need to add the node’s own interface addresses or the address the
lighthouse already sees; Nebula reports those automatically.
Adding and removing addresses
- Open the node, click Edit, and expand Advanced.
- Under Additional reachable addresses, type one
IP:port, for example
203.0.113.7:4242 or [2001:db8::1]:4242, and click Add. Repeat for each
address. - Use the trash button next to an address to remove it.
- Click Save.
The node picks up the change on its next config poll and restarts Nebula. The
certificate isn’t re-signed, and no other node needs to restart.
Through the API, the field is advertise_addrs on PATCH /api/nodes/{id}: a list
with one address per item. Send [] to clear it. Leave the field out to keep the
current list.
Rules
- IP addresses only. Nebula resolves a hostname here once at startup and
doesn’t start if the lookup fails, so hostnames are rejected.
- Port
0 means the node’s own listen port (4242). - IPv6 goes in brackets:
[2001:db8::1]:4242. - Rejected: addresses inside the Nebula network itself, loopback, link-local,
multicast, reserved space (
240.0.0.0/4, including the broadcast address
255.255.255.255), IPv4-mapped IPv6 (use the plain IPv4 address instead), and
0.0.0.0 / ::. - At most 8 addresses per node. Duplicates are merged.
- Addresses ending in
.0 or .255 are accepted but flagged with a warning:
on a /24 LAN they’re the network or broadcast address and won’t work, but on a
larger LAN they can be ordinary hosts. Nebula Commander can’t see your LAN’s
subnet mask, so it’s up to you.
Additional reachable addresses were contributed by Austin Colt
(@YeeClaw).
4 - Running Nebula manually
This is the manual method: you use Nebula Commander to create networks, nodes, and certificates, then run Nebula on devices yourself without ncclient. Config and certs are copied or downloaded from the UI (or API) and you start Nebula manually. Use this when you prefer to deploy config and certs yourself or when ncclient is not available (e.g. on mobile).
When to use this
- You prefer to deploy config and certs yourself (copy to the device, run
nebula -config ...). - You do not want to enroll devices or run the ncclient daemon.
- You are fine updating config and certs manually when the network or node changes (re-download from the UI or API and replace files, then restart Nebula).
With ncclient, the device enrolls once and ncclient polls for config and certs and can run or restart Nebula automatically. With manual setup, you handle file deployment and restarts yourself.
Steps
1. Create network and node in Nebula Commander
In the Web UI: create a network, add a node for this device, and create or sign a certificate for the node.
- Create certificate – The server generates the key and cert; you can download a bundle that includes
host.key, host.crt, ca.crt, and config. - Sign certificate – You generate the key on the device; the server signs the cert. You will need to place your own
host.key next to the downloaded certs.
2. Get config and certs onto the device
Download or copy from the UI (or use the API) the node’s config and certificate files. You typically need:
config.yaml (Nebula config for this node)ca.crt (CA certificate)host.crt (host certificate for this node)host.key (only if you used Create certificate; with Sign, you already have this on the device)
Where to get them depends on your Nebula Commander version: use the node’s detail or download actions in the UI, or the device/config API. Place the files in a directory on the device (e.g. /etc/nebula or ~/.nebula).
3. Install and run Nebula on the device
Install Nebula from slackhq/nebula (packages, binary release, or build from source). Then run:
nebula -config /path/to/config.yaml
Use the path to the config.yaml you deployed. Nebula will read ca.crt, host.crt, and host.key from the paths specified in the config (often the same directory as the config).
4. Run Nebula at startup (optional)
Use your platform’s init system so Nebula keeps running: systemd on Linux, launchd on macOS, or a Windows service/task. When you change config or certs (after re-downloading from Nebula Commander), replace the files and restart Nebula.
Mobile devices
The official Nebula client from defined.net (Nebula app) is the only way to run Nebula on a mobile device — ncclient is not available on mobile. This is a first-class path, not a workaround: set a node’s platform to iOS or Android on the Nodes page, then use its download config.yaml action — the same config the API always generates (cert/key/CA already inline), which is exactly the format the app’s “Add Site → From file” import expects. See Nodes: Mobile nodes for split-horizon DNS behavior on each platform.
Summary
| ncclient | Manual (nebula) |
|---|
| Enrollment | One-time; device gets a token | None |
| Config/certs | Fetched automatically by ncclient | You copy or download and place them |
| Nebula process | ncclient can run or restart it | You run and restart Nebula yourself |
| Updates | ncclient polls and updates files | You re-download and replace files, then restart Nebula |